HP 5940 User Guide - Page 53
Print task quick sets, Printing Shortcuts, Paper type, Default Print Settings
 |
View all HP 5940 manuals
Add to My Manuals
Save this manual to your list of manuals |
Page 53 highlights
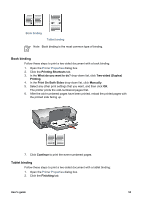
Follow these steps to select a specific paper type: 1. Open the Printer Properties dialog box. 2. Click the Printing Shortcuts tab. 3. In the Paper type drop-down list, click an appropriate paper type. 4. Select any other print settings that you want, and then click OK. Print task quick sets Use print task quick sets to print with or save print settings that you use often. If you frequently print on envelopes, for example, you can create a print task that contains the paper size, print quality, and orientation setting that you normally use for envelopes. After creating the print task, simply select it when printing on envelopes rather than setting each of the print settings separately. Note The printer software can save up to 25 print task quick sets. Create your own print task or use the specially designed print tasks that are available in the Print Task Quick Sets drop-down list. Use a print task quick set Follow these steps to use a print task quick set: 1. Open the Printer Properties dialog box. A Print Task Quick Sets drop-down list appears at the top of most tabs. 2. Go to Print Task Quick Sets on any tab where it appears. 3. In the drop-down list, click the print task that you want to use. 4. Click OK. Note To restore default print settings, click Default Print Settings in the Print Task Quick Sets drop-down list, and then click OK. Create a print task quick set Follow these steps to create a print task quick set: 1. Open the Printer Properties dialog box. 2. Select the options that you want to include in the new print task. 3. Go to Print Task Quick Sets on any tab where it appears. 4. Type a name for the new print task in the Print Task Quick Sets drop-down list, and then click Save. The print task quick set is added to the drop-down list. Note If you add more options to the print task, rename the print task and then click OK. User's guide 51
-
 1
1 -
2
-
3
-
4
-
5
-
6
-
7
-
8
-
9
-
10
-
11
-
12
-
13
-
14
-
15
-
16
-
17
-
18
-
19
-
20
-
21
-
22
-
23
-
24
-
25
-
26
-
27
-
28
-
29
-
30
-
31
-
32
-
33
-
34
-
35
-
36
-
37
-
38
-
39
-
40
-
41
-
42
-
43
-
44
-
45
-
46
-
47
-
 48
48 -
 49
49 -
 50
50 -
 51
51 -
 52
52 -
 53
53 -
 54
54 -
 55
55 -
 56
56 -
 57
57 -
 58
58 -
59
-
60
-
61
-
62
-
63
-
64
-
65
-
66
-
67
-
68
-
69
-
70
-
71
-
72
-
73
-
74
-
75
-
76
-
77
-
78
-
79
-
80
-
81
-
82
-
83
-
84
-
85
-
86
-
87
-
88
-
89
-
90
-
91
-
92
-
93
-
94
-
95
-
96
-
97
-
98
-
99
-
100
-
101
-
102
 |
 |