HP LaserJet Enterprise 600 HP LaserJet Enterprise 600 M601, M602, and M603 Ser - Page 155
Set job storage options with Windows, Print one copy for proof before printing all the copies
 |
View all HP LaserJet Enterprise 600 manuals
Add to My Manuals
Save this manual to your list of manuals |
Page 155 highlights
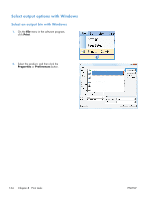
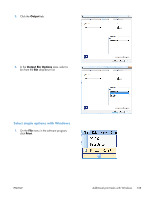
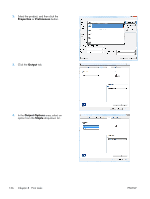
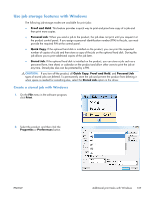
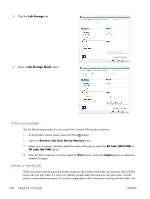
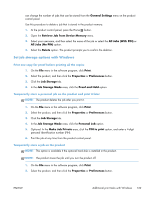
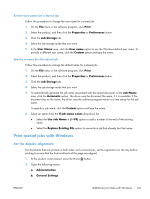
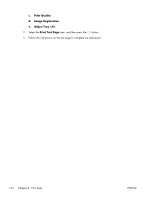
can change the number of jobs that can be stored from the General Settings menu on the product control panel. Use this procedure to delete a job that is stored in the product memory. 1. At the product control panel, press the Home button. 2. Open the Retrieve Job from Device Memory menu. 3. Select your username, and then select the name of the job or select the All Jobs (With PIN) or All Jobs (No PIN) option. 4. Select the Delete option. The product prompts you to confirm the deletion. Set job storage options with Windows Print one copy for proof before printing all the copies 1. On the File menu in the software program, click Print. 2. Select the product, and then click the Properties or Preferences button. 3. Click the Job Storage tab. 4. In the Job Storage Mode area, click the Proof and Hold option. Temporarily store a personal job on the product and print it later NOTE: The product deletes the job after you print it. 1. On the File menu in the software program, click Print. 2. Select the product, and then click the Properties or Preferences button. 3. Click the Job Storage tab. 4. In the Job Storage Mode area, click the Personal Job option. 5. Optional: In the Make Job Private area, click the PIN to print option, and enter a 4-digit personal identification number (PIN). 6. Print the job at any time from the product control panel. Temporarily store a job on the product NOTE: This option is available if the optional hard disk is installed in the product. NOTE: The product stores the job until you turn the product off. 1. On the File menu in the software program, click Print. 2. Select the product, and then click the Properties or Preferences button. ENWW Additional print tasks with Windows 139
-
 1
1 -
2
-
3
-
4
-
5
-
6
-
7
-
8
-
9
-
10
-
11
-
12
-
13
-
14
-
15
-
16
-
17
-
18
-
19
-
20
-
21
-
22
-
23
-
24
-
25
-
26
-
27
-
28
-
29
-
30
-
31
-
32
-
33
-
34
-
35
-
36
-
37
-
38
-
39
-
40
-
41
-
42
-
43
-
44
-
45
-
46
-
47
-
48
-
49
-
50
-
51
-
52
-
53
-
54
-
55
-
56
-
57
-
58
-
59
-
60
-
61
-
62
-
63
-
64
-
65
-
66
-
67
-
68
-
69
-
70
-
71
-
72
-
73
-
74
-
75
-
76
-
77
-
78
-
79
-
80
-
81
-
82
-
83
-
84
-
85
-
86
-
87
-
88
-
89
-
90
-
91
-
92
-
93
-
94
-
95
-
96
-
97
-
98
-
99
-
100
-
101
-
102
-
103
-
104
-
105
-
106
-
107
-
108
-
109
-
110
-
111
-
112
-
113
-
114
-
115
-
116
-
117
-
118
-
119
-
120
-
121
-
122
-
123
-
124
-
125
-
126
-
127
-
128
-
129
-
130
-
131
-
132
-
133
-
134
-
135
-
136
-
137
-
138
-
139
-
140
-
141
-
142
-
143
-
144
-
145
-
146
-
147
-
148
-
149
-
 150
150 -
 151
151 -
 152
152 -
 153
153 -
 154
154 -
 155
155 -
 156
156 -
 157
157 -
 158
158 -
 159
159 -
 160
160 -
161
-
162
-
163
-
164
-
165
-
166
-
167
-
168
-
169
-
170
-
171
-
172
-
173
-
174
-
175
-
176
-
177
-
178
-
179
-
180
-
181
-
182
-
183
-
184
-
185
-
186
-
187
-
188
-
189
-
190
-
191
-
192
-
193
-
194
-
195
-
196
-
197
-
198
-
199
-
200
-
201
-
202
-
203
-
204
-
205
-
206
-
207
-
208
-
209
-
210
-
211
-
212
-
213
-
214
-
215
-
216
-
217
-
218
-
219
-
220
-
221
-
222
-
223
-
224
-
225
-
226
-
227
-
228
-
229
-
230
-
231
-
232
-
233
-
234
-
235
-
236
-
237
-
238
-
239
-
240
-
241
-
242
-
243
-
244
-
245
-
246
-
247
-
248
-
249
-
250
-
251
-
252
-
253
-
254
-
255
-
256
-
257
-
258
-
259
-
260
-
261
-
262
-
263
-
264
 |
 |