HP LaserJet Enterprise 600 HP LaserJet Enterprise 600 M601, M602, and M603 Ser - Page 177
Enable memory, Windows XP, Windows Server
 |
View all HP LaserJet Enterprise 600 manuals
Add to My Manuals
Save this manual to your list of manuals |
Page 177 highlights
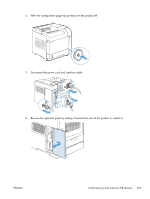
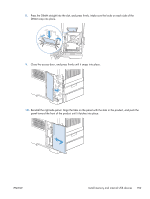
Enable memory Windows XP, Windows Server 2003, Windows Server 2008, and Windows Vista Windows 7 Mac OS X 10.5 and 10.6 1. Click Start. 2. Click Settings. 3. Click Printers and Faxes (using the default Start menu view) or click Printers (using the Classic Start menu view). 4. Right-click the product driver icon, and then select Properties. 5. Click the Device Settings tab. 6. Expand the area for Installable Options. 7. Next to Automatic Configuration, select Update Now. 8. Click OK. NOTE: If the memory is not updated correctly after using the Update Now option, you can manually select the total amount of memory installed in the product in the Installable Options area. The Update Now option overwrites any existing product configuration settings. 1. Click Start. 2. Click Devices and Printers. 3. Right-click the product driver icon, and then select Printer properties. 4. Click the Device Settings tab. 5. Expand the area for Installable Options. 6. Next to Automatic Configuration, select Update Now. 7. Click OK. NOTE: If the memory is not updated correctly after using the Update Now option, you can manually select the total amount of memory installed in the product in the Installable Options area. The Update Now option overwrites any existing product configuration settings. 1. From the Apple menu , click the System Preferences menu and then click the Print & Fax icon. 2. Select the product in the left side of the window. 3. Click the Options & Supplies button. 4. Click the Driver tab. 5. Configure the installed options. ENWW Install memory and internal USB devices 161
-
 1
1 -
2
-
3
-
4
-
5
-
6
-
7
-
8
-
9
-
10
-
11
-
12
-
13
-
14
-
15
-
16
-
17
-
18
-
19
-
20
-
21
-
22
-
23
-
24
-
25
-
26
-
27
-
28
-
29
-
30
-
31
-
32
-
33
-
34
-
35
-
36
-
37
-
38
-
39
-
40
-
41
-
42
-
43
-
44
-
45
-
46
-
47
-
48
-
49
-
50
-
51
-
52
-
53
-
54
-
55
-
56
-
57
-
58
-
59
-
60
-
61
-
62
-
63
-
64
-
65
-
66
-
67
-
68
-
69
-
70
-
71
-
72
-
73
-
74
-
75
-
76
-
77
-
78
-
79
-
80
-
81
-
82
-
83
-
84
-
85
-
86
-
87
-
88
-
89
-
90
-
91
-
92
-
93
-
94
-
95
-
96
-
97
-
98
-
99
-
100
-
101
-
102
-
103
-
104
-
105
-
106
-
107
-
108
-
109
-
110
-
111
-
112
-
113
-
114
-
115
-
116
-
117
-
118
-
119
-
120
-
121
-
122
-
123
-
124
-
125
-
126
-
127
-
128
-
129
-
130
-
131
-
132
-
133
-
134
-
135
-
136
-
137
-
138
-
139
-
140
-
141
-
142
-
143
-
144
-
145
-
146
-
147
-
148
-
149
-
150
-
151
-
152
-
153
-
154
-
155
-
156
-
157
-
158
-
159
-
160
-
161
-
162
-
163
-
164
-
165
-
166
-
167
-
168
-
169
-
170
-
171
-
 172
172 -
 173
173 -
 174
174 -
 175
175 -
 176
176 -
 177
177 -
 178
178 -
 179
179 -
 180
180 -
 181
181 -
 182
182 -
183
-
184
-
185
-
186
-
187
-
188
-
189
-
190
-
191
-
192
-
193
-
194
-
195
-
196
-
197
-
198
-
199
-
200
-
201
-
202
-
203
-
204
-
205
-
206
-
207
-
208
-
209
-
210
-
211
-
212
-
213
-
214
-
215
-
216
-
217
-
218
-
219
-
220
-
221
-
222
-
223
-
224
-
225
-
226
-
227
-
228
-
229
-
230
-
231
-
232
-
233
-
234
-
235
-
236
-
237
-
238
-
239
-
240
-
241
-
242
-
243
-
244
-
245
-
246
-
247
-
248
-
249
-
250
-
251
-
252
-
253
-
254
-
255
-
256
-
257
-
258
-
259
-
260
-
261
-
262
-
263
-
264
 |
 |