HP LaserJet Enterprise 600 HP LaserJet Enterprise 600 M601, M602, and M603 Ser - Page 172
Install memory and internal USB devices, Overview, Install memory, Install product memory
 |
View all HP LaserJet Enterprise 600 manuals
Add to My Manuals
Save this manual to your list of manuals |
Page 172 highlights
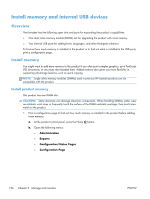
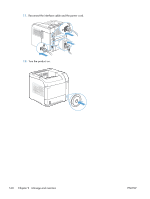
Install memory and internal USB devices Overview The formatter has the following open slots and ports for expanding the product's capabilities: ● One dual inline memory module (DIMM) slot for upgrading the product with more memory ● Two internal USB ports for adding fonts, languages, and other third-party solutions To find out how much memory is installed in the product or to find out what is installed in the USB ports, print a configuration page. Install memory You might want to add more memory to the product if you often print complex graphics, print PostScript (PS) documents, or use many downloaded fonts. Added memory also gives you more flexibility in supporting job-storage features, such as quick copying. NOTE: Single inline memory modules (SIMMs) used in previous HP LaserJet products are not compatible with the product. Install product memory This product has one DIMM slot. CAUTION: Static electricity can damage electronic components. When handling DIMMs, either wear an antistatic wrist strap or frequently touch the surface of the DIMM antistatic package, then touch bare metal on the product. 1. Print a configuration page to find out how much memory is installed in the product before adding more memory. a. At the product control panel, press the Home button. b. Open the following menus: ● Administration ● Reports ● Configuration/Status Pages ● Configuration Page 156 Chapter 9 Manage and maintain ENWW
-
 1
1 -
2
-
3
-
4
-
5
-
6
-
7
-
8
-
9
-
10
-
11
-
12
-
13
-
14
-
15
-
16
-
17
-
18
-
19
-
20
-
21
-
22
-
23
-
24
-
25
-
26
-
27
-
28
-
29
-
30
-
31
-
32
-
33
-
34
-
35
-
36
-
37
-
38
-
39
-
40
-
41
-
42
-
43
-
44
-
45
-
46
-
47
-
48
-
49
-
50
-
51
-
52
-
53
-
54
-
55
-
56
-
57
-
58
-
59
-
60
-
61
-
62
-
63
-
64
-
65
-
66
-
67
-
68
-
69
-
70
-
71
-
72
-
73
-
74
-
75
-
76
-
77
-
78
-
79
-
80
-
81
-
82
-
83
-
84
-
85
-
86
-
87
-
88
-
89
-
90
-
91
-
92
-
93
-
94
-
95
-
96
-
97
-
98
-
99
-
100
-
101
-
102
-
103
-
104
-
105
-
106
-
107
-
108
-
109
-
110
-
111
-
112
-
113
-
114
-
115
-
116
-
117
-
118
-
119
-
120
-
121
-
122
-
123
-
124
-
125
-
126
-
127
-
128
-
129
-
130
-
131
-
132
-
133
-
134
-
135
-
136
-
137
-
138
-
139
-
140
-
141
-
142
-
143
-
144
-
145
-
146
-
147
-
148
-
149
-
150
-
151
-
152
-
153
-
154
-
155
-
156
-
157
-
158
-
159
-
160
-
161
-
162
-
163
-
164
-
165
-
166
-
 167
167 -
 168
168 -
 169
169 -
 170
170 -
 171
171 -
 172
172 -
 173
173 -
 174
174 -
 175
175 -
 176
176 -
 177
177 -
178
-
179
-
180
-
181
-
182
-
183
-
184
-
185
-
186
-
187
-
188
-
189
-
190
-
191
-
192
-
193
-
194
-
195
-
196
-
197
-
198
-
199
-
200
-
201
-
202
-
203
-
204
-
205
-
206
-
207
-
208
-
209
-
210
-
211
-
212
-
213
-
214
-
215
-
216
-
217
-
218
-
219
-
220
-
221
-
222
-
223
-
224
-
225
-
226
-
227
-
228
-
229
-
230
-
231
-
232
-
233
-
234
-
235
-
236
-
237
-
238
-
239
-
240
-
241
-
242
-
243
-
244
-
245
-
246
-
247
-
248
-
249
-
250
-
251
-
252
-
253
-
254
-
255
-
256
-
257
-
258
-
259
-
260
-
261
-
262
-
263
-
264
 |
 |