HP LaserJet Enterprise 600 HP LaserJet Enterprise 600 M601, M602, and M603 Ser - Page 198
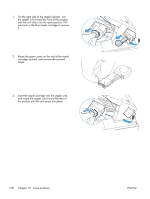
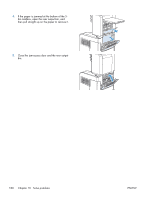
the black plastic guide that is located on the, Remove the jammed paper. If necessary, lift
 |
View all HP LaserJet Enterprise 600 manuals
Add to My Manuals
Save this manual to your list of manuals |
Page 198 highlights
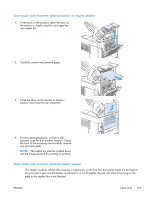
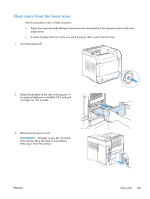
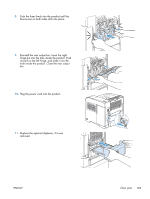
4. Open the rear output bin. 5. Remove the rear output bin. Place your finger near the left-side hinge, and push firmly to the right until the hinge-pin clears the hole inside the product. Rotate the output bin outward to remove it. 6. If paper is visible, remove it. If paper is not visible, push up on the two blue levers on the sides of the fuser, and pull the fuser straight out. 7. Remove the jammed paper. If necessary, lift the black plastic guide that is located on the top of the fuser to gain access to the jammed sheet. CAUTION: Do not use a sharp or metal object to clear paper from the fuser area. You might damage the fuser. 182 Chapter 10 Solve problems ENWW
-
 1
1 -
2
-
3
-
4
-
5
-
6
-
7
-
8
-
9
-
10
-
11
-
12
-
13
-
14
-
15
-
16
-
17
-
18
-
19
-
20
-
21
-
22
-
23
-
24
-
25
-
26
-
27
-
28
-
29
-
30
-
31
-
32
-
33
-
34
-
35
-
36
-
37
-
38
-
39
-
40
-
41
-
42
-
43
-
44
-
45
-
46
-
47
-
48
-
49
-
50
-
51
-
52
-
53
-
54
-
55
-
56
-
57
-
58
-
59
-
60
-
61
-
62
-
63
-
64
-
65
-
66
-
67
-
68
-
69
-
70
-
71
-
72
-
73
-
74
-
75
-
76
-
77
-
78
-
79
-
80
-
81
-
82
-
83
-
84
-
85
-
86
-
87
-
88
-
89
-
90
-
91
-
92
-
93
-
94
-
95
-
96
-
97
-
98
-
99
-
100
-
101
-
102
-
103
-
104
-
105
-
106
-
107
-
108
-
109
-
110
-
111
-
112
-
113
-
114
-
115
-
116
-
117
-
118
-
119
-
120
-
121
-
122
-
123
-
124
-
125
-
126
-
127
-
128
-
129
-
130
-
131
-
132
-
133
-
134
-
135
-
136
-
137
-
138
-
139
-
140
-
141
-
142
-
143
-
144
-
145
-
146
-
147
-
148
-
149
-
150
-
151
-
152
-
153
-
154
-
155
-
156
-
157
-
158
-
159
-
160
-
161
-
162
-
163
-
164
-
165
-
166
-
167
-
168
-
169
-
170
-
171
-
172
-
173
-
174
-
175
-
176
-
177
-
178
-
179
-
180
-
181
-
182
-
183
-
184
-
185
-
186
-
187
-
188
-
189
-
190
-
191
-
192
-
 193
193 -
 194
194 -
 195
195 -
 196
196 -
 197
197 -
 198
198 -
 199
199 -
 200
200 -
 201
201 -
 202
202 -
 203
203 -
204
-
205
-
206
-
207
-
208
-
209
-
210
-
211
-
212
-
213
-
214
-
215
-
216
-
217
-
218
-
219
-
220
-
221
-
222
-
223
-
224
-
225
-
226
-
227
-
228
-
229
-
230
-
231
-
232
-
233
-
234
-
235
-
236
-
237
-
238
-
239
-
240
-
241
-
242
-
243
-
244
-
245
-
246
-
247
-
248
-
249
-
250
-
251
-
252
-
253
-
254
-
255
-
256
-
257
-
258
-
259
-
260
-
261
-
262
-
263
-
264
 |
 |
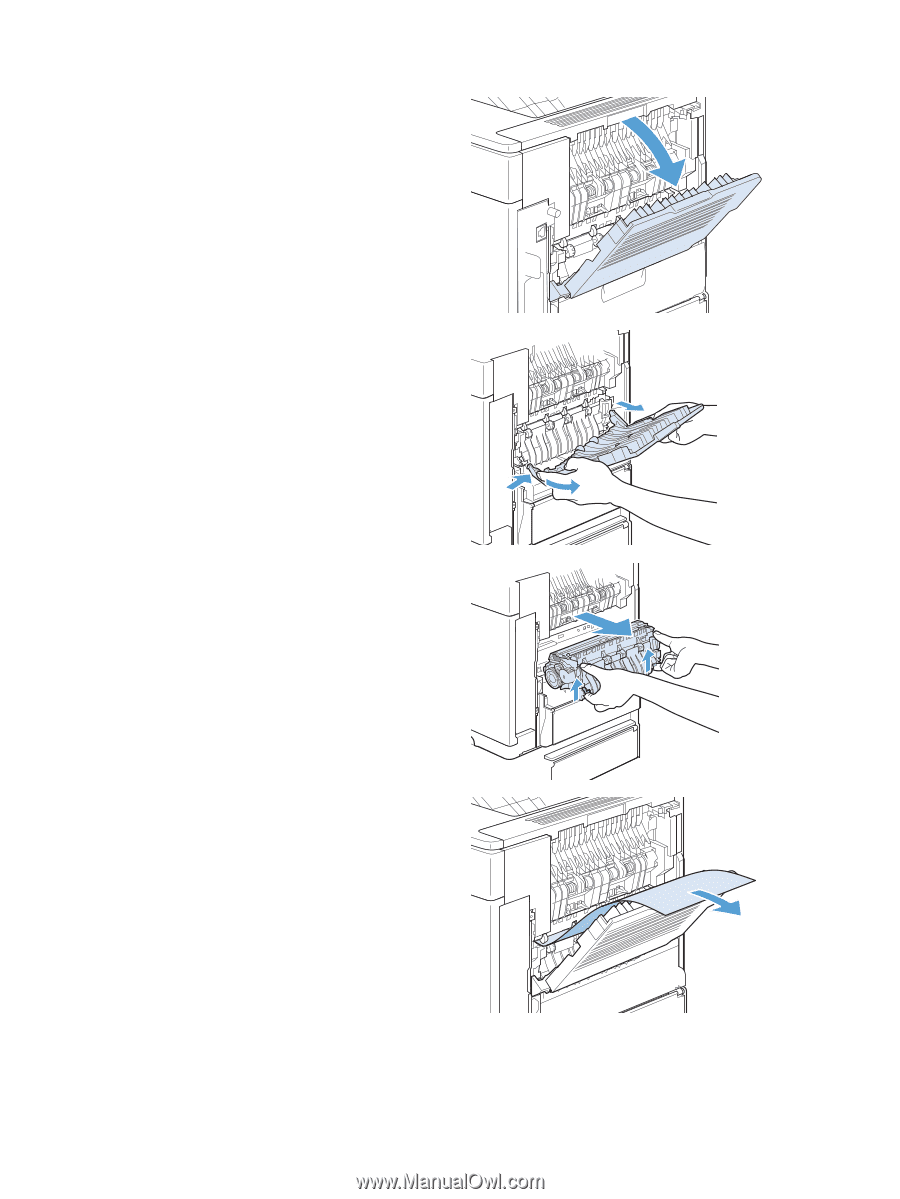
4.
Open the rear output bin.
5.
Remove the rear output bin. Place your finger
near the left-side hinge, and push firmly to the
right until the hinge-pin clears the hole inside
the product. Rotate the output bin outward to
remove it.
6.
If paper is visible, remove it.
If paper is not visible, push up on the two blue
levers on the sides of the fuser, and pull the
fuser straight out.
7.
Remove the jammed paper. If necessary, lift
the black plastic guide that is located on the
top of the fuser to gain access to the jammed
sheet.
CAUTION:
Do not use a sharp or metal
object to clear paper from the fuser area. You
might damage the fuser.
182
Chapter 10
Solve problems
ENWW