HP LaserJet Enterprise 600 HP LaserJet Enterprise 600 M601, M602, and M603 Ser - Page 28
Control-panel layout
 |
View all HP LaserJet Enterprise 600 manuals
Add to My Manuals
Save this manual to your list of manuals |
Page 28 highlights
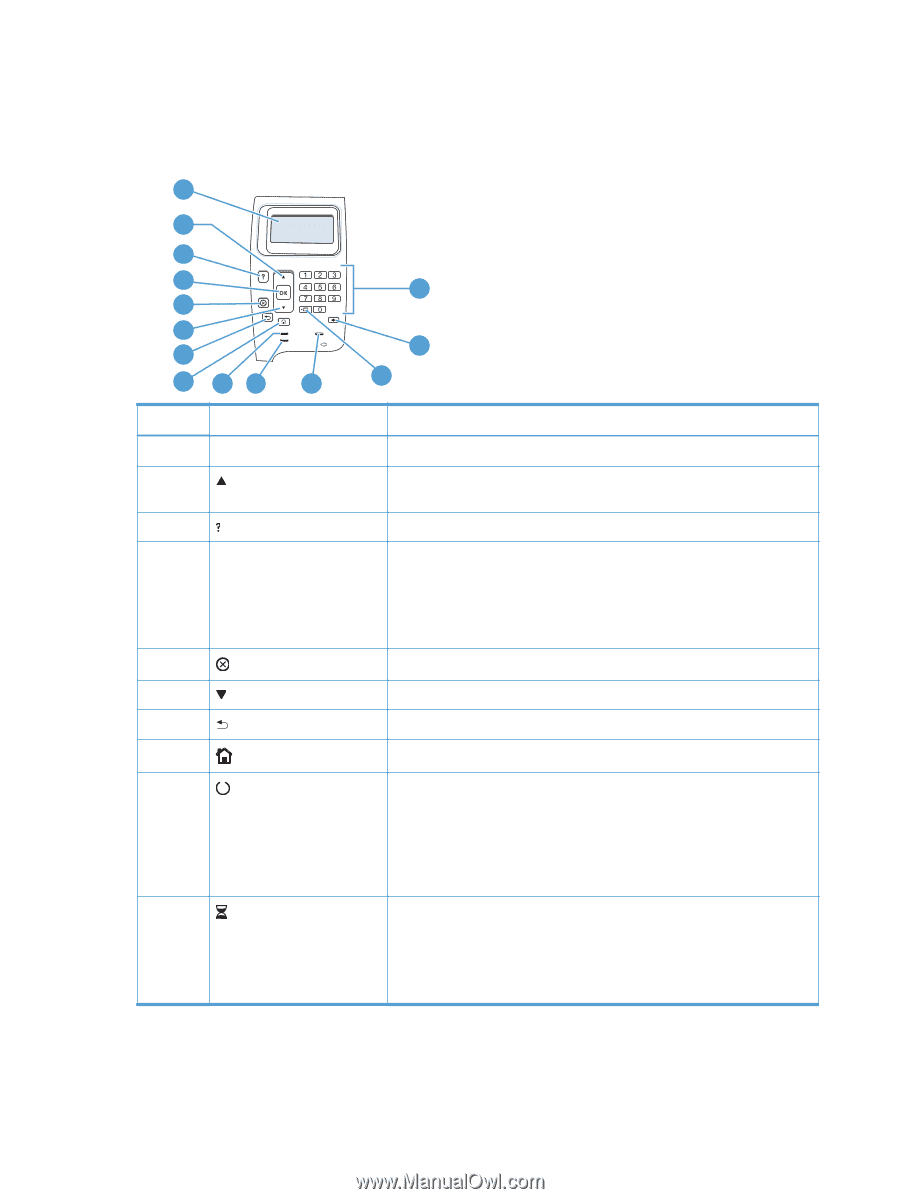
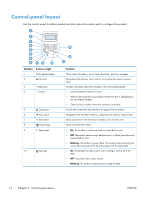
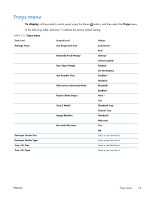
Control-panel layout Use the control panel to obtain product and job status information and to configure the product. 1 2 3 4 5 6 7 8 9 10 11 Number Button or light 1 Control-panel display 2 Up arrow 3 Help button 4 OK button 5 Stop button 6 Down arrow 7 Back arrow 8 Home button 9 Ready light 10 Data light 14 13 12 Function Shows status information, menus, help information, and error messages Navigates to the previous item in the list, or increases the value of numeric items Provides information about the message on the control-panel display ● Saves the selected value for an item ● Performs the action that is associated with the item that is highlighted on the control-panel display ● Clears an error condition when the condition is clearable Cancels the current print job and clears the pages from the product Navigates to the next item in the list, or decreases the value of numeric items Backs up one level in the menu tree or backs up one numeric entry Opens and closes the menus. ● On: The product is online and ready to accept data to print. ● Off: The product cannot accept data because it is offline (paused) or has experienced an error. ● Blinking: The product is going offline. The product stops processing the current job and expels all of the active pages from the paper path. ● On: The product has data to print, but is waiting to receive all of the data. ● Off: The product has no data to print. ● Blinking: The product is processing or printing the data. 12 Chapter 2 Control panel menus ENWW
-
 1
1 -
2
-
3
-
4
-
5
-
6
-
7
-
8
-
9
-
10
-
11
-
12
-
13
-
14
-
15
-
16
-
17
-
18
-
19
-
20
-
21
-
22
-
 23
23 -
 24
24 -
 25
25 -
 26
26 -
 27
27 -
 28
28 -
 29
29 -
 30
30 -
 31
31 -
 32
32 -
 33
33 -
34
-
35
-
36
-
37
-
38
-
39
-
40
-
41
-
42
-
43
-
44
-
45
-
46
-
47
-
48
-
49
-
50
-
51
-
52
-
53
-
54
-
55
-
56
-
57
-
58
-
59
-
60
-
61
-
62
-
63
-
64
-
65
-
66
-
67
-
68
-
69
-
70
-
71
-
72
-
73
-
74
-
75
-
76
-
77
-
78
-
79
-
80
-
81
-
82
-
83
-
84
-
85
-
86
-
87
-
88
-
89
-
90
-
91
-
92
-
93
-
94
-
95
-
96
-
97
-
98
-
99
-
100
-
101
-
102
-
103
-
104
-
105
-
106
-
107
-
108
-
109
-
110
-
111
-
112
-
113
-
114
-
115
-
116
-
117
-
118
-
119
-
120
-
121
-
122
-
123
-
124
-
125
-
126
-
127
-
128
-
129
-
130
-
131
-
132
-
133
-
134
-
135
-
136
-
137
-
138
-
139
-
140
-
141
-
142
-
143
-
144
-
145
-
146
-
147
-
148
-
149
-
150
-
151
-
152
-
153
-
154
-
155
-
156
-
157
-
158
-
159
-
160
-
161
-
162
-
163
-
164
-
165
-
166
-
167
-
168
-
169
-
170
-
171
-
172
-
173
-
174
-
175
-
176
-
177
-
178
-
179
-
180
-
181
-
182
-
183
-
184
-
185
-
186
-
187
-
188
-
189
-
190
-
191
-
192
-
193
-
194
-
195
-
196
-
197
-
198
-
199
-
200
-
201
-
202
-
203
-
204
-
205
-
206
-
207
-
208
-
209
-
210
-
211
-
212
-
213
-
214
-
215
-
216
-
217
-
218
-
219
-
220
-
221
-
222
-
223
-
224
-
225
-
226
-
227
-
228
-
229
-
230
-
231
-
232
-
233
-
234
-
235
-
236
-
237
-
238
-
239
-
240
-
241
-
242
-
243
-
244
-
245
-
246
-
247
-
248
-
249
-
250
-
251
-
252
-
253
-
254
-
255
-
256
-
257
-
258
-
259
-
260
-
261
-
262
-
263
-
264
 |
 |