HP LaserJet Enterprise 600 HP LaserJet Enterprise 600 M601, M602, and M603 Ser - Page 157
Set the user name for a stored job, Specify a name for the stored job, Print special jobs with Windows
 |
View all HP LaserJet Enterprise 600 manuals
Add to My Manuals
Save this manual to your list of manuals |
Page 157 highlights
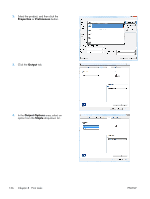
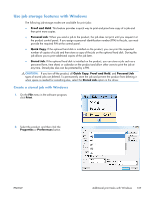
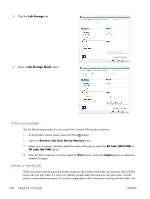
Set the user name for a stored job Follow this procedure to change the user name for a stored job. 1. On the File menu in the software program, click Print. 2. Select the product, and then click the Properties or Preferences button. 3. Click the Job Storage tab. 4. Select the job storage mode that you want. 5. In the User Name area, click the User name option to use the Windows default user name. To provide a different user name, click the Custom option and type the name. Specify a name for the stored job Follow this procedure to change the default name for a stored job. 1. On the File menu in the software program, click Print. 2. Select the product, and then click the Properties or Preferences button. 3. Click the Job Storage tab. 4. Select the job storage mode that you want. 5. To automatically generate the job name associated with the stored document, in the Job Name area, click the Automatic option. The driver uses the document file name, if it is available. If the document has no file name, the driver uses the software program name or a time stamp for the job name. To specify a job name, click the Custom option and type the name. 6. Select an option from the If job name exists drop-down list. ● Select the Use Job Name + (1-99) option to add a number to the end of the existing name. ● Select the Replace Existing File option to overwrite a job that already has that name. Print special jobs with Windows Set the duplex alignment For documents that are printed on both sides, such as brochures, set the registration for the tray before printing to ensure that the front and back of the page are aligned. 1. At the product control panel, press the Home button. 2. Open the following menus: a. Administration b. General Settings ENWW Additional print tasks with Windows 141
-
 1
1 -
2
-
3
-
4
-
5
-
6
-
7
-
8
-
9
-
10
-
11
-
12
-
13
-
14
-
15
-
16
-
17
-
18
-
19
-
20
-
21
-
22
-
23
-
24
-
25
-
26
-
27
-
28
-
29
-
30
-
31
-
32
-
33
-
34
-
35
-
36
-
37
-
38
-
39
-
40
-
41
-
42
-
43
-
44
-
45
-
46
-
47
-
48
-
49
-
50
-
51
-
52
-
53
-
54
-
55
-
56
-
57
-
58
-
59
-
60
-
61
-
62
-
63
-
64
-
65
-
66
-
67
-
68
-
69
-
70
-
71
-
72
-
73
-
74
-
75
-
76
-
77
-
78
-
79
-
80
-
81
-
82
-
83
-
84
-
85
-
86
-
87
-
88
-
89
-
90
-
91
-
92
-
93
-
94
-
95
-
96
-
97
-
98
-
99
-
100
-
101
-
102
-
103
-
104
-
105
-
106
-
107
-
108
-
109
-
110
-
111
-
112
-
113
-
114
-
115
-
116
-
117
-
118
-
119
-
120
-
121
-
122
-
123
-
124
-
125
-
126
-
127
-
128
-
129
-
130
-
131
-
132
-
133
-
134
-
135
-
136
-
137
-
138
-
139
-
140
-
141
-
142
-
143
-
144
-
145
-
146
-
147
-
148
-
149
-
150
-
151
-
 152
152 -
 153
153 -
 154
154 -
 155
155 -
 156
156 -
 157
157 -
 158
158 -
 159
159 -
 160
160 -
 161
161 -
 162
162 -
163
-
164
-
165
-
166
-
167
-
168
-
169
-
170
-
171
-
172
-
173
-
174
-
175
-
176
-
177
-
178
-
179
-
180
-
181
-
182
-
183
-
184
-
185
-
186
-
187
-
188
-
189
-
190
-
191
-
192
-
193
-
194
-
195
-
196
-
197
-
198
-
199
-
200
-
201
-
202
-
203
-
204
-
205
-
206
-
207
-
208
-
209
-
210
-
211
-
212
-
213
-
214
-
215
-
216
-
217
-
218
-
219
-
220
-
221
-
222
-
223
-
224
-
225
-
226
-
227
-
228
-
229
-
230
-
231
-
232
-
233
-
234
-
235
-
236
-
237
-
238
-
239
-
240
-
241
-
242
-
243
-
244
-
245
-
246
-
247
-
248
-
249
-
250
-
251
-
252
-
253
-
254
-
255
-
256
-
257
-
258
-
259
-
260
-
261
-
262
-
263
-
264
 |
 |