Konica Minolta bizhub C3350 bizhub C3850/C3350 Print Functions User Guide - Page 22
Installation procedure, Select [Install printers/MFPs], then click [Next].
 |
View all Konica Minolta bizhub C3350 manuals
Add to My Manuals
Save this manual to your list of manuals |
Page 22 highlights
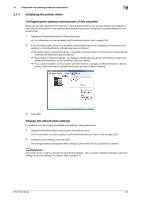
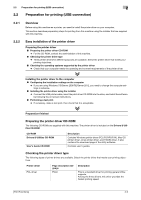
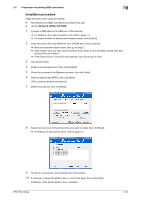
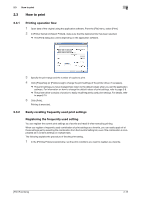
2.2 Preparation for printing (USB connection) 2 Installation procedure Install the printer driver using the installer. 0 Administrator privileges are required to perform this task. 0 Use the Drivers & Utilities CD-ROM. 1 Connect a USB cable to the USB port of this machine. % For details on the cable connection port, refer to page 1-4. % If a wizard window for adding new hardware opens, click [Cancel]. 2 Insert the printer driver CD-ROM into the CD-ROM drive of the computer. % Make sure that the installer starts, then go to Step 3. % If the installer does not start, open the printer driver folder on the CD-ROM, double-click [Set- up.exe], then go to Step 4. % If the [User Account Control] window appears, click [Continue] or [Yes]. 3 Click [Printer/FAX]. 4 Read the license agreement, then click [AGREE]. 5 Check the contents of the [Readme] window, then click [Next]. 6 Select [Install printers/MFPs], then click [Next]. USB-connected printers are detected. 7 Select this machine, then click [Next]. 8 Select the check box of the printer driver you want to install, then click [Next]. % For features of each printer driver, refer to page 2-4. 9 Check the components to be installed, then click [Install]. 10 If necessary, change the printer name or print a test page, then click [Finish]. Installation of the printer driver is then completed. [Print Functions] 2-12
-
 1
1 -
2
-
3
-
4
-
5
-
6
-
7
-
8
-
9
-
10
-
11
-
12
-
13
-
14
-
15
-
16
-
 17
17 -
 18
18 -
 19
19 -
 20
20 -
 21
21 -
 22
22 -
 23
23 -
 24
24 -
 25
25 -
 26
26 -
 27
27 -
28
-
29
-
30
-
31
-
32
-
33
-
34
-
35
-
36
-
37
-
38
-
39
-
40
-
41
-
42
-
43
-
44
-
45
-
46
-
47
-
48
-
49
-
50
-
51
-
52
-
53
-
54
-
55
-
56
-
57
-
58
-
59
-
60
-
61
-
62
-
63
-
64
-
65
-
66
-
67
-
68
-
69
-
70
-
71
-
72
-
73
-
74
-
75
-
76
-
77
-
78
-
79
-
80
-
81
-
82
-
83
-
84
-
85
-
86
-
87
-
88
-
89
-
90
-
91
-
92
-
93
-
94
-
95
-
96
-
97
-
98
-
99
-
100
-
101
-
102
-
103
-
104
-
105
-
106
-
107
-
108
-
109
-
110
-
111
-
112
-
113
-
114
-
115
-
116
-
117
-
118
 |
 |