Konica Minolta bizhub C3350 bizhub C3850/C3350 Print Functions User Guide - Page 63
Available operations in the [Con tab
 |
View all Konica Minolta bizhub C3350 manuals
Add to My Manuals
Save this manual to your list of manuals |
Page 63 highlights
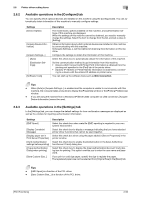
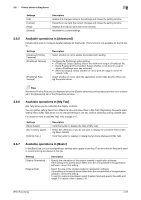
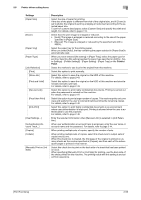
2.6 Printer driver setting items 2 2.6.2 Available operations in the [Configure] tab You can specify which optional devices are installed on this machine using the [Configure] tab. You can automatically obtain information of this machine to manually configure settings. Settings [Device Option] [Acquire Device Information] [Acquire Settings...] [Auto] [Destination Settings] [Software Tools] Description The model name, options installed on this machine, and authentication settings of this machine are displayed. When the settings of this machine cannot be obtained, you need to manually change the settings. Select the item to change from the list, and set a value in [Setting]. Obtains information about which optional devices are installed on this machine by communicating with this machine. In [Acquire Settings...], set the method of obtaining the information on this machine. Configure the settings to obtain the information of this machine. Select this check box to automatically obtain the information of this machine. Set the communication method to get information from this machine. • [Device which Connect with Printer Port]: Information is obtained from the printing port specified in the [Port] tab in the printer driver. • [Specify IP Address or Printer Name]: Information is obtained by connect- ing to a device with the entered IP address or printer name. You can start up the software tools such as Web Connection. Tips - When [Auto] in [Acquire Settings...] is enabled and the computer is unable to communicate with this machine, the computer takes a long time to display the [Properties] window or the [Printing Preferences] window. - If you are using the machine from a Windows XP/Server 2003 computer via USB connection, [Acquire Device Information] cannot be used. 2.6.3 Available operations in the [Settings] tab In the [Settings] tab, you can change the default settings for how confirmation messages are displayed as well as the window for inputting authentication information. Settings [EMF Spool] [Display Constraint Message] [Display paper set in Print Server Properties] [Verify Authentication settings before printing] [Popup Authentication Dialog when printing] [Save Custom Size...] Description Select this check box when meta file (EMF) spooling is required in your own system environment. Select this check box to display a message indicating that you have selected printer driver functions that cannot be used together. Select this check box when using the paper added in [Server Properties] in the printer window. Select this check box to enable the [Verify] button in the [User Authentication/Account Track] dialog box. Select this check box to display the [User Authentication/Account Track] dialog box for printing. This option reminds you to enter the user name and password. If you print on odd size paper, specify the size to register the paper. The registered paper size can be selected from [Original Size] in the [Basic] tab. Tips - [EMF Spool] is a function of the PCL driver. - [Save Custom Size...] is a function of the PCL driver. [Print Functions] 2-53
-
 1
1 -
2
-
3
-
4
-
5
-
6
-
7
-
8
-
9
-
10
-
11
-
12
-
13
-
14
-
15
-
16
-
17
-
18
-
19
-
20
-
21
-
22
-
23
-
24
-
25
-
26
-
27
-
28
-
29
-
30
-
31
-
32
-
33
-
34
-
35
-
36
-
37
-
38
-
39
-
40
-
41
-
42
-
43
-
44
-
45
-
46
-
47
-
48
-
49
-
50
-
51
-
52
-
53
-
54
-
55
-
56
-
57
-
 58
58 -
 59
59 -
 60
60 -
 61
61 -
 62
62 -
 63
63 -
 64
64 -
 65
65 -
 66
66 -
 67
67 -
 68
68 -
69
-
70
-
71
-
72
-
73
-
74
-
75
-
76
-
77
-
78
-
79
-
80
-
81
-
82
-
83
-
84
-
85
-
86
-
87
-
88
-
89
-
90
-
91
-
92
-
93
-
94
-
95
-
96
-
97
-
98
-
99
-
100
-
101
-
102
-
103
-
104
-
105
-
106
-
107
-
108
-
109
-
110
-
111
-
112
-
113
-
114
-
115
-
116
-
117
-
118
 |
 |
