Konica Minolta bizhub PRESS C6000 IC-601 Job Centro User Guide - Page 31
Settings of the list items, Clicking [Active Job] tab, [Image Controller Hold] tab
 |
View all Konica Minolta bizhub PRESS C6000 manuals
Add to My Manuals
Save this manual to your list of manuals |
Page 31 highlights
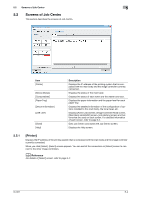
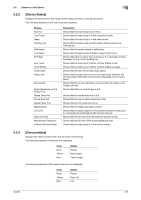
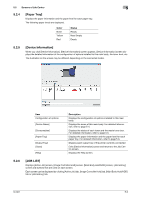
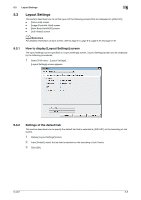
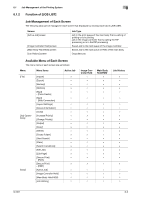
5.3 Layout Settings 5 5.3.3 Settings of the list items This section describes how to specify the list items of each screen that are displayed on [JOB LIST]. The available list items of each screen are as follows. Screen Active Job Image Controller Hold Main Body Hold/HDD Job History Available list items User Name, Status, Output Tray, Number of Sheets, Number of Copies, Pages and Minute(S) User Name, Output Tray, Number of Sheets, Number of Copies, Time Stored and PDL User Name, Number of Sheets, Number of Copies and Last Update User Name, Result, Number of Sheets, Number of Copies and Time Finished Note The list items can be specified respectively for the hold queue and HDD. 1 Display [Layout Settings] screen. 2 Clicking [Active Job] tab, [Image Controller Hold] tab, [Main Body Hold/HDD] tab or [Job History] tab, select the screen where the list items are specified. 3 To display more than one list item, check [List Display]. Not to display any list item, remove the check from [List Display]. % When you remove the check from [List Display] on a certain tab, that tab is not displayed on [JOB LIST]. % When you check [List Display] on a certain tab, [File Name] is always displayed in that tab. 4 Check the list items that you want to display. Or, remove the check from the list items that you do not want to display. 5 Repeat from Step 2 to Step 4 to specify the list items to display on each screen. 6 Click [OK]. 5.3.4 Settings of the date style This section describes how to specify the date style that is applied to the list items of [JOB LIST]. The date style is common and applied to [Image Controller Hold] screen - [Time Stored], [Main Body Hold/HDD] screen- [Last Update] and [Job History] screen - [Time Finished]. The available date styles are as follows. Style YYYY/MM/DD DD/MM/YYYY DD/Month/YYYY Sample 2009/08/25 25/08/2009 25/Aug/2009 Note Default style 1 Display [Layout Settings] screen. 2 From [Date Style], select the date style to apply. 3 Click [OK]. IC-601 5-9
-
 1
1 -
2
-
3
-
4
-
5
-
6
-
7
-
8
-
9
-
10
-
11
-
12
-
13
-
14
-
15
-
16
-
17
-
18
-
19
-
20
-
21
-
22
-
23
-
24
-
25
-
 26
26 -
 27
27 -
 28
28 -
 29
29 -
 30
30 -
 31
31 -
 32
32 -
 33
33 -
 34
34 -
 35
35 -
 36
36 -
37
-
38
-
39
-
40
-
41
-
42
-
43
-
44
-
45
-
46
-
47
-
48
-
49
-
50
-
51
-
52
-
53
-
54
-
55
-
56
-
57
-
58
-
59
-
60
-
61
-
62
-
63
-
64
-
65
-
66
-
67
-
68
-
69
-
70
-
71
-
72
-
73
-
74
-
75
-
76
-
77
-
78
-
79
-
80
-
81
-
82
-
83
-
84
-
85
-
86
-
87
-
88
-
89
-
90
-
91
-
92
 |
 |
