Konica Minolta bizhub PRESS C6000 IC-601 Job Centro User Guide - Page 77
Unlock the Secure Print Job, 6.4.3 Create/Delete Folder in/from HDD of the Main Body, Create New
 |
View all Konica Minolta bizhub PRESS C6000 manuals
Add to My Manuals
Save this manual to your list of manuals |
Page 77 highlights
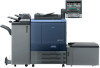
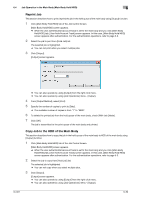
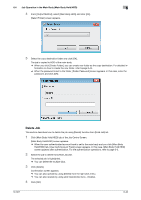
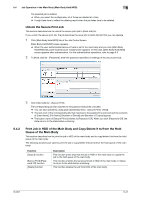
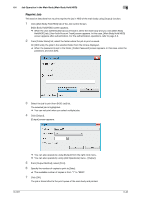
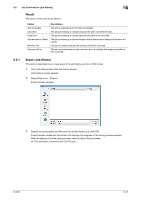
6.4 Job Operation in the Main Body (Main Body Hold/HDD) 6 Unlock the Secure Print Job This section describes how to unlock the secure print job in [HDD Job] list. If you unlock the secure print job, the job becomes the usual job in [HDD Job] list that you can operate. 1 Click [Main Body Hold/HDD] tab of the Job Centro Screen. [Main Body Hold/HDD] screen appears. % When the user authentication/account track is set to the main body and you click [Main Body Hold/HDD] tab, [User Auth/Account Track] screen appears. In this case, [Main Body Hold/HDD] screen appears after authentication. For the authentication operations, refer to page 5-3. 2 From [Folder Name] list, select the folder where the job to unlock is saved. On [HDD Job], the jobs in the selected folder from the list are displayed. % When the password is set to the folder, [Folder Password] screen appears. In this case, enter the password, and click [OK]. 3 To [HDD Job] list - [Password], enter the password specified on settings of the secure print job. 4 Click [HDD Job] list - [Secure Print]. The corresponding job that matches to the password becomes unlocked. % You can also operate by using [Job Operations] menu - [Secure Print] - [HDD]. % The lock icon of the corresponding job that matches to the password is removed and the contents of [User Name], [File Name], [Number of Sheets] and [Number of Copies] appear. % The button name of [Secure Print] switches to [Password Off]. When you click [Password Off], the state returns to the state before unlocking. 6.4.3 Create/Delete Folder in/from HDD of the Main Body This section describes how to create/delete the folder in/from HDD of the main body. The following functions are used to create/delete the folder. Function [Create Folder] function [Delete] function Description This function creates new folder in the HDD of the main body. This function deletes the folder from HDD of the main body. Create New Folder This section describes how to create the new folder in HDD of the main body using [Create Folder] function. 1 Click [Main Body Hold/HDD] tab of the Job Centro Screen. [Main Body Hold/HDD] screen appears. % When the user authentication/account track is set to the main body and you click [Main Body Hold/HDD] tab, [User Auth/Account Track] screen appears. In this case, [Main Body Hold/HDD] screen appears after authentication. For the authentication operations, refer to page 5-3. 2 Click [Create Folder]. [Create Folder] screen appears. IC-601 % You can also operate by using [Job Operations] menu - [Create Folder]. 6-44
-
 1
1 -
2
-
3
-
4
-
5
-
6
-
7
-
8
-
9
-
10
-
11
-
12
-
13
-
14
-
15
-
16
-
17
-
18
-
19
-
20
-
21
-
22
-
23
-
24
-
25
-
26
-
27
-
28
-
29
-
30
-
31
-
32
-
33
-
34
-
35
-
36
-
37
-
38
-
39
-
40
-
41
-
42
-
43
-
44
-
45
-
46
-
47
-
48
-
49
-
50
-
51
-
52
-
53
-
54
-
55
-
56
-
57
-
58
-
59
-
60
-
61
-
62
-
63
-
64
-
65
-
66
-
67
-
68
-
69
-
70
-
71
-
 72
72 -
 73
73 -
 74
74 -
 75
75 -
 76
76 -
 77
77 -
 78
78 -
 79
79 -
 80
80 -
 81
81 -
 82
82 -
83
-
84
-
85
-
86
-
87
-
88
-
89
-
90
-
91
-
92
 |
 |