Motorola i856 User Guide - Sprint - Page 110
Filtering Contacts Entries, Finding Speed Dial Numbers, Adding a Number to an Entry, Editing Entries
 |
View all Motorola i856 manuals
Add to My Manuals
Save this manual to your list of manuals |
Page 110 highlights
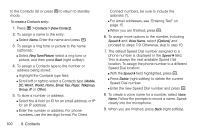
3. Press r to display the entry, and then scroll up or down to view all information stored for the entry. Tip To display the next or previous entry, scroll right or left. Filtering Contacts Entries You can set Contacts to display only entries containing Direct Connect numbers, Groups, and Talkgroups. ᮣ Press / > Contacts > / > Filter > Show DC. Select Show All to display all Contacts entries. Finding Speed Dial Numbers ᮣ Press / > Contacts, select an entry and select a phone number. The speed dial number is listed directly under the contact phone number. Adding a Number to an Entry 1. Display a Contacts entry. (See "Viewing Contacts" on page 101.) 2. Press Edit (left softkey) or / > Edit. 3. Highlight the number type field above an open number and press the navigation key right or left to select a number type. 4. Scroll down to the open field, enter the new number or address and press r. 5. Press Save (left softkey) to save the new number. - or - To assign a speed dial number or Voice Name, select [Options] > Speed # or Voice Name. Complete the process, press Back (right softkey) and then press Save (left softkey) to save the entry. Editing Entries 1. Press / > Contacts and highlight an entry. 2. Press Edit (left softkey) or / > Edit. 3. Follow the applicable instructions in "Creating Contacts Entries" on page 99 to edit the entry. 102 8. Contacts
-
 1
1 -
2
-
3
-
4
-
5
-
6
-
7
-
8
-
9
-
10
-
11
-
12
-
13
-
14
-
15
-
16
-
17
-
18
-
19
-
20
-
21
-
22
-
23
-
24
-
25
-
26
-
27
-
28
-
29
-
30
-
31
-
32
-
33
-
34
-
35
-
36
-
37
-
38
-
39
-
40
-
41
-
42
-
43
-
44
-
45
-
46
-
47
-
48
-
49
-
50
-
51
-
52
-
53
-
54
-
55
-
56
-
57
-
58
-
59
-
60
-
61
-
62
-
63
-
64
-
65
-
66
-
67
-
68
-
69
-
70
-
71
-
72
-
73
-
74
-
75
-
76
-
77
-
78
-
79
-
80
-
81
-
82
-
83
-
84
-
85
-
86
-
87
-
88
-
89
-
90
-
91
-
92
-
93
-
94
-
95
-
96
-
97
-
98
-
99
-
100
-
101
-
102
-
103
-
104
-
 105
105 -
 106
106 -
 107
107 -
 108
108 -
 109
109 -
 110
110 -
 111
111 -
 112
112 -
 113
113 -
 114
114 -
 115
115 -
116
-
117
-
118
-
119
-
120
-
121
-
122
-
123
-
124
-
125
-
126
-
127
-
128
-
129
-
130
-
131
-
132
-
133
-
134
-
135
-
136
-
137
-
138
-
139
-
140
-
141
-
142
-
143
-
144
-
145
-
146
-
147
-
148
-
149
-
150
-
151
-
152
-
153
-
154
-
155
-
156
-
157
-
158
-
159
-
160
-
161
-
162
-
163
-
164
-
165
-
166
-
167
-
168
-
169
-
170
-
171
-
172
-
173
-
174
-
175
-
176
-
177
-
178
-
179
-
180
-
181
-
182
-
183
-
184
-
185
-
186
-
187
-
188
-
189
-
190
-
191
 |
 |
