Motorola i856 User Guide - Sprint - Page 137
Camera, Taking Pictures
 |
View all Motorola i856 manuals
Add to My Manuals
Save this manual to your list of manuals |
Page 137 highlights
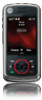
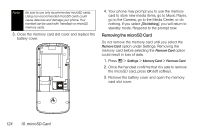
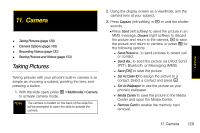
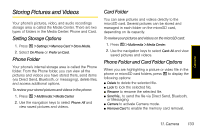
Camera 11. Camera ࡗ Taking Pictures (page 129) ࡗ Camera Options (page 130) ࡗ Recording Videos (page 131) ࡗ Storing Pictures and Videos (page 133) Taking Pictures Taking pictures with your phone's built-in camera is as simple as choosing a subject, pointing the lens, and pressing a button. 1. With the slide open, press / > Multimedia > Camera to activate camera mode. Note The camera is located on the back of the slide.You will be prompted to open the slide to activate the camera. 2. Using the display screen as a viewfinder, aim the camera lens at your subject. 3. Press Capture (left softkey) or r or until the shutter sounds. Ⅲ Press Send (left softkey) to send the picture in an MMS message, Discard (right softkey) to discard the picture and return to the camera, r to save the picture and return to camera, or press / for the following options: ● Send Picture vi... to send pictures to recent call or contact. ● Send Via... to send the picture via Direct Send (PTT), Bluetooth, or Messaging (MMS). ● Save [OK] to save the picture. ● Set As Caller ID to assign the picture to a contact. Select a contact and press r. ● Set As Wallpaper to use the picture as your phone's wallpaper. ● Media Center to save the picture to the Media Center and open the Media Center. ● Remove Card to enable the memory card removal. 11. Camera 129
-
 1
1 -
2
-
3
-
4
-
5
-
6
-
7
-
8
-
9
-
10
-
11
-
12
-
13
-
14
-
15
-
16
-
17
-
18
-
19
-
20
-
21
-
22
-
23
-
24
-
25
-
26
-
27
-
28
-
29
-
30
-
31
-
32
-
33
-
34
-
35
-
36
-
37
-
38
-
39
-
40
-
41
-
42
-
43
-
44
-
45
-
46
-
47
-
48
-
49
-
50
-
51
-
52
-
53
-
54
-
55
-
56
-
57
-
58
-
59
-
60
-
61
-
62
-
63
-
64
-
65
-
66
-
67
-
68
-
69
-
70
-
71
-
72
-
73
-
74
-
75
-
76
-
77
-
78
-
79
-
80
-
81
-
82
-
83
-
84
-
85
-
86
-
87
-
88
-
89
-
90
-
91
-
92
-
93
-
94
-
95
-
96
-
97
-
98
-
99
-
100
-
101
-
102
-
103
-
104
-
105
-
106
-
107
-
108
-
109
-
110
-
111
-
112
-
113
-
114
-
115
-
116
-
117
-
118
-
119
-
120
-
121
-
122
-
123
-
124
-
125
-
126
-
127
-
128
-
129
-
130
-
131
-
 132
132 -
 133
133 -
 134
134 -
 135
135 -
 136
136 -
 137
137 -
 138
138 -
 139
139 -
 140
140 -
 141
141 -
 142
142 -
143
-
144
-
145
-
146
-
147
-
148
-
149
-
150
-
151
-
152
-
153
-
154
-
155
-
156
-
157
-
158
-
159
-
160
-
161
-
162
-
163
-
164
-
165
-
166
-
167
-
168
-
169
-
170
-
171
-
172
-
173
-
174
-
175
-
176
-
177
-
178
-
179
-
180
-
181
-
182
-
183
-
184
-
185
-
186
-
187
-
188
-
189
-
190
-
191
 |
 |
