Motorola i856 User Guide - Sprint - Page 116
Subject, Browse, Location, Start, No Time, Duration, Custom, Repeat, Multiple Day, Reminder, Ring Tone
 |
View all Motorola i856 manuals
Add to My Manuals
Save this manual to your list of manuals |
Page 116 highlights
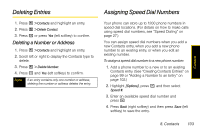
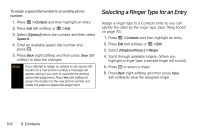
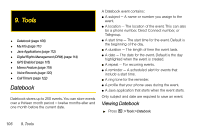
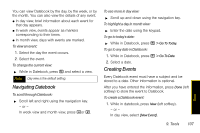
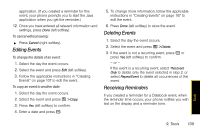
2. To assign a subject to the event, select Subject and: Ⅲ Enter the name or enter a phone number, Direct Connect number, or Talkgroup number. - or - Press Browse (left softkey) to choose from common event names. 3. To assign a location to the event (optional), select Location and enter the location or enter a phone number, Direct Connect number, or Talkgroup number. 4. The start time automatically assigned to an event is the beginning of the day. To change the start time or assign no start time, select Start and then enter a start time or press No Time (left softkey). 5. To assign a duration, select Duration and select a duration from the list or select Custom and enter a duration. 6. The date automatically assigned to an event is the date that was highlighted or selected when you began creating the event. To change the date of the event, select Date and then enter a date. 7. To make the event a recurring event: Ⅲ Select Repeat and then select a repeat cycle. ● If the event occurs more than once a week, select Multiple Day, and select the days. ● Press Done (left softkey). Ⅲ In the End field, select a date for the event to stop recurring. 8. To create a reminder for this event, select Reminder and then select a reminder time or select Custom to enter a reminder time. Note If an event has no start time, you cannot create a reminder for it. 9. To set the ring tone for a reminder, select Ring Tone and then select a ring tone. 10. To assign a profile for your phone to use during the event, select Profile and then select a profile. (Your phone switches to this profile when the event starts and switches back to the previous profile when the event ends.) 11. To assign a Java application to start when the event starts, select App and then select an 108 9. Tools
-
 1
1 -
2
-
3
-
4
-
5
-
6
-
7
-
8
-
9
-
10
-
11
-
12
-
13
-
14
-
15
-
16
-
17
-
18
-
19
-
20
-
21
-
22
-
23
-
24
-
25
-
26
-
27
-
28
-
29
-
30
-
31
-
32
-
33
-
34
-
35
-
36
-
37
-
38
-
39
-
40
-
41
-
42
-
43
-
44
-
45
-
46
-
47
-
48
-
49
-
50
-
51
-
52
-
53
-
54
-
55
-
56
-
57
-
58
-
59
-
60
-
61
-
62
-
63
-
64
-
65
-
66
-
67
-
68
-
69
-
70
-
71
-
72
-
73
-
74
-
75
-
76
-
77
-
78
-
79
-
80
-
81
-
82
-
83
-
84
-
85
-
86
-
87
-
88
-
89
-
90
-
91
-
92
-
93
-
94
-
95
-
96
-
97
-
98
-
99
-
100
-
101
-
102
-
103
-
104
-
105
-
106
-
107
-
108
-
109
-
110
-
 111
111 -
 112
112 -
 113
113 -
 114
114 -
 115
115 -
 116
116 -
 117
117 -
 118
118 -
 119
119 -
 120
120 -
 121
121 -
122
-
123
-
124
-
125
-
126
-
127
-
128
-
129
-
130
-
131
-
132
-
133
-
134
-
135
-
136
-
137
-
138
-
139
-
140
-
141
-
142
-
143
-
144
-
145
-
146
-
147
-
148
-
149
-
150
-
151
-
152
-
153
-
154
-
155
-
156
-
157
-
158
-
159
-
160
-
161
-
162
-
163
-
164
-
165
-
166
-
167
-
168
-
169
-
170
-
171
-
172
-
173
-
174
-
175
-
176
-
177
-
178
-
179
-
180
-
181
-
182
-
183
-
184
-
185
-
186
-
187
-
188
-
189
-
190
-
191
 |
 |
