NEC NP-UM330X eBeam Education Software Manual - Page 36
Recorder, Recorder Controls, Movie File Type Options
 |
View all NEC NP-UM330X manuals
Add to My Manuals
Save this manual to your list of manuals |
Page 36 highlights
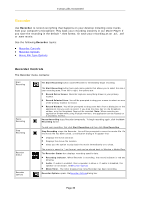
© 2011 Luidia, Incorporated Recorder Use Recorder to record everything that happens on your desktop including voice tracks from your computer's microphone. Play back your recording instantly in our Movie Player if you save the recording in the default *.ebm format. Or save your recording as an .avi, .swf or .wmv movie. See the following Recorder topics: Recorder Controls Recorder Options Movie File Type Options Recorder Controls The Recorder menu contains: Start Recording Pause Recording Stop Recording Recorder Status Recorder Options The Start Recording button causes Recorder to immediately begin recording. The Start Recording button has a sub-menu palette that allows you to select the size of your recording area. From left to right, the options are: Record Entire Screen: Recorder captures everything shown in your primary monitor. Record Selected Area: You will be prompted to drag your mouse to select an area of the primary monitor to record. Record Window: You will be prompted to drag cross hairs from a dialog box to the application that you wish to record. If you drop the cross hair on the Scrapbook window, only the Scrapbook Page will be recorded. Note: When recording an application window while using multiple monitors, the application can be located on a secondary monitor. Pause Recording stops Recorder temporarily. To begin recording again, click the Start Recording button. To end your recording, first click Start Recording and then click Stop Recording. Stop Recording stops the Recorder. You w ill be prompted to save the movie file. Once the movie file has been saved, a notification dialog w ill appear that: Displays the movie duration Displays the movie file location Gives you the option to play back the movie immediately or to close. The movie is saved in *.avi format, and can be played back in Window s Media Player. The Recorder Status box displays recording specific data. Recording indicator . When Recorder is recording, the record indicator is red and blinking. Audio. If audio in enabled, then a speaker is show n. If audio is disabled, the speaker is not show n. SeeRecorder Options. Movie Timer . The timer displays how long Recorder has been recording. Recorder Options opens theRecorder Optionsdialog box. Page 36
-
 1
1 -
2
-
3
-
4
-
5
-
6
-
7
-
8
-
9
-
10
-
11
-
12
-
13
-
14
-
15
-
16
-
17
-
18
-
19
-
20
-
21
-
22
-
23
-
24
-
25
-
26
-
27
-
28
-
29
-
30
-
 31
31 -
 32
32 -
 33
33 -
 34
34 -
 35
35 -
 36
36 -
 37
37 -
 38
38 -
 39
39 -
 40
40 -
 41
41 -
42
-
43
-
44
-
45
-
46
-
47
-
48
-
49
-
50
-
51
-
52
-
53
-
54
-
55
-
56
-
57
-
58
-
59
-
60
-
61
-
62
-
63
-
64
-
65
-
66
-
67
-
68
-
69
-
70
-
71
-
72
-
73
-
74
-
75
-
76
-
77
-
78
-
79
-
80
-
81
-
82
-
83
-
84
-
85
-
86
-
87
-
88
-
89
-
90
-
91
-
92
-
93
-
94
-
95
-
96
-
97
-
98
-
99
-
100
-
101
-
102
-
103
-
104
-
105
-
106
-
107
-
108
-
109
-
110
-
111
 |
 |
