Nikon D100 Product Manual - Page 111
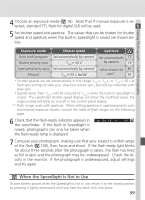
When the Speedlight Is Not in Use
 |
UPC - 018208252718
View all Nikon D100 manuals
Add to My Manuals
Save this manual to your list of manuals |
Page 111 highlights
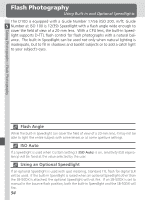
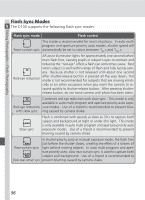
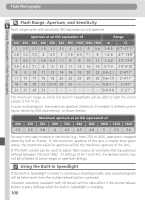
Using Built-in and Optional Speedlights Taking Photographs-Flash Photography 4 Choose an exposure mode ( 76). Note that if manual exposure is selected, standard TTL flash for digital SLR will be used. 5 Set shutter speed and aperture. The values that can be chosen for shutter speed and aperture when the built-in Speedlight is raised are shown below. Exposure mode Shutter speed Aperture Auto multi program Set automatically by camera* Set automatically 77 Shutter-priority auto 1/180 s-30 s† by camera 79 Aperture-priority auto Set automatically by camera* Value chosen by 81 Manual 1/180 s-30 s, † user** 82 * Shutter speeds are set automatically in the range 1/180 s-1/60 s, or 1/180 s-30 s at flash sync settings of slow sync, slow rear-curtain sync, and red-eye reduction with slow sync. † Speeds faster than 1/180 s will be reduced to 1/180 s while the built-in Speedlight is raised. The viewfinder shutter-speed display will show the modified value; the original value will blink on and off in the control panel display. ** Flash range varies with aperture. When setting aperture in aperture-priority auto and manual exposure modes, consult the table of flash ranges on the following page. 6 Check that the flash-ready indicator appears in the viewfinder. If the built-in Speedlight is raised, photographs can only be taken when the flash-ready lamp is displayed. 7 Compose your photograph, making sure that your subject is within range of the flash ( 100), then focus and shoot. If the flash-ready light blinks for about three seconds after the photograph is taken, the flash has fired at full output and the photograph may be underexposed. Check the results in the monitor. If the photograph is underexposed, adjust settings and try again. When the Speedlight Is Not in Use To save battery power when the Speedlight is not in use, return it to the closed position by pressing it lightly downward until you hear the latch click into place. 99
-
 1
1 -
2
-
3
-
4
-
5
-
6
-
7
-
8
-
9
-
10
-
11
-
12
-
13
-
14
-
15
-
16
-
17
-
18
-
19
-
20
-
21
-
22
-
23
-
24
-
25
-
26
-
27
-
28
-
29
-
30
-
31
-
32
-
33
-
34
-
35
-
36
-
37
-
38
-
39
-
40
-
41
-
42
-
43
-
44
-
45
-
46
-
47
-
48
-
49
-
50
-
51
-
52
-
53
-
54
-
55
-
56
-
57
-
58
-
59
-
60
-
61
-
62
-
63
-
64
-
65
-
66
-
67
-
68
-
69
-
70
-
71
-
72
-
73
-
74
-
75
-
76
-
77
-
78
-
79
-
80
-
81
-
82
-
83
-
84
-
85
-
86
-
87
-
88
-
89
-
90
-
91
-
92
-
93
-
94
-
95
-
96
-
97
-
98
-
99
-
100
-
101
-
102
-
103
-
104
-
105
-
 106
106 -
 107
107 -
 108
108 -
 109
109 -
 110
110 -
 111
111 -
 112
112 -
 113
113 -
 114
114 -
 115
115 -
 116
116 -
117
-
118
-
119
-
120
-
121
-
122
-
123
-
124
-
125
-
126
-
127
-
128
-
129
-
130
-
131
-
132
-
133
-
134
-
135
-
136
-
137
-
138
-
139
-
140
-
141
-
142
-
143
-
144
-
145
-
146
-
147
-
148
-
149
-
150
-
151
-
152
-
153
-
154
-
155
-
156
-
157
-
158
-
159
-
160
-
161
-
162
-
163
-
164
-
165
-
166
-
167
-
168
-
169
-
170
-
171
-
172
-
173
-
174
-
175
-
176
-
177
-
178
-
179
-
180
-
181
-
182
-
183
-
184
-
185
-
186
-
187
-
188
-
189
-
190
-
191
-
192
-
193
-
194
-
195
-
196
-
197
-
198
-
199
-
200
-
201
-
202
-
203
-
204
-
205
-
206
-
207
-
208
-
209
-
210
-
211
-
212
 |
 |