Olympus C-2000 C-2000 Zoom Instruction manual (5.5 MB) - Page 192
Printing With The P-300
 |
UPC - 050332128231
View all Olympus C-2000 manuals
Add to My Manuals
Save this manual to your list of manuals |
Page 192 highlights
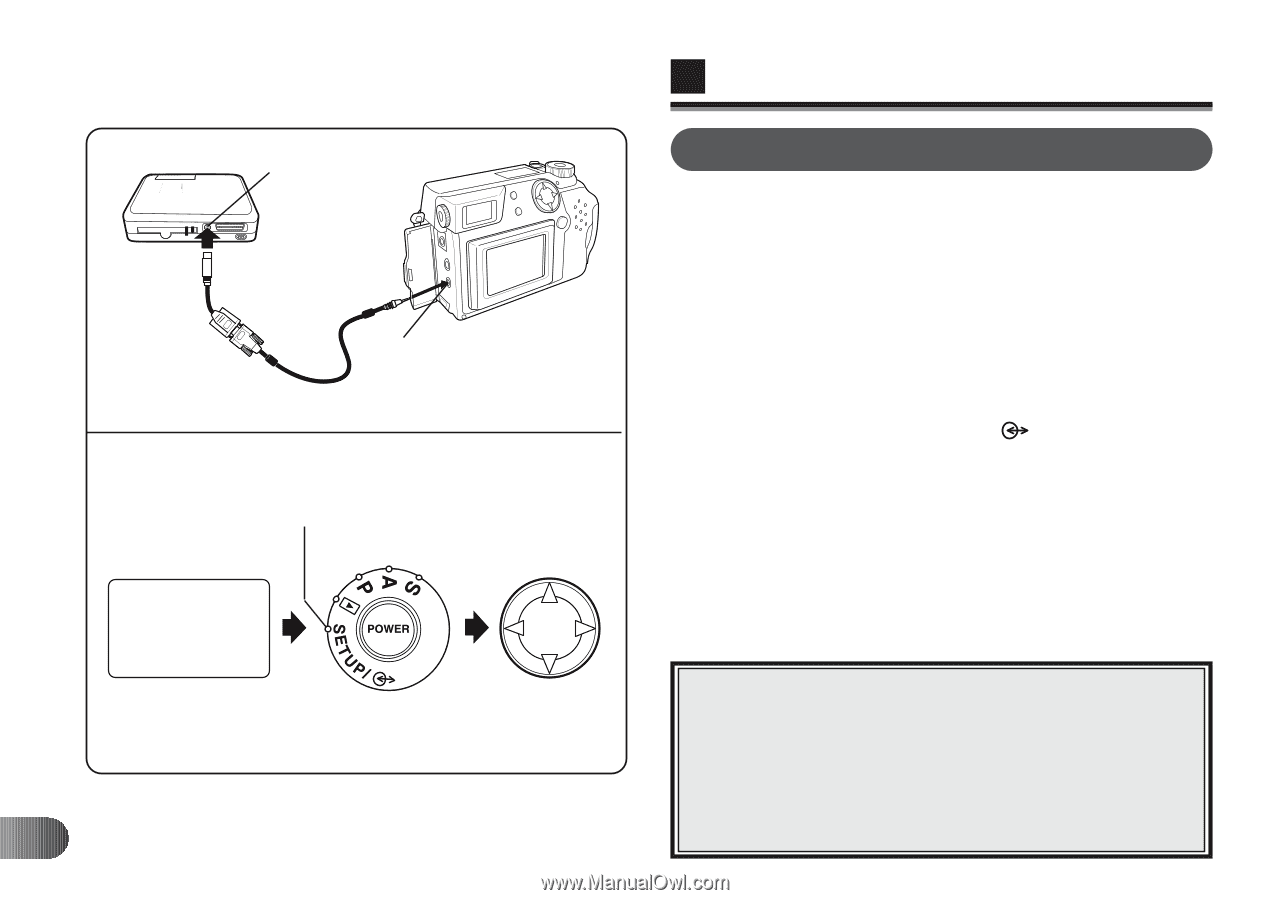
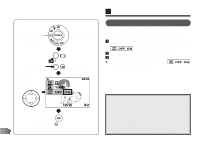
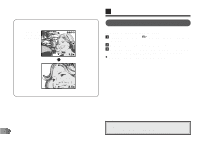
P-300 Serial port Port série Puerto serie Computer connector Connecteur pour ordinateur Connector para computadora Control panel Écran de commande Panel de control Outer connection Raccordement externe Conexión externa Jog dial Molette de défilement Disco Jog E PRINTING WITH THE P-300 HOW TO PRINT By connecting the camera to the P-300 printer with the direct connect cable, pictures can be printed directly from the camera. Make sure that the power of the printer and the camera are off before connecting. 1 Connect the computer connector of the camera to the serial port of the printer with the provided RS-232C cable and conversion connector for Mac. Turn on the printer. 2 After the indicators on the control panel go off, turn on the camera and set the Mode dial to " ". ● The LCD monitor turns on automatically. 3 Select the picture you want to print using the Jog dial. 4 Enter the number of copies to be printed on the printer, then press the DIRECT PRINT button on the printer to start printing. Note: x The LCD monitor display goes off during printing, and other operations are disabled. x The date can be printed as well. (p. 208) x The use of the optional AC adapter is recommended. x Images taken in TIFF (non-compression) cannot 192 be printed.
-
 1
1 -
2
-
3
-
4
-
5
-
6
-
7
-
8
-
9
-
10
-
11
-
12
-
13
-
14
-
15
-
16
-
17
-
18
-
19
-
20
-
21
-
22
-
23
-
24
-
25
-
26
-
27
-
28
-
29
-
30
-
31
-
32
-
33
-
34
-
35
-
36
-
37
-
38
-
39
-
40
-
41
-
42
-
43
-
44
-
45
-
46
-
47
-
48
-
49
-
50
-
51
-
52
-
53
-
54
-
55
-
56
-
57
-
58
-
59
-
60
-
61
-
62
-
63
-
64
-
65
-
66
-
67
-
68
-
69
-
70
-
71
-
72
-
73
-
74
-
75
-
76
-
77
-
78
-
79
-
80
-
81
-
82
-
83
-
84
-
85
-
86
-
87
-
88
-
89
-
90
-
91
-
92
-
93
-
94
-
95
-
96
-
97
-
98
-
99
-
100
-
101
-
102
-
103
-
104
-
105
-
106
-
107
-
108
-
109
-
110
-
111
-
112
-
113
-
114
-
115
-
116
-
117
-
118
-
119
-
120
-
121
-
122
-
123
-
124
-
125
-
126
-
127
-
128
-
129
-
130
-
131
-
132
-
133
-
134
-
135
-
136
-
137
-
138
-
139
-
140
-
141
-
142
-
143
-
144
-
145
-
146
-
147
-
148
-
149
-
150
-
151
-
152
-
153
-
154
-
155
-
156
-
157
-
158
-
159
-
160
-
161
-
162
-
163
-
164
-
165
-
166
-
167
-
168
-
169
-
170
-
171
-
172
-
173
-
174
-
175
-
176
-
177
-
178
-
179
-
180
-
181
-
182
-
183
-
184
-
185
-
186
-
 187
187 -
 188
188 -
 189
189 -
 190
190 -
 191
191 -
 192
192 -
 193
193 -
 194
194 -
 195
195 -
 196
196 -
 197
197 -
198
-
199
-
200
-
201
-
202
-
203
-
204
-
205
-
206
-
207
-
208
-
209
-
210
-
211
-
212
-
213
-
214
-
215
-
216
-
217
-
218
-
219
-
220
-
221
-
222
-
223
-
224
-
225
-
226
-
227
-
228
-
229
-
230
-
231
-
232
-
233
-
234
-
235
-
236
-
237
-
238
-
239
-
240
-
241
-
242
-
243
-
244
-
245
-
246
-
247
-
248
 |
 |