Ricoh 2020D Scanner Reference - Page 19
Orig. Orientation Priority, Original Type Setting, Selecting a custom size, Type 1Text, Type 2Photo
 |
View all Ricoh 2020D manuals
Add to My Manuals
Save this manual to your list of manuals |
Page 19 highlights
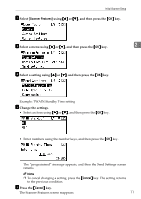
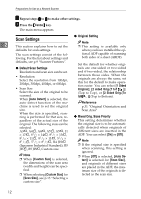
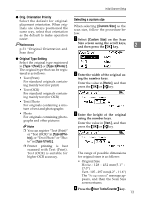
Initial Scanner Setup ❖ Orig. Orientation Priority Select the default for original placement orientation. When originals are always positioned the same way, select that orientation as the default to make operation easier. Reference p.31 "Original Orientation and Scan Area" ❖ Original Type Setting Select the original type registered in [Type 1(Text):] or [Type 2(Photo):]. The original type that can be registered is as follows: • Text (Print) For standard originals containing mainly text (for print) • Text (OCR) For standard originals containing mainly text (for OCR) • Text/Photo For originals containing a mixture of text and photographs • Photo For originals containing photographs and other pictures Note ❒ You can register "Text (Print)" or "Text (OCR)" in [Type 2(Photo):], or "Text/Photo" or "Photo" in [Type 1(Text):]. ❒ Printer printing is best scanned with Text (Print). Text (OCR) is suitable for higher OCR accuracy. Selecting a custom size When selecting [Custom Size] as the scan size, follow the procedure below. A Select [Custom Size] on the Scan Size screen using the scroll keys, and then press the {OK} key. 2 B Enter the width of the original us- ing the number keys. Enter the value in [Horiz.], and then press the {OK} or {#} key. C Enter the height of the original using the number keys. Enter the value in [Vert.], and then press the {OK} or {#} key. The range of possible dimensions for original sizes is as follows: • Original Size Horiz.: 128 - 432 mm(5.1" 17.0") Vert.: 105 - 297 mm(4.2" - 11.6") The "Programmed" message appears, and then the Scan Size screen returns. D Press the {User Tools/Counter} key. 13
-
 1
1 -
2
-
3
-
4
-
5
-
6
-
7
-
8
-
9
-
10
-
11
-
12
-
13
-
 14
14 -
 15
15 -
 16
16 -
 17
17 -
 18
18 -
 19
19 -
 20
20 -
 21
21 -
 22
22 -
 23
23 -
 24
24 -
25
-
26
-
27
-
28
-
29
-
30
-
31
-
32
-
33
-
34
-
35
-
36
-
37
-
38
-
39
-
40
-
41
-
42
-
43
-
44
-
45
-
46
-
47
-
48
-
49
-
50
-
51
-
52
-
53
-
54
-
55
-
56
-
57
-
58
-
59
-
60
-
61
-
62
-
63
-
64
-
65
-
66
-
67
-
68
-
69
-
70
-
71
-
72
-
73
-
74
-
75
-
76
-
77
-
78
-
79
-
80
-
81
-
82
-
83
-
84
-
85
-
86
-
87
-
88
 |
 |
