Ricoh 2020D Scanner Reference - Page 39
For a Network TWAIN Scanner, Auto Detect, Scan Size, Cancel, Document, Orientation, Simplex, Auto de
 |
View all Ricoh 2020D manuals
Add to My Manuals
Save this manual to your list of manuals |
Page 39 highlights
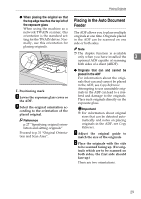
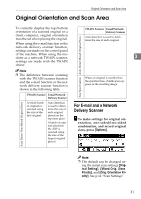
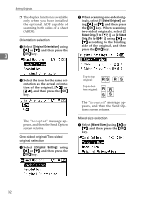
Original Orientation and Scan Area B When originals of the same width and different length are placed, select [On] using {U} or {T}, and then press the {OK} key. For a Network TWAIN Scanner A Open the scanner properties dia- log box. Reference p.66 "Scanning Originals" B Select the position from the [Docu- ment] list in the [Document] area. C The "Accepted" message ap- Select [ / ] or [ / ] in 3 pears, and then the Send Op- the [Orientation:] list. tions screen returns. Note ❒ When [Off] is selected and [Auto Detect] is selected for [Scan Size], if originals of dif- Reference p.27 "Specifying original orientation and setting originals" D When the originals are placed in ferent sizes are placed in the the ADF, select [Simplex] or [Du- ADF, the size of the largest plex] in the [Side:] list. original placed is detected and set as the scan size. For Note originals smaller than this ❒ The duplex function is available size, a blank space will ap- only when you have installed pear in the resulting image. the optional ADF capable of C Press the {Cancel} key. The E-mail screen appears. scanning both sides of a sheet (ARDF). ❒ If originals of different sizes are placed in the ADF, specify the original size or detection meth- od in the [Size:] box. If [Auto de- tection (Uni-size)] is selected, all originals are scanned using the size of the first page. If [Auto de- tection (Multi-size)] is selected, all originals are scanned according to their own width. For both Uni-size and Multi-size, all orig- inals are scanned using their own length. 33
-
 1
1 -
2
-
3
-
4
-
5
-
6
-
7
-
8
-
9
-
10
-
11
-
12
-
13
-
14
-
15
-
16
-
17
-
18
-
19
-
20
-
21
-
22
-
23
-
24
-
25
-
26
-
27
-
28
-
29
-
30
-
31
-
32
-
33
-
 34
34 -
 35
35 -
 36
36 -
 37
37 -
 38
38 -
 39
39 -
 40
40 -
 41
41 -
 42
42 -
 43
43 -
 44
44 -
45
-
46
-
47
-
48
-
49
-
50
-
51
-
52
-
53
-
54
-
55
-
56
-
57
-
58
-
59
-
60
-
61
-
62
-
63
-
64
-
65
-
66
-
67
-
68
-
69
-
70
-
71
-
72
-
73
-
74
-
75
-
76
-
77
-
78
-
79
-
80
-
81
-
82
-
83
-
84
-
85
-
86
-
87
-
88
 |
 |
