Ricoh 2020D Scanner Reference - Page 48
Options, Sender's Name, Op's E-mail Address, Sender's Name Default, Send Settings, Scanner, Features
 |
View all Ricoh 2020D manuals
Add to My Manuals
Save this manual to your list of manuals |
Page 48 highlights
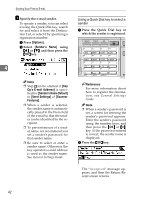
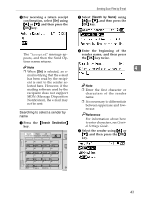
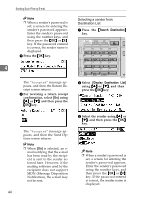
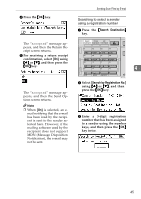
Sending Scan Files by E-mail H Specify the e-mail sender. To specify a sender, you can select it using the Quick Dial key, search for and select it from the Destination List, or select it by specifying a registration number. A Press [Options]. B Select [Sender's Name] using {U} or {T}, and then press the {OK} key. 4 Note ❒ Step Hcan be omitted if [Key Op's E-mail Address] is specified for [Sender's Name Default] in [Send Settings] of [Scanner Features]. ❒ When a sender is selected, the sender name is automatically placed in the From field of the e-mail so that the sender can be identified by the recipient. ❒ To prevent misuse of a sender name, we recommend you set a sender's password for that sender name. ❒ Be sure to select or enter a sender name. Otherwise the key operator's e-mail address is used as the sender name. See General Settings Guide. Using a Quick Dial key to select a sender A Press the Quick Dial key in which the sender is registered. Search Check Job Destination Destination Information 01 ABC 05 MNO 09 YZ 13 02 DEF 06 PQR 10 @@..___ 14 03 GHI 07 STU 11 - & 15 04 JKL 08 VWX 12 16 Shift Space Symbols AAH013S Reference For more information about how to register the destination, see General Settings Guide. Note ❒ When a sender's password is set, a screen for entering the sender's password appears. Enter the sender's password using the number keys, and then press the {OK} or {#} key. If the password entered is correct, the sender name is displayed. B Press the {OK} key. The "Accepted" message appears, and then the Return Receipt screen returns. 42
-
 1
1 -
2
-
3
-
4
-
5
-
6
-
7
-
8
-
9
-
10
-
11
-
12
-
13
-
14
-
15
-
16
-
17
-
18
-
19
-
20
-
21
-
22
-
23
-
24
-
25
-
26
-
27
-
28
-
29
-
30
-
31
-
32
-
33
-
34
-
35
-
36
-
37
-
38
-
39
-
40
-
41
-
42
-
 43
43 -
 44
44 -
 45
45 -
 46
46 -
 47
47 -
 48
48 -
 49
49 -
 50
50 -
 51
51 -
 52
52 -
 53
53 -
54
-
55
-
56
-
57
-
58
-
59
-
60
-
61
-
62
-
63
-
64
-
65
-
66
-
67
-
68
-
69
-
70
-
71
-
72
-
73
-
74
-
75
-
76
-
77
-
78
-
79
-
80
-
81
-
82
-
83
-
84
-
85
-
86
-
87
-
88
 |
 |
