Ricoh 2020D Scanner Reference - Page 43
Procedure for Sending by E, Scanner, Clear Modes, Options, Cancel
 |
View all Ricoh 2020D manuals
Add to My Manuals
Save this manual to your list of manuals |
Page 43 highlights
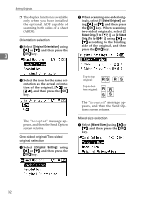
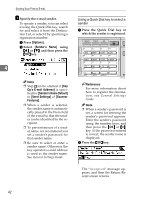
Sending Scan Files by E-mail Sending Scan Files by E-mail Procedure for Sending by Email Scan files are sent after specifying scan settings and destinations. D Make sure that no previous set- tings remain. Note ❒ If a previous setting remains, press the {Clear Modes} key. A Press the {Scanner} key. Search Check Job Destination Destination Information E Place the original, and then make the scan settings and settings for orientation if necessary. 01 ABC 05 02 DEF 06 03 GHI 07 04 JKL 08 Reference p.12 "Scan Settings" 4 p.27 "Setting Originals" MNO 09 YZ 13 PQR 10 @@..___ 14 STU 11 - & 15 VWX 12 16 Making the settings A Press [Options]. Shift Space Symbols AAH012S B If the user codes are set, enter a user code using the number keys, and then press the {#} key. B Select items such as resolution and original size using {U} or {T}, and then change their settings. The initial scanner screen appears. Reference For information about user codes, see General Settings Guide. C If the Network Delivery Scanner screen appears, press [ ] to switch to the E-mail screen. The E-mail screen appears. Scan settings can be made in the same way as default scan settings. See p.12 "Scan Settings". C Press the {Cancel} key. The E-mail screen appears. F Specify the destination To specify a destination, you can select it using the Quick Dial key, search for and select it from the Destination List, select it by specifying a registration number, or enter the e-mail address directly. 37
-
 1
1 -
2
-
3
-
4
-
5
-
6
-
7
-
8
-
9
-
10
-
11
-
12
-
13
-
14
-
15
-
16
-
17
-
18
-
19
-
20
-
21
-
22
-
23
-
24
-
25
-
26
-
27
-
28
-
29
-
30
-
31
-
32
-
33
-
34
-
35
-
36
-
37
-
 38
38 -
 39
39 -
 40
40 -
 41
41 -
 42
42 -
 43
43 -
 44
44 -
 45
45 -
 46
46 -
 47
47 -
 48
48 -
49
-
50
-
51
-
52
-
53
-
54
-
55
-
56
-
57
-
58
-
59
-
60
-
61
-
62
-
63
-
64
-
65
-
66
-
67
-
68
-
69
-
70
-
71
-
72
-
73
-
74
-
75
-
76
-
77
-
78
-
79
-
80
-
81
-
82
-
83
-
84
-
85
-
86
-
87
-
88
 |
 |
