Samsung SGH-A847 User Manual (user Manual) (ver.f8) (English) - Page 86
Set as, Delete, Save as, Effects, Adjust, Transform, Insert, Shortcuts, Camera, Camcorder, Rename - unlock
 |
View all Samsung SGH-A847 manuals
Add to My Manuals
Save this manual to your list of manuals |
Page 86 highlights
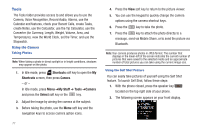
• Set as: allows you to set the photo as your wallpaper on your Main Display, Front Display, or set the photo as a Caller ID for a contact. • Delete: allows you to delete the photo you have taken. • Rename: allows you to rename the photo. • Edit: allows you to edit the photo reloading the photo in edit mode and bringing up a set of options consisting of: - Save as: allows you to change the name of the image. - Effects: allows you to choose effects such as Filter, Style, Warp, and Partial Blur. - Adjust: allows you to make adjustments on the Brightness, Contrast, or Color of the photo. - Transform: allows you to Resize, Rotate, or Flip the photo. - Crop: allows you to move the Navigation key to select the portion of the image you want to crop. - Insert: allows you to add Frames, Cliparts, Emoticon, or Text to a photo. - Set as: allows you to set the photo as wallpaper for the Main Display, Cover Display, or assign it to a Caller ID. - Send: allows you to send the photo using a Multimedia Message, send to Mobile Share, or send to a Bluetooth device. • More: provides access to the following options: - Slide Show: allows you create a slide show of graphics in your Pictures folder. - Lock/Unlock: allows you to lock/unlock the photo. Lock prevents deletion, unlock allows deletion. 81 - Bluetooth Visibility: allows you to enable visibility to Bluetooth devices. - Print via: allows you to print the photo using a USB or Bluetooth connection. - Properties: allows you to view the properties of a photo. Using the Camcorder Shooting Video Tip: When shooting video in direct sunlight or in bright conditions, it is recommended that you provide your subject with sufficient light by having the light source behind you. 1. In Idle mode, press the Shortcuts soft key to open the My Shortcuts screen. 2. From the on screen list choose Camera and press the key. 3. Press the - or - key twice to switch to the camcorder. Press the Menu soft key, which activates the icons across the top of the display, use the navigation keys to select the icon, then select the Camcorder option from the drop down list. 4. Adjust the image by aiming the camcorder at the subject.
-
 1
1 -
2
-
3
-
4
-
5
-
6
-
7
-
8
-
9
-
10
-
11
-
12
-
13
-
14
-
15
-
16
-
17
-
18
-
19
-
20
-
21
-
22
-
23
-
24
-
25
-
26
-
27
-
28
-
29
-
30
-
31
-
32
-
33
-
34
-
35
-
36
-
37
-
38
-
39
-
40
-
41
-
42
-
43
-
44
-
45
-
46
-
47
-
48
-
49
-
50
-
51
-
52
-
53
-
54
-
55
-
56
-
57
-
58
-
59
-
60
-
61
-
62
-
63
-
64
-
65
-
66
-
67
-
68
-
69
-
70
-
71
-
72
-
73
-
74
-
75
-
76
-
77
-
78
-
79
-
80
-
 81
81 -
 82
82 -
 83
83 -
 84
84 -
 85
85 -
 86
86 -
 87
87 -
 88
88 -
 89
89 -
 90
90 -
 91
91 -
92
-
93
-
94
-
95
-
96
-
97
-
98
-
99
-
100
-
101
-
102
-
103
-
104
-
105
-
106
-
107
-
108
-
109
-
110
-
111
-
112
-
113
-
114
-
115
-
116
-
117
-
118
-
119
-
120
-
121
-
122
-
123
-
124
-
125
-
126
-
127
-
128
-
129
-
130
-
131
-
132
-
133
-
134
-
135
-
136
-
137
-
138
-
139
-
140
-
141
-
142
-
143
-
144
-
145
-
146
-
147
-
148
-
149
-
150
-
151
-
152
-
153
-
154
-
155
-
156
-
157
-
158
-
159
-
160
-
161
-
162
-
163
-
164
-
165
-
166
-
167
-
168
-
169
-
170
-
171
-
172
-
173
-
174
-
175
-
176
-
177
-
178
-
179
-
180
-
181
-
182
-
183
-
184
-
185
-
186
-
187
 |
 |
