Samsung SPH-M390 User Manual Ver.fg2_f2 (English(north America)) - Page 41
Secret Contacts, Groups, Adding a Group
 |
View all Samsung SPH-M390 manuals
Add to My Manuals
Save this manual to your list of manuals |
Page 41 highlights
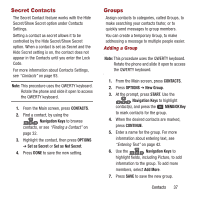
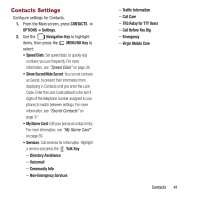
Secret Contacts The Secret Contact feature works with the Hide Secret/Show Secret option under Contacts Settings. Setting a contact as secret allows it to be controlled by the Hide Secret/Show Secret option. When a contact is set as Secret and the Hide Secret setting is on, the contact does not appear in the Contacts until you enter the Lock Code. For more information about Contacts Settings, see "Contacts" on page 93. Note: This procedure uses the QWERTY keyboard. Rotate the phone and slide it open to access the QWERTY keyboard. 1. From the Main screen, press CONTACTS. 2. Find a contact, by using the Navigation Keys to browse contacts, or see "Finding a Contact" on page 32. 3. Highlight the contact, then press OPTIONS ➔ Set as Secret or Set as Not Secret. 4. Press DONE to save the new setting. Groups Assign contacts to categories, called Groups, to make searching your contacts faster, or to quickly send messages to group members. You can create a temporary Group, to make addressing a message to multiple people easier. Adding a Group Note: This procedure uses the QWERTY keyboard. Rotate the phone and slide it open to access the QWERTY keyboard. 1. From the Main screen, press CONTACTS. 2. Press OPTIONS ➔ New Group. 3. At the prompt, press START. Use the Navigation Keys to highlight contact(s), and press the MENU/OK Key to mark contacts for the group. 4. When the desired contacts are marked, press CONTINUE. 5. Enter a name for the group. For more information about entering text, see "Entering Text" on page 42. 6. Use the Navigation Keys to highlight fields, including Picture, to add information to the group. To add more members, select Add More. 7. Press SAVE to save the new group. Contacts 37
-
 1
1 -
2
-
3
-
4
-
5
-
6
-
7
-
8
-
9
-
10
-
11
-
12
-
13
-
14
-
15
-
16
-
17
-
18
-
19
-
20
-
21
-
22
-
23
-
24
-
25
-
26
-
27
-
28
-
29
-
30
-
31
-
32
-
33
-
34
-
35
-
 36
36 -
 37
37 -
 38
38 -
 39
39 -
 40
40 -
 41
41 -
 42
42 -
 43
43 -
 44
44 -
 45
45 -
 46
46 -
47
-
48
-
49
-
50
-
51
-
52
-
53
-
54
-
55
-
56
-
57
-
58
-
59
-
60
-
61
-
62
-
63
-
64
-
65
-
66
-
67
-
68
-
69
-
70
-
71
-
72
-
73
-
74
-
75
-
76
-
77
-
78
-
79
-
80
-
81
-
82
-
83
-
84
-
85
-
86
-
87
-
88
-
89
-
90
-
91
-
92
-
93
-
94
-
95
-
96
-
97
-
98
-
99
-
100
-
101
-
102
-
103
-
104
-
105
-
106
-
107
-
108
-
109
-
110
-
111
-
112
-
113
-
114
-
115
-
116
-
117
-
118
-
119
-
120
-
121
-
122
-
123
-
124
-
125
-
126
-
127
-
128
-
129
-
130
-
131
-
132
-
133
 |
 |