Sony DPP-FP90 Instruction Manual
Sony DPP-FP90 Manual
 |
View all Sony DPP-FP90 manuals
Add to My Manuals
Save this manual to your list of manuals |
Sony DPP-FP90 manual content summary:
- Sony DPP-FP90 | Instruction Manual - Page 1
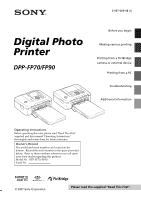
(1) Digital Photo Printer DPP-FP70/FP90 Before you begin Making various printing Printing from a PictBridge camera or external device Printing from a PC Troubleshooting Additional information Operating Instructions Before operating this unit, please read "Read This First" supplied and this manual - Sony DPP-FP90 | Instruction Manual - Page 2
Sony Customer Information Services Center 1-800-222-SONY (7669) The number below is for the FCC related matters only. Regulatory Information Declaration of Conformity Trade Name: SONY Model No.: DPP-FP70 Responsible Party: Address: Sony the instructions, may picture of this digital photo printer - Sony DPP-FP90 | Instruction Manual - Page 3
contact your nearest Sony service station. Duplication, edition, or printing of a CD, TV programs, copyrighted materials such as pictures or publications, or to the copyright holder's claim for damages. When using photo images with this printer, pay special attention not to infringe the provisions of - Sony DPP-FP90 | Instruction Manual - Page 4
Gailly and Mark Adler Program © 2007 Sony Corporation Documentation ©2007 Sony Corporation All rights reserved. This manual or the software described herein, in whole or in part used in this manual The illustrations and screen status used in this manual are of the DPP-FP70 unless noted otherwise. - Sony DPP-FP90 | Instruction Manual - Page 5
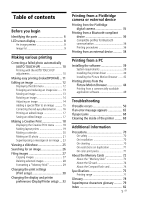
39 Installing the printer driver 40 Installing the Picture Motion Browser ...... 42 Printing photos from the Picture Motion Browser 44 Printing from a commercially-available application software 49 Troubleshooting If trouble occurs 50 If an error message appears 65 If paper jams 68 Cleaning - Sony DPP-FP90 | Instruction Manual - Page 6
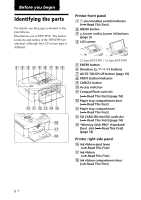
(page 9) 4 LCD screen 2.5 type DPP-FP70 / 3.6 type DPP-FP90 5 ENTER button 6 Direction (f/F/g/G) buttons 7 AUTO TOUCH-UP button (page 10) 8 PRINT button/indicator 9 CANCEL button 0 Access indicator qa CompactFlash card slot (.Read This First) (page 74) qs Paper tray compartment door (.Read This - Sony DPP-FP90 | Instruction Manual - Page 7
, close it to its original position. Notes • When you bring the printer, make sure to remove memory cards, external device, and paper tray. Otherwise malfunctions may occur. • When using the DPP-FP90, set the LCD panel to its original position. 2 Ventilation holes 3 DC IN 24V jack (.Read This First - Sony DPP-FP90 | Instruction Manual - Page 8
of the selected images/ Total number of image 3 Ink ribbon indication (P: P size/C: Cleaning cartridge) 4 Image number (folder- file number)* (* 7 Print quantity You can set the print quantity up to 20. • To increase the print quantity one by one, press f repeatedly. • To reduce the print quantity - Sony DPP-FP90 | Instruction Manual - Page 9
Before you begin Image list DPP-FP70 DPP-FP90 Switching the screen display between an image preview and image list You can switch an image preview and the image list as follows: • To display - Sony DPP-FP90 | Instruction Manual - Page 10
Making various printing Correcting a failed photo automatically (AUTO TOUCH-UP) What is "AUTO TOUCH-UP" feature? In this case, use Red-eye correction to make red-eye adjustments manually (page 16). The automatic red-eye correction of this printer uses the technology of FotoNation Inc. in the U.S.A. - Sony DPP-FP90 | Instruction Manual - Page 11
For how to preset images for printing, see the manual of your digital camera. • Some types of digital cameras do not support the DPOF function, or the printer may not support some of the functions of the digital camera. Buttons to be used in easy printing g/G/f/F/ENTER CANCEL MENU 1 Press MENU on - Sony DPP-FP90 | Instruction Manual - Page 12
the printer. The menu bar is displayed. Edit menu icon Menu bar Tips • Even if the remaining volume of the ink ribbon is shorter than the print quantity, you can proceed with printing. If the ink ribbon runs out in the middle of printing and a message appears, follow the displayed instructions to - Sony DPP-FP90 | Instruction Manual - Page 13
Making various printing Cursor Edit menu Items / Procedures Increases or reduces the size of an image by pressing the buttons on the printer. Moves an image. Rotates an image. Adjusts the picture quality of an image. Adds an filter to an image. Reduces the red-eye phenomenon. Undoes the - Sony DPP-FP90 | Instruction Manual - Page 14
G to make the picture bluish or g to make it reddish. • Saturation: Press G to deepen the colors or g to lighten the colors. • Sharpness: Press G to sharpen the outlines or g to soften them. 5 Press ENTER. The adjustment takes effect. The Edit menu appears again. Tip To print the image previewed - Sony DPP-FP90 | Instruction Manual - Page 15
Cross Filter: Adds a cross, starburst effect to the light source to print an image with sparkling impression. • Partial Color: Makes the surroundings of a black and white picture. • Paint: Makes the image look like a painted picture. • Fish-eye: Makes the image look like a photo taken with a fish- - Sony DPP-FP90 | Instruction Manual - Page 16
phenomenon of a subject shot by flash, you can adjust it manually. Note If you perform additional editing, such as enlarging, reducing the size by pressing (zoom in) or (zoom out) buttons on the printer. Tip Make the size of the adjustment frame two to seven times as print the image previewed, press - Sony DPP-FP90 | Instruction Manual - Page 17
PRINT to start printing. The image previewed is printed. Tip When you select "External Device", a dialog box for selecting a drive may be displayed. Follow the instructions do not turn off the printer or remove a memory card or an external device from the printer. The printer, memory card, USB card, - Sony DPP-FP90 | Instruction Manual - Page 18
saved in a memory card or an external device, you can make the following prints: Menu You can make... Layout Print A print with 2/4/9/13/16 split images. Calendar Calendars with your favorite images. ID Photo An ID photo by specifying vertical and horizontal sizes for an image. Superimpose - Sony DPP-FP90 | Instruction Manual - Page 19
adjusting the image position is displayed. Adjustment tools Making various printing 3 Press g/G/f/F to select the desired template, then press adjusts a failed photo having problems such as backlit, out-of-focus, or redeye phenomenon, by pressing the button on the printer. Tip You can - Sony DPP-FP90 | Instruction Manual - Page 20
image area. When you select a template with multiple images, repeat the steps 4 through 7 to select an image for each area. Tip To save or print the layout images previewed, see page 17. Image area Calendar area Making a calendar You can make calendars with your favorite images. 1 Display the - Sony DPP-FP90 | Instruction Manual - Page 21
the desired vertical and horizontal sizes for an image to be printed as an photo for an identification card such as a passport or a small photo stand. 1 Display the Creative Print menu (page 18). 2 Press g/G/f/F to select "ID Photo", then press ENTER. The window used for setting the height and - Sony DPP-FP90 | Instruction Manual - Page 22
a monochrome picture. Corrects the red-eye phenomenon. (Page 16) AUTO TOUCH-UP Automatically adjusts a failed photo having problems such as backlit, out-of-focus, or redeye phenomenon, by pressing the button on the printer. 9 Press g/G to select and press ENTER. The preview of the ID photo print is - Sony DPP-FP90 | Instruction Manual - Page 23
characters or illustration, draw them with a black ink pen on a white paper, shoot them with a digital camera, and save them on a memory card. You can also use "Superimpose characters glossary" on page 79. 1 Display the Creative Print menu (page 18). 2 Press g/G/f/F to select "Superimpose - Sony DPP-FP90 | Instruction Manual - Page 24
displayed. To superimpose multiple handwritten characters or preset messages Press g/G to select (Handwritten message) or (Standard format message) and repeat step 4. Tip To save and print the superimposed image previewed, see page 17. 24 GB - Sony DPP-FP90 | Instruction Manual - Page 25
You can perform a slideshow of the images saved in a memory card or an external device. You can also manually print an image being displayed. Buttons to be used in this section g/G/f/F/ENTER PRINT CANCEL MENU 1 Press MENU. The menu bar is displayed. Menu bar Slideshow menu icon To exit the menu - Sony DPP-FP90 | Instruction Manual - Page 26
files (folder and file numbers) that you want to search for: Starting image number Ending image number Tip The above screen is when a Sony Cybershot digital camera is connected. • When you select "By Date": Specify the starting and ending dates of the files that you want to search for: Starting - Sony DPP-FP90 | Instruction Manual - Page 27
to be used in this section g/G/f/F/ENTER CANCEL MENU Making various printing 5 Press ENTER. Searching starts. When the search is complete, the and "By Date", "01" is displayed on the images found to indicate their print quantity. You can easily check the images you selected on the image list. • - Sony DPP-FP90 | Instruction Manual - Page 28
. Note While copying images, do not turn off the printer or remove a memory card or an external device from the printer. The printer, memory card, or USB external device may be damaged or selecting a drive may be displayed. Follow the instructions on the screen to select the destination drive. 28 GB - Sony DPP-FP90 | Instruction Manual - Page 29
• During deleting, do not turn off the printer or remove the memory card. The printer or the memory card may be damaged. Or your digital camera. For the details, see the operating instruction of the digital camera not turn off the printer or remove the memory card. The printer or the memory card - Sony DPP-FP90 | Instruction Manual - Page 30
and 32. Buttons to be used in this section g/G/f/F/ENTER CANCEL MENU 1 Press MENU. The menu bar is displayed. Menu bar Print setup menu icon Note During the Creative Print operations, you cannot select the items except for "Color Setting". (Setting items which cannot be selected and changed are - Sony DPP-FP90 | Instruction Manual - Page 31
and more vivid pictures than the Photo mode. Tip For the images shot by an Exif Print (Exif 2.21)-compliant digital camera, they are adjusted to their optimum picture quality. Notes • Theimagedataisnotcorrected. • WhenprintinginPCmode,theAutoFinePrint4setting with the printer driver has priority - Sony DPP-FP90 | Instruction Manual - Page 32
image is saved with the printer, the date of saving is printed. Prints an image without the date. Adjusts the colors and sharpness of a print. Press g/G to select the more greenish the picture becomes as if it receives green light. The lower you set the level, the darker the picture becomes as if red - Sony DPP-FP90 | Instruction Manual - Page 33
Making various printing Changing the display and printer preferences (Display/ Printer setup) The Display/Printer setup menu allows you to change the display and printer preferences listed on page 34. Buttons to be used in this section g/G/f/F/ENTER CANCEL MENU 1 Press MENU. The menu bar is - Sony DPP-FP90 | Instruction Manual - Page 34
demonstration flash file will be started. Unit In the Creative Print ID photo menu, you can select the unit you use in specifying the sizes of a photo as follows: • cm* • inch Printer Information Version of the firmware and total print number will be displayed. Display Language You can select - Sony DPP-FP90 | Instruction Manual - Page 35
your digital camera ready for printing with a PictBridgecompliant printer. The settings and operations that are necessary before connection differ depending on the digital camera. For details, see the operating instructions of the digital camera you use. (In case of Sony Cyber-shot digital camera - Sony DPP-FP90 | Instruction Manual - Page 36
connecting the Sony DPPA-BT1 Bluetooth USB adaptor to your printer, you can print an image of a Bluetoothcompliant mobile phone, digital camera, or Push Profile) For the profiles that your Bluetooth device supports, please refer to its manual. What is "Profile"? Standards that enable the Bluetooth - Sony DPP-FP90 | Instruction Manual - Page 37
For printing procedures, refer to the manual of the Bluetooth device you use. To select the printer from a Bluetoothcompliant device, select "Sony DPPFP70 ##"/"Sony DPP-FP90 ##". ("##" stands for the two figures from the right of the address displayed in the LCD screen.): When input of Pass code* is - Sony DPP-FP90 | Instruction Manual - Page 38
device ready for printing with the Mass Storage-compliant printer. The settings and operations that are necessary before connection differ depending on the external device you use. For details, see the operating instructions of the external device. (In case of Sony Cyber-shot digital camera, for - Sony DPP-FP90 | Instruction Manual - Page 39
supplied CD-ROM The supplied CD-ROM contains the following software: • Printer driver for DPP-FP70/FP90: The software describes the printer's requirements and enables printing from the PC. • Picture Motion Browser: Sony's original software application that allows you to handle photographs and moving - Sony DPP-FP90 | Instruction Manual - Page 40
can also use the software to write data into an external memory card for taking it outside. Installing the printer driver Follow the procedures below to install the driver. Notes • Before installing the driver, do not connect the printer to the PC . • When using the Windows Vista/XP/2000, log on to - Sony DPP-FP90 | Instruction Manual - Page 41
3m in length. 9 Wait for a while, then check to see that "Sony DPP-FP70" or "Sony DPP-FP90" is added to the "Printers and Faxes". Printing from a PC The setup starts. 5 When "Sony DPP-FP60/70/90 printer driver has been successfully installed." dialog is displayed, click "Finish". 6 Connect the - Sony DPP-FP90 | Instruction Manual - Page 42
. 4 Click "Yes". 5 Check to see that "DPP-FP70" or "DPP-FP90" is removed from the "Printers and Faxes" window. 6 Click "Server Properties" from the "File" menu, and click "Drivers" tab in the "Printers Server Properties" window. 7 Select "Sony DPP-FP70" or "Sony DPP-FP90" from the list box and click - Sony DPP-FP90 | Instruction Manual - Page 43
or Remove Programs." 3 Select "Sony Picture Utility" and click "Change/Remove" . The software uninstallation starts. 4 Click "Finish". Printing from a PC The dialog box you are prompted to restart your PC, follow the displayed instructions to restart it. 9 When the installation is complete, remove - Sony DPP-FP90 | Instruction Manual - Page 44
Printing photos from the Picture Motion Browser 2 Click "Start". You can use the Picture Motion Browser to print an image from your PC using P size print paper. 1 Start the Picture Motion Browser window using either of the following methods: • Double-click (Picture Motion Browser) on the Windows - Sony DPP-FP90 | Instruction Manual - Page 45
the following explanation. 4 Select the photos that you want to print and click (print). The Print dialog box is displayed. 5 In the "Printer" drop-down list box, select "Sony DPP-FP70" or "Sony DPP-FP90". To set the paper orientation or other print options, go to step 6. To print, skip to step 11 - Sony DPP-FP90 | Instruction Manual - Page 46
or other options. 8 Click "Advanced". The "DPP-FP70/FP90 Advanced Options" dialog box is displayed. Items Functions Paper/Output •Paper Size: From the dropdown list box, select the paper size you actually use for printing: P size (post card size)/L size Note: L size print paper is not sold in some - Sony DPP-FP90 | Instruction Manual - Page 47
" tab, specify the color or paper source. Items Functions Tray Selection From the "Paper Source" dropdown list box, elect "Automatically Select". Color To print in colors, select "Color". To print in monochrome, select "Black & White". Advanced The "DPP-FP70/FP90 Advanced Options" dialog box is - Sony DPP-FP90 | Instruction Manual - Page 48
The printing job is canceled. Note Do not remove the job being printed. Doing so may cause paper jam. To register a browsing folder The Picture Motion will also be registered. • When the software is first started, the message prompting you to register "My Pictures" will be displayed. • Depending on - Sony DPP-FP90 | Instruction Manual - Page 49
we suggest you select "ON" for the "Borderless Print" in the "Printer Features" of the "Sony DPP-FP70/FP90 Advanced Options" dialog box as the printer driver setting. Print quantity setting Depending on the application software you use, the print quantity setting of the application you use may have - Sony DPP-FP90 | Instruction Manual - Page 50
Troubleshooting If trouble occurs If you run into any problems using the printer, use the following guidance to solve the problem. If the problem persists, consult your Sony dealer. Power Symptom The 1 (on/ standby) switch cannot be turned on. Check • Is the AC power cord properly connected? - Sony DPP-FP90 | Instruction Manual - Page 51
it may not be printed with the printer even if it is printer can display, save, delete or handle up to 9 999 image files. If there are more than 9 999 images stored in a memory card or an external device, use the PC or PictBridge mode to display and handle the remaining images. Troubleshooting - Sony DPP-FP90 | Instruction Manual - Page 52
printer (read error). • Did you specify the print quantity in the image list? c Once you have selected images in the "Printing multiple images" procedures, you cannot print a digital camera is 3:4. When an image is edited or printed in the P size, it is saved as a more horizontal print image and - Sony DPP-FP90 | Instruction Manual - Page 53
Cause/Solutions • Is the print paper properly c If print paper is not properly loaded, set in the paper tray? the printer may develop trouble. (.Read This First) Check the following: • Insert the correct set of print paper and ink ribbon. • Load the print paper in the correct direction in - Sony DPP-FP90 | Instruction Manual - Page 54
be printed with deteriorated picture quality. • Did you allow dust or c Do not touch the printing surface (the finger prints to get on the shiny-side with no imprint). printed surface? Fingerprints on the printing surface may result in imperfect printing. • Did you use used print paper or ink - Sony DPP-FP90 | Instruction Manual - Page 55
a highly-compressed JPEG file may be also recorded. As the printer does not support the RAW file format, it may use the JPEG file to print an image. A RAW file can be printed from a PC. For details, see the operating instructions of the digital camera you are using. What is a RAW file? A RAW - Sony DPP-FP90 | Instruction Manual - Page 56
displayed.) c Because of the differences in the printer's internal processing and PC software processing, the printed images will be different. c Set "Date Print" in the Print setup menu to "On". (.page 32) c The "Date Print" function of this unit supports an image that is compatible with the DCF - Sony DPP-FP90 | Instruction Manual - Page 57
of trouble with the printer, but because the image was rewritten with your digital camera. c Re-insert the paper tray firmly straight in to the end. cThe print head or paper path may be soiled. Use the supplied cleaning cartridge and sheet to clean the head and path. Troubleshooting Continued - Sony DPP-FP90 | Instruction Manual - Page 58
Symptom Check The picture is too bright, dark, reddish, yellowish, or greenish. The eyes of and "Pattern1/ 2" setting does not take effect. Check • Are you operating the Creative Print menu? Cause/Solutions c In the Creative Print menu, templates are used and you cannot select border/borderless - Sony DPP-FP90 | Instruction Manual - Page 59
external device protected? device to release the protection and try printing again. • Is the image DPOF-preset? c Release the DPOF preset with your digital camera. • Is the write-protect switch c Slide the the write protect switch to the LOCK position. (.page 73) Troubleshooting Continued 59 GB - Sony DPP-FP90 | Instruction Manual - Page 60
as the data processing finishes, the printer starts printing. c Paper is jammed. See "If paper jams" (.page 68) and remove jammed paper from the printer. If jammed paper cannot be removed, contact the Sony service facilities. c If no indicator is lit, the thermal head may be overheated. Leave the - Sony DPP-FP90 | Instruction Manual - Page 61
• Does the firmware of your c See the manual supplied with your digital camera support the camera, or consult with the printer? manufacturer. • Is "Connecting" displayed? c The message is not displayed while the printer is in the Edit, Creative Print, or other menu modes. Exit the menu and - Sony DPP-FP90 | Instruction Manual - Page 62
the memory card or an external device images from the printer. c Please download the printer driver from the Customer support home page (.page 77). Or contact your Sony dealer. c Follow the procedures in the operating instructions to install the driver (.page 40). If an error occurs, restart your - Sony DPP-FP90 | Instruction Manual - Page 63
the printer shows trouble, do the following: 1. Turn off the 1 (on/standby) switch then turn it on again. 2. Disconnect the power cable, wait for 5 to 10 seconds, and then connect the cable again. 3. Restart your computer. If these do not solve the problem, consult with your Sony dealer or service - Sony DPP-FP90 | Instruction Manual - Page 64
in the "Pages Per Sheet" in the "Layout" tab of the "Sony DPPFP70/FP90 Properties" dialog box does not match the actual print quantity and printed results. Colors of the printed image from a PC are different from those printed from a memory card. Cause/Solutions c Depending on the application you - Sony DPP-FP90 | Instruction Manual - Page 65
and on, then retry. c An error has occurred with the printer. Unplug the AC power cord of the printer, connect it again and then try operating again. If this occurs again, consult with your Sony dealer or Sony service facilities. Memory cards and external device Error messages Meaning/Solutions - Sony DPP-FP90 | Instruction Manual - Page 66
External Device has trouble. Write error built-in memory of a digital camera may be write-protected. supported. Meaning/Solutions c A USB device that the printer does not support may be connected. Or, the USB settings of the connected device may be incompatible. Refer to the operating instructions - Sony DPP-FP90 | Instruction Manual - Page 67
in the printer and set the print paper for the identical size. (.Read This First) Paper jam. Remove Print Paper. c Paper jams. See "If paper jams" (.page 68) and remove jammed paper from the printer. If the jammed paper cannot be removed, contact the Sony service facilities. Troubleshooting 67 - Sony DPP-FP90 | Instruction Manual - Page 68
it. 2 Insert the supplied cleaning cartridge into the printer and close the ink ribbon compartment door. Jammed paper 2 Remove the ejected print paper from the printer. 3 Remove the paper tray and ink ribbon from the printer and check to see if there is no jammed print paper inside. Check to see if - Sony DPP-FP90 | Instruction Manual - Page 69
on the print paper and carry out cleaning, which may cause paper jam or other troubles. • If a cleaning does not improve printed picture quality, please carry out cleaning a couple of times. • You cannot clean the printer while it is connected to a PC or a PictBridge camera. 69 GB Troubleshooting - Sony DPP-FP90 | Instruction Manual - Page 70
the ink ribbon, paper tray, AC adaptor, the memory card, or an external device from the printer and put the printer and its peripherals in the original box with the protective packaging. If you no longer have the original box and packing parts, use similar packing material so that the printer will - Sony DPP-FP90 | Instruction Manual - Page 71
the print paper for this printer only. - Do not use the print paper ejected without printed. • Do not print on used sheets of print paper or attempt to rewind the ribbon inside the ink ribbon. Doing so could result in damages to the printer. • Do not remove the paper tray while printing. Additional - Sony DPP-FP90 | Instruction Manual - Page 72
Notes on storing print packs • When you are going to store a partiallyused pack of the ink ribbon and print paper for an extended period of time, store it in its original bag or in a similar container. • When you are going to store print paper in the paper tray, make sure to close the tray cover and - Sony DPP-FP90 | Instruction Manual - Page 73
Digital Printer" from each area page. Notes on use • For the latest information on the "Memory Stick" that the printer supports, see the "Memory Stick" compatibilities information on the Sony web site. • Do not insert multiple "Memory Stick" at the same time, which may cause trouble with the printer - Sony DPP-FP90 | Instruction Manual - Page 74
COMPACT VAULT You can also use the following by using a commercially available CompactFlash card adaptor*5: • Smart Media card*5 • xD-Picture printer's insertion slot. The printer may be damaged. *5 When using a commercially available CompactFlash card adaptor, refer to the operating instructions - Sony DPP-FP90 | Instruction Manual - Page 75
or writing data and the access indicator is flashing. Otherwise, data may be rendered unreadable or erased. Specifications x Printer Printing method Dye sublimation printing (Yellow/ Magenta/Cyan 3 pass) Resolution 300 (H) x 300 (V) dpi Image processing per dot 256 levels processing (8 bits - Sony DPP-FP90 | Instruction Manual - Page 76
: Approx. 169 mm ( 6 3/4 inches) longer than the above depth. Mass DPP-FP70: Approx. 1.1 kg (2 lb 7 oz) DPP-FP90: Approx. 1.2 kg (2 lb 10 oz) (excluding the paper tray, ink ribbon, AC power adaptor) Supplied accessories See supplied "Read This First". x AC power adaptor AC-S2422 Power - Sony DPP-FP90 | Instruction Manual - Page 77
Information Display" of the "Display/Printer setup" menu (page 34). *1: Print Settings: Borderless, No time stamp, AutoFine Print 4: ON (Photo) *2: When printing a photo (4.22 MB file size) taken by a Sony digital still camera containing effective picture elements of approximately 10,100,000 or - Sony DPP-FP90 | Instruction Manual - Page 78
-use printer. The printer supports DPOF printing and can automatically print the preset number of copies of the DPOF preset images. Exif 2.21 (Exif Print) Exif (Exchangeable image file format for digital cameras) Print is a global standard for digital photo printing. A digital camera supporting Exif - Sony DPP-FP90 | Instruction Manual - Page 79
Superimpose characters glossary You can use the characters here to superimpose onto an image. Please take a picture of the desired characters in advance, and follow the procedures for superimposing handwriting in pages 23 and 24 to trim the necessary portion and superimpose - Sony DPP-FP90 | Instruction Manual - Page 80
80 GB - Sony DPP-FP90 | Instruction Manual - Page 81
Additional information 81 GB - Sony DPP-FP90 | Instruction Manual - Page 82
29 Front panel 6 H Handle 7 I Icon 34 ID photo 21 Image data display 8 Image list 9 Image preview 8 Index printing 11 Ink ribbon Notes on use 71 Input indications 8 Installing Picture Motion Browser 42 Printer driver 40 L Language 34 Layout print 19 LCD backlight 34 LCD screen 8 Listing Order 34 - Sony DPP-FP90 | Instruction Manual - Page 83
Searching for an image 26 Sepia 15 Setting the print quantity 8 Slideshow 25 Special filter 15 Specifications 75 Superimposing 23 Switching the screen display 9 System requirement 39 T Troubleshooting 50 U Uninstalling Picture Motion Browser 43 Printer driver 42 Unit 34 USB memory 38 W Write-protect - Sony DPP-FP90 | Instruction Manual - Page 84
Printed using VOC (Volatile Organic Compound)-free vegetable oil based ink. Sony Corporation Printed in China
-
 1
1 -
 2
2 -
 3
3 -
 4
4 -
 5
5 -
 6
6 -
 7
7 -
8
-
9
-
10
-
11
-
12
-
13
-
14
-
15
-
16
-
17
-
18
-
19
-
20
-
21
-
22
-
23
-
24
-
25
-
26
-
27
-
28
-
29
-
30
-
31
-
32
-
33
-
34
-
35
-
36
-
37
-
38
-
39
-
40
-
41
-
42
-
43
-
44
-
45
-
46
-
47
-
48
-
49
-
50
-
51
-
52
-
53
-
54
-
55
-
56
-
57
-
58
-
59
-
60
-
61
-
62
-
63
-
64
-
65
-
66
-
67
-
68
-
69
-
70
-
71
-
72
-
73
-
74
-
75
-
76
-
77
-
78
-
79
-
80
-
81
-
82
-
83
-
84
 |
 |
3-097-069-
13
(1)
2007 Sony Corporation
Operating Instructions
Before operating this unit, please read "Read This First"
supplied and this manual "Operating Instructions"
thoroughly and retain them for future reference.
Owner’s Record
The model and serial numbers are located on the
bottom.
Record the serial number in the space provided
below.
Refer to these numbers whenever you call upon
your Sony dealer regarding this product.
Model No.
DPP-FP70/FP90
Serial No.
Digital Photo
Printer
DPP-FP70/FP90
Before you begin
Making various printing
Printing from a PictBridge
camera or external device
Printing from a PC
Troubleshooting
Additional information
Please read the supplied "Read This First"
.