Sony DPP-FP90 Instruction Manual - Page 31
Settings, Contents, Making various printing - drivers
 |
View all Sony DPP-FP90 manuals
Add to My Manuals
Save this manual to your list of manuals |
Page 31 highlights
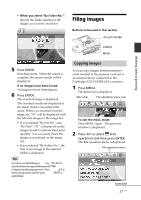
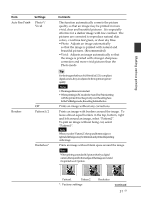
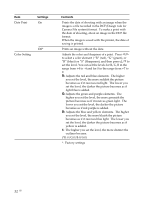
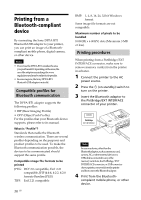
Making various printing Item Auto Fine Print4 Settings Photo*/ Vivid Borders Off Pattern1/2 Borderless* Contents The function automatically corrects the picture quality so that an image may be printed in more vivid, clear and beautiful pictures. It is especially effective for a darker image with low contrast. The pictures are corrected to reproduce natural skin colors, vivid tree leaf green, or clear sky blue. •Photo: Adjusts an image automatically so that the image is printed with natural and beautiful pictures. (Recommended) •Vivid: Adjusts an image automatically so that the image is printed with stronger sharpness correction and more vivid pictures than the Photo mode. Tip For the images shot by an Exif Print (Exif 2.21)-compliant digital camera, they are adjusted to their optimum picture quality. Notes • Theimagedataisnotcorrected. • WhenprintinginPCmode,theAutoFinePrint4setting with the printer driver has priority over the setting here. In the PictBridge mode, this setting holds effective. Prints an image without any corrections. Prints an image with borders around the image. To leave almost-equal borders in the top, bottom, right and left around an image, select "Pattern2". To pint an image without being cut, select "Pattern1". Note When you select "Pattern 2", the top and bottom edges or right and left edges may be trimmed and printed depending on the image. Prints an image without blank space around the image. Note When printing a standard 4:3 picture shot by a digital camera, the top and bottom edges of the image are cut and it is printed as a 3:2 picture. Pattern1 Pattern 2 *: Factory settings Borderless Continued 31 GB
-
 1
1 -
2
-
3
-
4
-
5
-
6
-
7
-
8
-
9
-
10
-
11
-
12
-
13
-
14
-
15
-
16
-
17
-
18
-
19
-
20
-
21
-
22
-
23
-
24
-
25
-
 26
26 -
 27
27 -
 28
28 -
 29
29 -
 30
30 -
 31
31 -
 32
32 -
 33
33 -
 34
34 -
 35
35 -
 36
36 -
37
-
38
-
39
-
40
-
41
-
42
-
43
-
44
-
45
-
46
-
47
-
48
-
49
-
50
-
51
-
52
-
53
-
54
-
55
-
56
-
57
-
58
-
59
-
60
-
61
-
62
-
63
-
64
-
65
-
66
-
67
-
68
-
69
-
70
-
71
-
72
-
73
-
74
-
75
-
76
-
77
-
78
-
79
-
80
-
81
-
82
-
83
-
84
 |
 |