Sony DPP-FP90 Instruction Manual - Page 6
Before you begin, Identifying the parts - ink
 |
View all Sony DPP-FP90 manuals
Add to My Manuals
Save this manual to your list of manuals |
Page 6 highlights
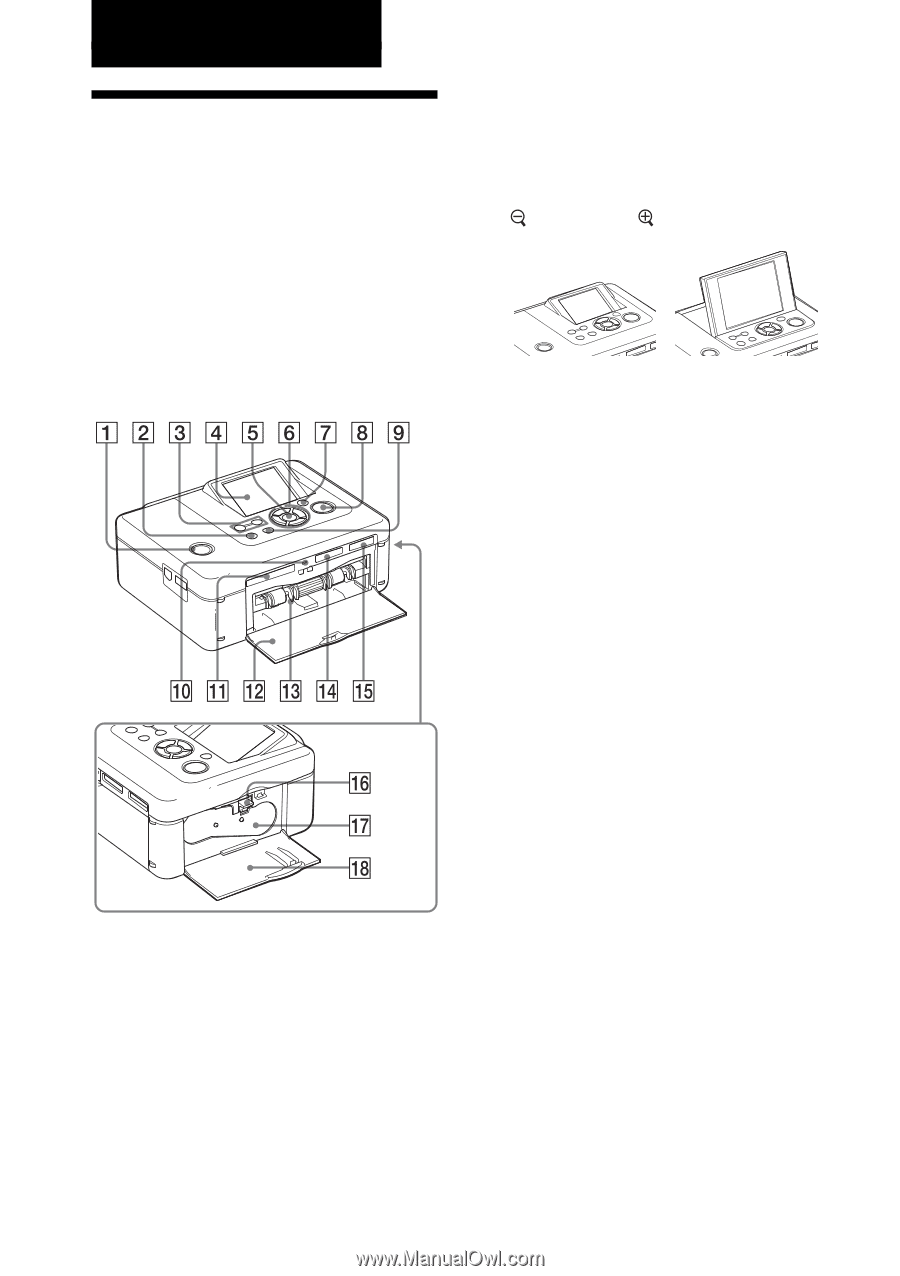
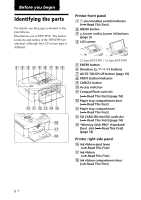
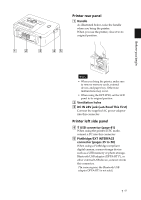
Before you begin Identifying the parts For details, see the pages indicated in the parentheses. Illustrations are of DPP-FP70. The button locations and names of the DPP-FP90 are identical, although the LCD screen type is different. Printer front panel 1 1 (on/standby) switch/indicator (.Read This First) 2 MENU button 3 (zoom out)/ (zoom in) buttons (page 9) 4 LCD screen 2.5 type DPP-FP70 / 3.6 type DPP-FP90 5 ENTER button 6 Direction (f/F/g/G) buttons 7 AUTO TOUCH-UP button (page 10) 8 PRINT button/indicator 9 CANCEL button 0 Access indicator qa CompactFlash card slot (.Read This First) (page 74) qs Paper tray compartment door (.Read This First) qd Paper tray compartment (.Read This First) qf SD CARD (SD/miniSD card) slot (.Read This First) (page 74) qg "Memory Stick PRO" (Standard/ Duo) slot (.Read This First) (page 72) Printer right side panel qh Ink ribbon eject lever (.Read This First) qj Ink ribbon (.Read This First) qk Ink ribbon compartment door (.Read This First) 6 GB
-
 1
1 -
 2
2 -
 3
3 -
 4
4 -
 5
5 -
 6
6 -
 7
7 -
 8
8 -
 9
9 -
 10
10 -
 11
11 -
 12
12 -
13
-
14
-
15
-
16
-
17
-
18
-
19
-
20
-
21
-
22
-
23
-
24
-
25
-
26
-
27
-
28
-
29
-
30
-
31
-
32
-
33
-
34
-
35
-
36
-
37
-
38
-
39
-
40
-
41
-
42
-
43
-
44
-
45
-
46
-
47
-
48
-
49
-
50
-
51
-
52
-
53
-
54
-
55
-
56
-
57
-
58
-
59
-
60
-
61
-
62
-
63
-
64
-
65
-
66
-
67
-
68
-
69
-
70
-
71
-
72
-
73
-
74
-
75
-
76
-
77
-
78
-
79
-
80
-
81
-
82
-
83
-
84
 |
 |