Sony SNC-RZ50N User Guide - Page 36
Initialize Tab, OK/Cancel, Reboot, Factory default, Backup setting data, Restore setting - reset
 |
UPC - 027242240377
View all Sony SNC-RZ50N manuals
Add to My Manuals
Save this manual to your list of manuals |
Page 36 highlights
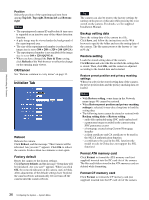
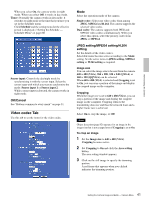
Administrating the Camera Position Select the position of the superimposed item from among Top-left, Top-right, Bottom-left and Bottomright Notes • The superimposed camera ID and/or date & time area is regarded as an inactive area of the object detection function. • A pale image may be viewed under the background of the superimposed area. • The size of the superimposed number is reduced if the image size is set to 384 × 288 or 320 × 240 (QVGA). • The superimposed number is not readable if the image size is set to 160 × 120 (QQVGA). • When you have changed the Date & Time setting, click Refresh of the Web browser to reflect the change on the opening main viewer. OK/Cancel See "Buttons common to every menu" on page 31. Initialize Tab Reboot Reboots the camera. Click Reboot, and the message "This Camera will be rebooted. Are you sure?" appears. Click OK to reboot the camera. It takes about two minutes to start again. Factory default Resets the camera to the factory settings. Click Factory default, and the message "Setup data will be initialized. Are you sure?" appears. When you click OK, the network indicator on the camera starts to blink. After adjustments of the default settings have finished, the camera reboots automatically. Do not turn off the camera until the camera reboots. Tip The camera can also be reset to the factory settings by turning on the power of this unit while pressing the reset switch on the camera. For details, see the supplied Installation Manual. Backup setting data Saves the setting data of the camera in a file. Click Save, and follow the instructions on the Web browser to specify the folder and save the setting data of the camera. The file name preset at the factory is "sncrz50.cfg." Restore setting Loads the stored setting data of the camera. Click Browse and select the file in which the setting data is stored. Then, click OK, and the camera is adjusted according to the loaded data and restarted. Restore preset position and privacy masking settings When you select it, the stored setting data of the camera, the preset position data and the privacy masking data are loaded. Notes • With Restore setting, some items in the Network menu (page 44) cannot be restored. • When Restore preset position and privacy masking settings is selected, it may take a long time to load the setting data. • The following items cannot be stored or restored with Backup setting data or Restore setting. - audio files uploaded using SNC audio upload tool - a panorama image recorded in the camera using SNC panorama creator - a homepage created using Custom Homepage Installer - a client certificate and CA certificate to be used in the 802.1X authentication function - a certificate to be used in the SSL function (the model on sale in China does not support the SSL function.) Format ATA memory card Click Format to format the ATA memory card (not supplied) inserted into the PC card slot of the camera. The files and folders stored in the ATA memory card are deleted while formatting. Format CF memory card Click Format to format the CF memory card (not supplied) inserted into the CF card slot of the camera. 36 Configuring the System - System Menu
-
 1
1 -
2
-
3
-
4
-
5
-
6
-
7
-
8
-
9
-
10
-
11
-
12
-
13
-
14
-
15
-
16
-
17
-
18
-
19
-
20
-
21
-
22
-
23
-
24
-
25
-
26
-
27
-
28
-
29
-
30
-
 31
31 -
 32
32 -
 33
33 -
 34
34 -
 35
35 -
 36
36 -
 37
37 -
 38
38 -
 39
39 -
 40
40 -
 41
41 -
42
-
43
-
44
-
45
-
46
-
47
-
48
-
49
-
50
-
51
-
52
-
53
-
54
-
55
-
56
-
57
-
58
-
59
-
60
-
61
-
62
-
63
-
64
-
65
-
66
-
67
-
68
-
69
-
70
-
71
-
72
-
73
-
74
-
75
-
76
-
77
-
78
-
79
-
80
-
81
-
82
-
83
-
84
-
85
-
86
-
87
-
88
-
89
-
90
-
91
-
92
-
93
-
94
-
95
-
96
-
97
-
98
-
99
-
100
-
101
-
102
-
103
-
104
-
105
-
106
-
107
-
108
-
109
-
110
-
111
-
112
-
113
-
114
-
115
-
116
-
117
-
118
-
119
-
120
 |
 |
