Sony SNC-RZ50N User Guide - Page 38
Setting the Camera Image and Audio - Camera Menu, Common Tab, Camera Menu - network color camera
 |
UPC - 027242240377
View all Sony SNC-RZ50N manuals
Add to My Manuals
Save this manual to your list of manuals |
Page 38 highlights
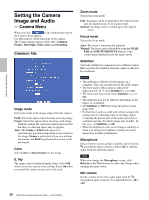
Administrating the Camera Setting the Camera Image and Audio - Camera Menu When you click in the Administrator menu, the Camera menu appears. Use this menu to set the functions of the camera. The Camera menu consists of five tabs: Common, Picture, Day/Night, Video codec and Streaming. Common Tab Image mode Selects the mode of the image output from the camera. Field: Select this option when shooting a moving image. Frame: Select this option when shooting a still image. With this setting, the vertical resolution increases but the edge of a moving object may be jagged. Auto: The Frame or Field mode process is automatically performed depending on movement in the image. Frame is performed for an area without movement, and Field is performed for an area with movement. Color Select Color or Monochrome for the image. E. flip The image can be displayed upside down. Select Off when you fix the camera to the ceiling. Select On when you install the camera on the rack or the desk. Zoom mode Selects the zoom mode. Full: An image can be zoomed up to 26× optical zoom and 12× digital zoom, 312× zoom in total. Optical: An image can be zoomed up to 26× optical zoom. Focus mode Selects the focus mode. Auto: The focus is automatically adjusted. Manual: The focus can be adjusted by using the NEAR, FAR and ONE PUSH FOCUS buttons of the control panel displayed from the main viewer. Stabilizer Select the stabilizer to compensate for oscillation. Select On to activate the stabilizer when the camera is affected by oscillation. Notes • The stabilizer is effective for the images on a computer. They are not effective for the video output. • The view angle of the camera is reduced by approximately 10 % when Stabilizer is set to On. • The frame rate lowers half when Stabilizer is set to On. • The stabilizer may not be effective depending on the degree of oscillation. • Set Stabilizer to Off when using the privacy mask (page 105). • If a flat object such as a solid wall or floor occupies the greater part of a shooting scene or if a large object occupying the greater part of the scene passes by or continues moving, the whole image may tremble. In this case, set Stabilizer to Off. • When the brightness of the scene changes suddenly or when you change the brightness setting, the whole image may tremble momentarily. Microphone Select whether you are going to send the audio from the m microphone input connector. Select On to send the audio from this network camera. Note When you change the Microphone setting, click Refresh on the Web browser to reflect the change when opening the main viewer. Mic volume Set the volume level of the audio input from the m microphone input connector. It is adjustable from -10 to +10. 38 Setting the Camera Image and Audio - Camera Menu
-
 1
1 -
2
-
3
-
4
-
5
-
6
-
7
-
8
-
9
-
10
-
11
-
12
-
13
-
14
-
15
-
16
-
17
-
18
-
19
-
20
-
21
-
22
-
23
-
24
-
25
-
26
-
27
-
28
-
29
-
30
-
31
-
32
-
 33
33 -
 34
34 -
 35
35 -
 36
36 -
 37
37 -
 38
38 -
 39
39 -
 40
40 -
 41
41 -
 42
42 -
 43
43 -
44
-
45
-
46
-
47
-
48
-
49
-
50
-
51
-
52
-
53
-
54
-
55
-
56
-
57
-
58
-
59
-
60
-
61
-
62
-
63
-
64
-
65
-
66
-
67
-
68
-
69
-
70
-
71
-
72
-
73
-
74
-
75
-
76
-
77
-
78
-
79
-
80
-
81
-
82
-
83
-
84
-
85
-
86
-
87
-
88
-
89
-
90
-
91
-
92
-
93
-
94
-
95
-
96
-
97
-
98
-
99
-
100
-
101
-
102
-
103
-
104
-
105
-
106
-
107
-
108
-
109
-
110
-
111
-
112
-
113
-
114
-
115
-
116
-
117
-
118
-
119
-
120
 |
 |
