Sony SNC-RZ50N User Guide - Page 57
CA certificate Tab, Setting the 802.1X authentication function - Example of Windows Server 2003
 |
UPC - 027242240377
View all Sony SNC-RZ50N manuals
Add to My Manuals
Save this manual to your list of manuals |
Page 57 highlights
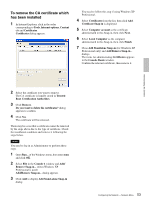
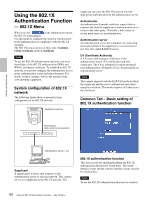
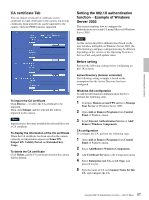
Administrating the Camera CA certificate Tab You can import a trusted CA certificate (server certificate or route certificate) to the camera. Up to four certificates from trusted CAs can be imported to the camera. Only the PEM format is supported. To import the CA certificate Click Browse... to select the CA certificate to be imported. Then click Submit, and the selected file will be imported to the camera. Note Import process becomes invalid if the selected file is not a CA certificate. To display the information of the CA certificate When the CA certificate has been saved in the camera correctly, its information appears on Issuer DN, Subject DN, Validity Period and Extended Key Usage. To delete the CA certificate Click Delete, and the CA certificate stored in the camera will be deleted. Setting the 802.1X authentication function - Example of Windows Server 2003 This section explains how to configure the authentication server and CA using Microsoft Windows Server 2003. Note As this section describes authentication based on the user interface in English on Windows Server 2003, the UI terminology and page configuration may be different depending on the version of the Operating System or Service Pack and patch update status. Before setting Perform the following settings before configuring an 802.1X network. Active Directory (domain controller) The following setting example is based on the assumption that the Active Directory has been configured. Windows IAS configuration To add the IAS (Internet Authentication Service), perform the following steps: 1 Configure Remote access/VPN server in Manage Your Server of Windows Server 2003. 2 Open Add or Remove Programs from Control Panel of Windows menu. 3 Install Internet Authentication Service in Add/ Remove Windows Components. CA configuration To configure the CA, perform the following steps: 1 Open Add or Remove Programs from Control Panel of Windows menu. 2 Select Add/Remove Windows Components. 3 Add Certificate Services in the Component menu. 4 Select Enterprise root CA on CA Type, and proceed to next. 5 Type the name of CA on Common Name for this CA, and configure the CA. 57 Using the 802.1X Authentication Function - 802.1X Menu
-
 1
1 -
2
-
3
-
4
-
5
-
6
-
7
-
8
-
9
-
10
-
11
-
12
-
13
-
14
-
15
-
16
-
17
-
18
-
19
-
20
-
21
-
22
-
23
-
24
-
25
-
26
-
27
-
28
-
29
-
30
-
31
-
32
-
33
-
34
-
35
-
36
-
37
-
38
-
39
-
40
-
41
-
42
-
43
-
44
-
45
-
46
-
47
-
48
-
49
-
50
-
51
-
 52
52 -
 53
53 -
 54
54 -
 55
55 -
 56
56 -
 57
57 -
 58
58 -
 59
59 -
 60
60 -
 61
61 -
 62
62 -
63
-
64
-
65
-
66
-
67
-
68
-
69
-
70
-
71
-
72
-
73
-
74
-
75
-
76
-
77
-
78
-
79
-
80
-
81
-
82
-
83
-
84
-
85
-
86
-
87
-
88
-
89
-
90
-
91
-
92
-
93
-
94
-
95
-
96
-
97
-
98
-
99
-
100
-
101
-
102
-
103
-
104
-
105
-
106
-
107
-
108
-
109
-
110
-
111
-
112
-
113
-
114
-
115
-
116
-
117
-
118
-
119
-
120
 |
 |
