Sony SNC-RZ50N User Guide - Page 60
Personal Information Exchange, Certificate Template - default password
 |
UPC - 027242240377
View all Sony SNC-RZ50N manuals
Add to My Manuals
Save this manual to your list of manuals |
Page 60 highlights
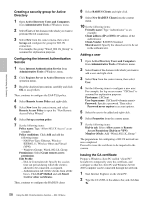
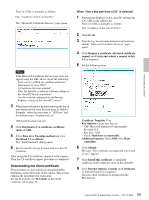
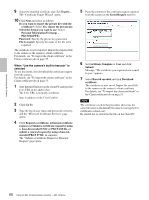
Administrating the Camera 9 Select the installed certificate and click Export.... The "Certificate Export Wizard" opens. 10 Click Next and select as follows. Do you want to export the private key with the certificate?: Select Yes, export the private key. Select the format you want to use: Select Personal Information Exchange - PKCS#12(PFX). Password: Specify the private key password. File to export: Specify the name of the file to be exported. The certificate is now exported. Import the exported file to the camera as the camera's client certificate. For details, see "To import the client certificate" in the Client certificate tab on page 55. When "Use the camera's built-in key pair" is selected To use this mode, first download the certificate request from the camera. For details, see "To import the client certificate" in the Client certificate tab on page 55. 1 Start Internet Explorer on the client PC and type the CA's URL in the address bar. The CA's URL is normally as follows: 2 Click Go To. 3 Type the log-in user name and password correctly, and the "Microsoft Certificate Services" page opens. 4 Click Request a certificate, advanced certificate request and Submit a certificate request by using a base-64-encoded CMC or PKCS #10 file, or submit a renewal request by using a base-64encoded PKCS #7 file in sequence. The "Submit a Certificate Request or Renewal Request" page opens. 5 Paste the contents of the certificate request exported from the camera in the Saved Request text box. 6 Set Certificate Template to User and click Submit. Message "The certificate you requested was issued to you." appears. 7 Select Base 64 encoded and click Download certificate . The certificate is now saved. Import the saved file to the camera as the camera's client certificate. For details, see "To import the client certificate" in the Client certificate tab on page 55. Note The certificate saved in the procedure above has the same file name as the default file name for saving the CA certificate (certnew.cer). Be careful not to overwrite the file on the client PC. 60 Using the 802.1X Authentication Function - 802.1X Menu
-
 1
1 -
2
-
3
-
4
-
5
-
6
-
7
-
8
-
9
-
10
-
11
-
12
-
13
-
14
-
15
-
16
-
17
-
18
-
19
-
20
-
21
-
22
-
23
-
24
-
25
-
26
-
27
-
28
-
29
-
30
-
31
-
32
-
33
-
34
-
35
-
36
-
37
-
38
-
39
-
40
-
41
-
42
-
43
-
44
-
45
-
46
-
47
-
48
-
49
-
50
-
51
-
52
-
53
-
54
-
 55
55 -
 56
56 -
 57
57 -
 58
58 -
 59
59 -
 60
60 -
 61
61 -
 62
62 -
 63
63 -
 64
64 -
 65
65 -
66
-
67
-
68
-
69
-
70
-
71
-
72
-
73
-
74
-
75
-
76
-
77
-
78
-
79
-
80
-
81
-
82
-
83
-
84
-
85
-
86
-
87
-
88
-
89
-
90
-
91
-
92
-
93
-
94
-
95
-
96
-
97
-
98
-
99
-
100
-
101
-
102
-
103
-
104
-
105
-
106
-
107
-
108
-
109
-
110
-
111
-
112
-
113
-
114
-
115
-
116
-
117
-
118
-
119
-
120
 |
 |
