Sony SNC-RZ50N User Guide - Page 50
Certificate options, Certificates, Validity Period - factory reset
 |
UPC - 027242240377
View all Sony SNC-RZ50N manuals
Add to My Manuals
Save this manual to your list of manuals |
Page 50 highlights
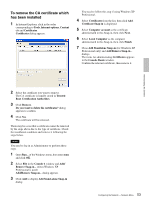
Administrating the Camera When you use SSL connection for the first time When you use SSL connection only with the SSL function On, you cannot access the camera if the SSL function does not work properly. In this case, you must reset the camera to the factory settings. (All settings will be initialized.) To avoid this, check that SSL connection is possible by following the steps. 1 Set the SSL function to On, and select Allow HTTP connection for some clients. 2 Click OK to close the main viewer and the setting window. 3 Display the main viewer in SSL connection. Refer to "Using the SSL function" on page 15 for connection. 4 After checking that SSL connection is possible, cancel Allow HTTP connection for some clients selected in step 1. Even if the setting window or the browser is closed as SSL connection is impossible, http connection is possible as Allow HTTP connection for some clients is selected. First check the setting contents of SSL tab in http connection, then check the SSL connection again. When Allow HTTP connection for some clients is not selected, you will not be able to access the camera if SSL connection becomes impossible. In this case, turn on the power of the main unit while pressing the reset switch on the camera so as to initialize. For details, refer to the supplied Installation Manual. Note As SSL connection becomes load for the camera, all images may not be downloaded and mark may appear when the camera accesses the setting window from the browser. In this case, reload the window. Press F5 key on the keyboard to reload. Certificate options Select an installation mode of the certificate. Use an external certificate: Uses the certificate including the private key information issued by a CA. The PKCS#12 and PEM formats are supported. Use the CSR issued from the camera: Use CSR corresponding to the private key information that is stored in the tamper-resistant chip built in the camera. Only the PEM format is supported in this mode. To use this mode, first obtain the certificate from the CA by performing "Export certificate request" on page 51. Note Even if the SSL function is set to On, it is not active in the following cases: -When Use an external certificate is selected in "Certificate options," and also when the certificate and the private key password are not set properly. -When Use the CSR issued from the camera is selected in "Certification options," and also the certificate is not set properly. Use the camera's built-in certificate (For test use): Uses the certificate that is stored in the tamperresistant chip built in the camera. The private key information corresponding to the certificate is also stored in the tamper-resistant chip. You do not need to install an external certificate. However, you cannot execute the existence proof that is one of the SSL functions for the following reasons. • A prepared value is set for a distinguished name (Common name and so on). • The certificate is not issued by a trusted CA. For reasons of security, we recommend using this mode only when there is no problem even if perfect security is not saved. Notes • When Use the camera's built-in certificate is selected, Security Alert dialog appears on the SSL connection with a browser. For details, refer to "Using the SSL function" (page 15). • SSL connection may be impossible due to the type of the certificate installed in the camera. In this case, refer to "How to install the CA certificate" on page 52 and install it. Certificates Import, display or delete the certificate. To import the certificate Click Browse... to select the certificate to be imported. Then click Submit, and the selected file will be imported to the camera. Note The import process becomes invalid if the selected file is not a certificate or the imported certificate is not allowed. To display information of the certificate When the certificate has been saved in the camera correctly, its information appears on Status, Issuer DN, Subject DN, Validity Period and Extended Key Usage. 50 Configuring the Network - Network Menu
-
 1
1 -
2
-
3
-
4
-
5
-
6
-
7
-
8
-
9
-
10
-
11
-
12
-
13
-
14
-
15
-
16
-
17
-
18
-
19
-
20
-
21
-
22
-
23
-
24
-
25
-
26
-
27
-
28
-
29
-
30
-
31
-
32
-
33
-
34
-
35
-
36
-
37
-
38
-
39
-
40
-
41
-
42
-
43
-
44
-
 45
45 -
 46
46 -
 47
47 -
 48
48 -
 49
49 -
 50
50 -
 51
51 -
 52
52 -
 53
53 -
 54
54 -
 55
55 -
56
-
57
-
58
-
59
-
60
-
61
-
62
-
63
-
64
-
65
-
66
-
67
-
68
-
69
-
70
-
71
-
72
-
73
-
74
-
75
-
76
-
77
-
78
-
79
-
80
-
81
-
82
-
83
-
84
-
85
-
86
-
87
-
88
-
89
-
90
-
91
-
92
-
93
-
94
-
95
-
96
-
97
-
98
-
99
-
100
-
101
-
102
-
103
-
104
-
105
-
106
-
107
-
108
-
109
-
110
-
111
-
112
-
113
-
114
-
115
-
116
-
117
-
118
-
119
-
120
 |
 |
