Sony STR-DN840 Operating Instructions (Large File - 14.22 MB) - Page 18
Getting started - settings
 |
View all Sony STR-DN840 manuals
Add to My Manuals
Save this manual to your list of manuals |
Page 18 highlights
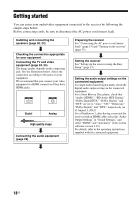
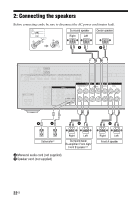
Getting started You can enjoy your audio/video equipment connected to the receiver by following the simple steps below. Before connecting cords, be sure to disconnect the AC power cord (mains lead). Installing and connecting the speakers (page 20, 22) Checking the connection appropriate for your equipment Connecting the TV and video equipment (page 24, 25) The image quality depends on the connecting jack. See the illustration below. Select the connection according to the jacks on your equipment. We recommend that you connect your video equipment via HDMI connection if they have HDMI jacks. Digital Analog High quality image Connecting the audio equipment (page 29) Preparing the receiver See "Connecting the AC power cord (mains lead)" (page 33) and "Turning on the receiver" (page 33). Setting the receiver See "Setting up the receiver using the Easy Setup" (page 33). Setting the audio output settings on the connected equipment To output multi channel digital audio, check the digital audio output setting on the connected equipment. For a Sony Blu-ray Disc player, check that "Audio (HDMI)," "BD Audio MIX Setting," "Dolby Digital/DTS," "Dolby Digital," and "DTS" are set to "Auto," "Off," "Bitstream," "Dolby Digital," and "DTS," respectively (as of August 1, 2012). For a PlayStation 3, after having connected the receiver with an HDMI cable, select the "Audio Output Settings" in "Sound Settings," and select "HDMI" and "Automatic" (with system software version 4.21). For details, refer to the operating instructions supplied with the connected equipment. 18US
-
 1
1 -
2
-
3
-
4
-
5
-
6
-
7
-
8
-
9
-
10
-
11
-
12
-
 13
13 -
 14
14 -
 15
15 -
 16
16 -
 17
17 -
 18
18 -
 19
19 -
 20
20 -
 21
21 -
 22
22 -
 23
23 -
24
-
25
-
26
-
27
-
28
-
29
-
30
-
31
-
32
-
33
-
34
-
35
-
36
-
37
-
38
-
39
-
40
-
41
-
42
-
43
-
44
-
45
-
46
-
47
-
48
-
49
-
50
-
51
-
52
-
53
-
54
-
55
-
56
-
57
-
58
-
59
-
60
-
61
-
62
-
63
-
64
-
65
-
66
-
67
-
68
-
69
-
70
-
71
-
72
-
73
-
74
-
75
-
76
-
77
-
78
-
79
-
80
-
81
-
82
-
83
-
84
-
85
-
86
-
87
-
88
-
89
-
90
-
91
-
92
-
93
-
94
-
95
-
96
-
97
-
98
-
99
-
100
-
101
-
102
-
103
-
104
-
105
-
106
-
107
-
108
-
109
-
110
-
111
-
112
-
113
-
114
-
115
-
116
-
117
-
118
-
119
-
120
-
121
-
122
-
123
-
124
-
125
-
126
-
127
-
128
 |
 |