Sony STR-DN840 Operating Instructions (Large File - 14.22 MB) - Page 88
Easy Setup, Speaker Settings menu, Auto Calibration, To check the Auto Calibration, results - speaker setup
 |
View all Sony STR-DN840 manuals
Add to My Manuals
Save this manual to your list of manuals |
Page 88 highlights
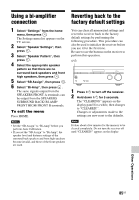
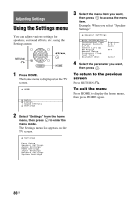
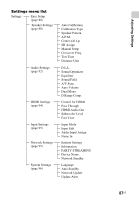
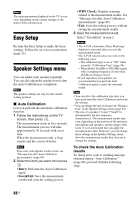
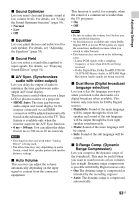
Note The menu parameters displayed on the TV screen vary, depending on the current settings or the status of the selected icon. Easy Setup Re-runs the Easy Setup to make the basic settings. Follow the on-screen instructions (page 33). Speaker Settings menu You can adjust each speaker manually. You can also adjust the speaker levels after the Auto Calibration is completed. Note The speaker settings are only for the current seating position. x Auto Calibration Lets you perform the automatic calibration function. 1 Follow the instructions on the TV screen, then press . The measurement starts in five seconds. The measurement process will take approximately 30 seconds with a test tone. When the measurement ends, a beep sounds and the screen switches. Note If an error code appears on the screen, see "Message list after Auto Calibration measurement" (page 89). 2 Select the item you want, then press . • Retry: Performs the Auto Calibration again. • Save&Exit: Save the measurement results and exits the setting process. • WRN Check: Displays warning related to the measurement results. See "Message list after Auto Calibration measurement" (page 89). • Exit: Exits the setting process without saving the measurement results. 3 Save the measurement result. Select "Save&Exit" in step 2. Notes • The A.P.M. (Automatic Phase Matching) function is activated after you save the measurement result. • The A.P.M. function does not work in the following cases. - The calibration type is set to "Off" when using the "Calibration Type" (page 90). - When Dolby TrueHD or DTS-HD signals with a sampling frequency of more than 48 kHz are being received. • If you reposition your speaker, we recommend that you perform Auto Calibration again to enjoy the surround sound. Tips • You can select the calibration type after you have performed the Auto Calibration and saved the settings. • You can change the unit of distance in "Distance Unit" in the Speaker Settings menu (page 92). • The size of a speaker ("Large"/"Small") is determined by the low frequency characteristics. The measurement results may vary, depending on the position of the optimizer microphone and speakers, and the shape of the room. It is recommended that you apply the measurement results. However, you can change those settings in the Speaker Settings menu. Save the measurement results first, then try to change the settings. To check the Auto Calibration results To check error code or warning message obtained during "Auto Calibration" (page 88), proceed with the following steps. 88US
-
 1
1 -
2
-
3
-
4
-
5
-
6
-
7
-
8
-
9
-
10
-
11
-
12
-
13
-
14
-
15
-
16
-
17
-
18
-
19
-
20
-
21
-
22
-
23
-
24
-
25
-
26
-
27
-
28
-
29
-
30
-
31
-
32
-
33
-
34
-
35
-
36
-
37
-
38
-
39
-
40
-
41
-
42
-
43
-
44
-
45
-
46
-
47
-
48
-
49
-
50
-
51
-
52
-
53
-
54
-
55
-
56
-
57
-
58
-
59
-
60
-
61
-
62
-
63
-
64
-
65
-
66
-
67
-
68
-
69
-
70
-
71
-
72
-
73
-
74
-
75
-
76
-
77
-
78
-
79
-
80
-
81
-
82
-
 83
83 -
 84
84 -
 85
85 -
 86
86 -
 87
87 -
 88
88 -
 89
89 -
 90
90 -
 91
91 -
 92
92 -
 93
93 -
94
-
95
-
96
-
97
-
98
-
99
-
100
-
101
-
102
-
103
-
104
-
105
-
106
-
107
-
108
-
109
-
110
-
111
-
112
-
113
-
114
-
115
-
116
-
117
-
118
-
119
-
120
-
121
-
122
-
123
-
124
-
125
-
126
-
127
-
128
 |
 |