Sony STR-DN840 Operating Instructions (Large File - 14.22 MB) - Page 55
Selecting the calibration type, Adjusting the Equalizer, Using the Pure Direct function
 |
View all Sony STR-DN840 manuals
Add to My Manuals
Save this manual to your list of manuals |
Page 55 highlights
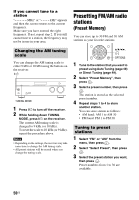
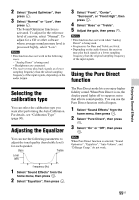
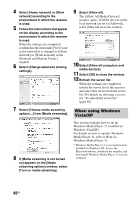
Enjoying Sound Effects 2 Select "Sound Optimizer", then press . 3 Select "Normal" or "Low", then press . The Sound Optimizer function is activated. To adjust for the reference level of a movie, select "Normal". To adjust for a CD or other software whose average sound pressure level is processed highly, select "Low". Notes • This function does not work in the following cases. - "Analog Direct" is being used. - Headphones are connected. • The receiver may play back signals at a lower sampling frequency than the actual sampling frequency of the input signals, depending on the audio format. 3 Select "Front", "Center", "Surround", or "Front High", then press . 4 Select "Bass" or "Treble". 5 Adjust the gain, then press . Notes • This function does not work when "Analog Direct" is being used. • Frequencies for Bass and Treble are fixed. • Depending on the audio format, the receiver may play back signals at a lower sampling frequency than the original sampling frequency of the input signals. Using the Pure Direct function Selecting the calibration type You can select the calibration type you want after performing the Auto Calibration. For details, see "Calibration Type" (page 90). Adjusting the Equalizer You can use the following parameters to adjust the tonal quality (bass/treble level) for each speaker. Bass Treble Level (dB) The Pure Direct mode lets you enjoy higher fidelity sound. When Pure Direct is on, the display panel lights off to suppress noise that affects sound quality. You can use the Pure Direct function with all inputs. 1 Select "Sound Effects" from the home menu, then press . 2 Select "Pure Direct", then press . 3 Select "On" or "Off", then press . Note When Pure Direct function is selected, "Sound Optimizer", "Equalizer", "Auto Volume", and "D.Range Comp." do not work. Frequency (Hz) 1 Select "Sound Effects" from the home menu, then press . 2 Select "Equalizer", then press . 55US
-
 1
1 -
2
-
3
-
4
-
5
-
6
-
7
-
8
-
9
-
10
-
11
-
12
-
13
-
14
-
15
-
16
-
17
-
18
-
19
-
20
-
21
-
22
-
23
-
24
-
25
-
26
-
27
-
28
-
29
-
30
-
31
-
32
-
33
-
34
-
35
-
36
-
37
-
38
-
39
-
40
-
41
-
42
-
43
-
44
-
45
-
46
-
47
-
48
-
49
-
 50
50 -
 51
51 -
 52
52 -
 53
53 -
 54
54 -
 55
55 -
 56
56 -
 57
57 -
 58
58 -
 59
59 -
 60
60 -
61
-
62
-
63
-
64
-
65
-
66
-
67
-
68
-
69
-
70
-
71
-
72
-
73
-
74
-
75
-
76
-
77
-
78
-
79
-
80
-
81
-
82
-
83
-
84
-
85
-
86
-
87
-
88
-
89
-
90
-
91
-
92
-
93
-
94
-
95
-
96
-
97
-
98
-
99
-
100
-
101
-
102
-
103
-
104
-
105
-
106
-
107
-
108
-
109
-
110
-
111
-
112
-
113
-
114
-
115
-
116
-
117
-
118
-
119
-
120
-
121
-
122
-
123
-
124
-
125
-
126
-
127
-
128
 |
 |