Sony STR-DN840 Operating Instructions (Large File - 14.22 MB) - Page 95
Input Settings menu, Network Settings menu, Subwoofer Level, Fast View, Input Mode, Input Edit
 |
View all Sony STR-DN840 manuals
Add to My Manuals
Save this manual to your list of manuals |
Page 95 highlights
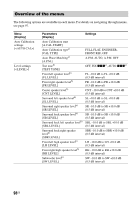
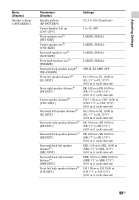
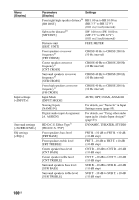
Adjusting Settings x Subwoofer Level Lets you set the level of the subwoofer to 0 dB or + 10 dB when PCM signals are input via an HDMI connection. You can set the level for each input to which an HDMI input jack is assigned independently. • Auto: Automatically sets the level to 0dB or +10dB, depending on the audio stream. • +10dB • 0dB x Fast View Lets you set the operation of Fast View. This fast HDMI switching function supports all HDMI inputs. • Auto: You can select HDMI input faster than the normal selection. • Off: Fast View and preview for HDMI functions are not available. Input Settings menu You can adjust the settings for the connections of the receiver and other equipment. x Input Mode Lets you fix the audio input mode when you connect equipment to both digital and analog audio input jacks. For details, see "Switching between digital and analog audio (INPUT MODE)" (page 83). x Input Edit Lets you set the following items for each input. • Watch: Displays an input to the Watch menu. • Listen: Displays an input to the Listen menu. • Watch+Listen: Displays an input to both the Watch and Listen menus. x Audio Input Assign Lets you set the audio input jack(s) assigned to each input. For details, see "Using other audio input jacks (Audio Input Assign)" (page 83). x Name In Lets you set the name displayed on the Watch/Listen menu. You can enter a name of up to 8 characters for inputs and display it. It is more recognizable having the equipment named on the display than the jacks. 1 Select "Name In", then press . 2 Select the input you want to name, then press . 3 Press V/v repeatedly to select a character then press b. You can move the input position backward and forward by pressing B/b. 4 Repeat step 3 to input a character one by one, then press . The name you entered is registered. Network Settings menu You can adjust the settings for the network. The Network Settings menu is available only when the Home Network or SEN function is selected. x Internet Settings Lets you make the network settings. For details, see "Configuring the network settings of the receiver" (page 36). • Wired Setup • Wireless Setup x Information Lets you check the network information for the network. 1 Select "Information", then press . 95US
-
 1
1 -
2
-
3
-
4
-
5
-
6
-
7
-
8
-
9
-
10
-
11
-
12
-
13
-
14
-
15
-
16
-
17
-
18
-
19
-
20
-
21
-
22
-
23
-
24
-
25
-
26
-
27
-
28
-
29
-
30
-
31
-
32
-
33
-
34
-
35
-
36
-
37
-
38
-
39
-
40
-
41
-
42
-
43
-
44
-
45
-
46
-
47
-
48
-
49
-
50
-
51
-
52
-
53
-
54
-
55
-
56
-
57
-
58
-
59
-
60
-
61
-
62
-
63
-
64
-
65
-
66
-
67
-
68
-
69
-
70
-
71
-
72
-
73
-
74
-
75
-
76
-
77
-
78
-
79
-
80
-
81
-
82
-
83
-
84
-
85
-
86
-
87
-
88
-
89
-
 90
90 -
 91
91 -
 92
92 -
 93
93 -
 94
94 -
 95
95 -
 96
96 -
 97
97 -
 98
98 -
 99
99 -
 100
100 -
101
-
102
-
103
-
104
-
105
-
106
-
107
-
108
-
109
-
110
-
111
-
112
-
113
-
114
-
115
-
116
-
117
-
118
-
119
-
120
-
121
-
122
-
123
-
124
-
125
-
126
-
127
-
128
 |
 |