3Com 4800G Getting Started Guide - Page 51
Removing the Dedicated CX4 Cable, Verifying the Installation, Removing the Dedicated, CX4 Cable
 |
UPC - 662705534183
View all 3Com 4800G manuals
Add to My Manuals
Save this manual to your list of manuals |
Page 51 highlights
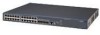
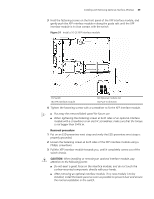
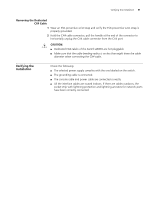
Verifying the Installation 51 Removing the Dedicated CX4 Cable 1 Wear an ESD-preventive wrist strap and verify the ESD-preventive wrist strap is properly grounded. 2 Hold the CX4 cable connector, pull the handle at the end of the connector to horizontally unplug the CX4 cable connector from the CX4 port. c CAUTION: ■ Dedicated CX4 cables of the Switch 4800G are hot pluggable. ■ Make sure that the cable bending radius is no less than eight times the cable diameter when connecting the CX4 cable. Verifying the Installation Check the following: ■ The selected power supply complies with the one labeled on the switch. ■ The grounding cable is connected. ■ The console cable and power cable are connected correctly. ■ All the interface cables are routed indoors. If there are cables outdoors, the socket strip with lightning protection and lightning arresters for network ports have been correctly connected.
-
 1
1 -
2
-
3
-
4
-
5
-
6
-
7
-
8
-
9
-
10
-
11
-
12
-
13
-
14
-
15
-
16
-
17
-
18
-
19
-
20
-
21
-
22
-
23
-
24
-
25
-
26
-
27
-
28
-
29
-
30
-
31
-
32
-
33
-
34
-
35
-
36
-
37
-
38
-
39
-
40
-
41
-
42
-
43
-
44
-
45
-
 46
46 -
 47
47 -
 48
48 -
 49
49 -
 50
50 -
 51
51 -
 52
52 -
 53
53 -
 54
54 -
 55
55 -
 56
56 -
57
-
58
-
59
-
60
-
61
-
62
-
63
-
64
-
65
-
66
-
67
-
68
-
69
-
70
-
71
-
72
-
73
-
74
-
75
-
76
-
77
-
78
-
79
-
80
-
81
-
82
 |
 |