AIWA NSX-999 Operating Instructions - Page 42
Tuning, A Preset Station
 |
View all AIWA NSX-999 manuals
Add to My Manuals
Save this manual to your list of manuals |
Page 42 highlights
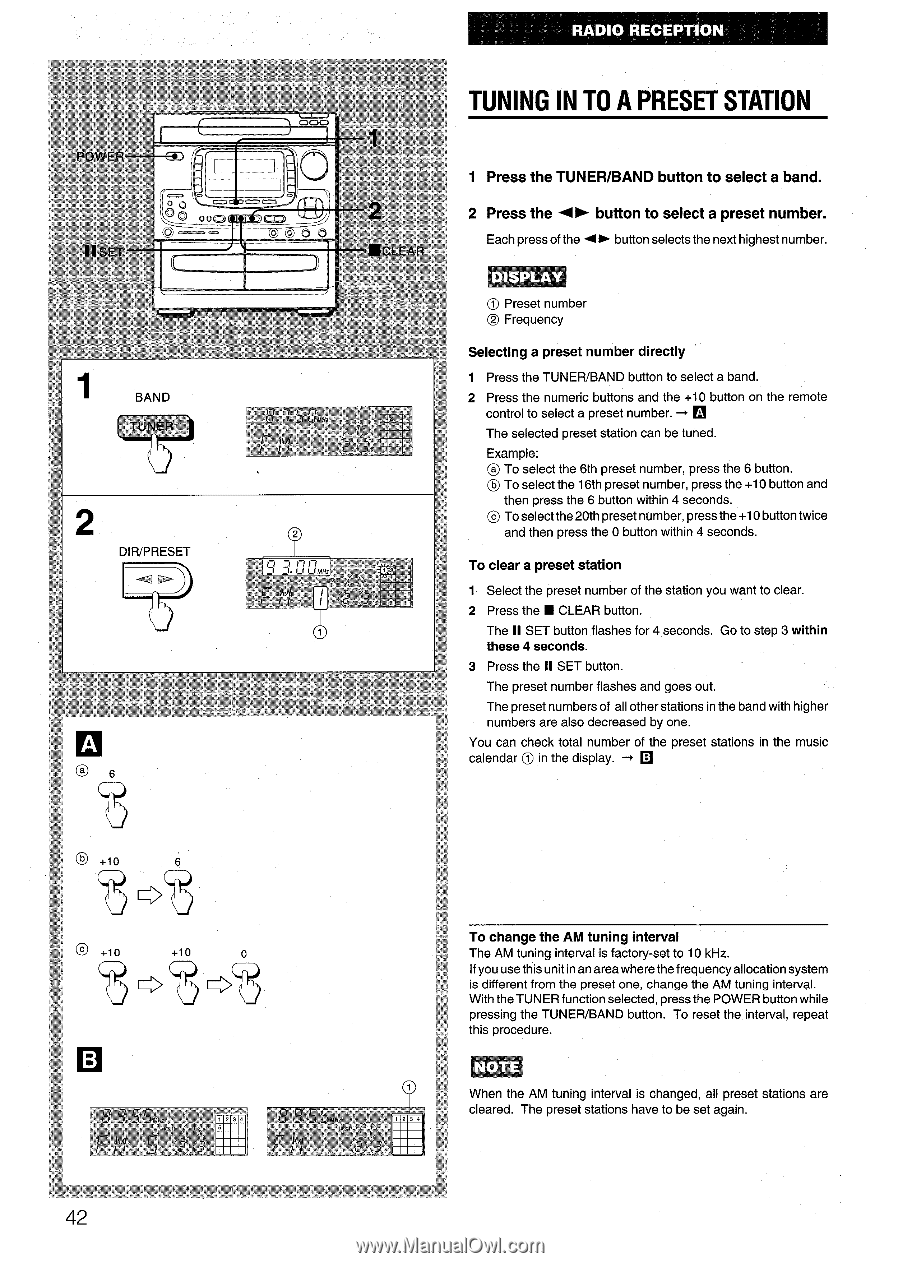
I BAND 2 @ +10 +10 %"8"8 um m TUNING INTO A PRESET STATION 1 Press the TUNEFVBAND button to select a band. 2 Press the 4> button to select a preset number. Each press of the+> button selects the next highest number. ~ Preset number @ Frequency Selecting a preset number directly 1 Press the TUNEWBAND button to select a band. 2 Press the numeric buttons and the +1 O button on the remote control to select a preset number. + u The selected preset station can be tuned. Example: @To select the 6th preset number, press the 6 button. @To select the 16th preset number, press the +10 button and then press the 6 button within 4 seconds. @ Toselectthe20th preset number, press the +1Obutton twice and then press the O button within 4 seconds. To clear a preset station 1 Select the preset number of the station you want to clear. 2 Press the s CLEAR button. The II SET button flashes for 4 seconds. Go to step 3 within these 4 seconds. 3 Press the II SET button. The preset number flashes and goes out. The preset numbers of all other stations in the band with higher numbers are also decreased by one. You can check total number of the preset stations in the music calendar O in the display. + u To change the AM tuning interval The AM tuning interval is factory-set to 10 kHz. If you use this unit in an area where the frequency allocation system is different from the preset one, change the AM tuning interval. With the TUNER function selected, press the POWER button while pressing the TUNEFUBAND button. To reset the interval, repeat this procedure. When the AM tuning interval is changed, all preset stations are cleared. The preset stations have to be set again.
-
 1
1 -
2
-
3
-
4
-
5
-
6
-
7
-
8
-
9
-
10
-
11
-
12
-
13
-
14
-
15
-
16
-
17
-
18
-
19
-
20
-
21
-
22
-
23
-
24
-
25
-
26
-
27
-
28
-
29
-
30
-
31
-
32
-
33
-
34
-
35
-
36
-
 37
37 -
 38
38 -
 39
39 -
 40
40 -
 41
41 -
 42
42 -
 43
43 -
 44
44 -
 45
45 -
 46
46 -
 47
47 -
48
-
49
-
50
-
51
-
52
-
53
-
54
-
55
-
56
-
57
-
58
-
59
-
60
-
61
-
62
-
63
-
64
-
65
-
66
-
67
-
68
-
69
-
70
-
71
-
72
-
73
-
74
-
75
-
76
-
77
-
78
-
79
-
80
 |
 |