Canon PIXMA MX490 Guide for My Image Garden Windows - Page 184
Cancel, Save Selected Image, Save All, Filtered Images
 |
View all Canon PIXMA MX490 manuals
Add to My Manuals
Save this manual to your list of manuals |
Page 184 highlights
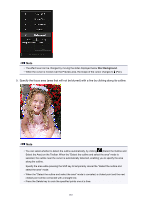
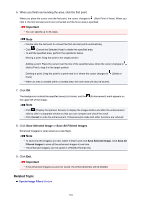
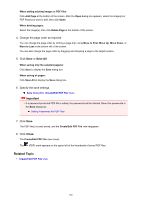
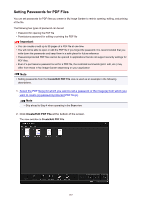
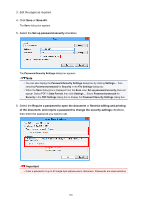
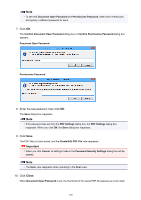
6. When you finish surrounding the area, click the first point. When you place the cursor over the first point, the cursor changes to (Start Point of Area). When you click it, the first and last points are connected and the focus area is specified. Important • You can specify up to 30 areas. Note • Double-click the last point to connect the first and last points automatically. • Click (Cancel the Selected Area) to delete the specified area. • To edit the specified area, perform the operations below. Moving a point: Drag the point to the target position Adding a point: Place the cursor over the line of the specified area; when the cursor changes to (Add a Point), drag it to the target position Deleting a point: Drag the point to a point next to it, where the cursor changes to (Delete a Point) • When an area is created within a created area, the inner area will also be blurred. 7. Click OK. The background outside the specified area(s) is blurred, and the the upper left of the image. (Enhancement) mark appears on Note • Click (Display Comparison Screen) to display the images before and after the enhancement side by side in a separate window so that you can compare and check the result. • Click Cancel to undo the enhancement. Enhancements made with other functions are retained. 8. Click Save Selected Image or Save All Filtered Images. Enhanced image(s) is (are) saved as a new file(s). Note • To save only the image(s) you like, select it (them) and click Save Selected Image. Click Save All Filtered Images to save all the enhanced images at one time. • The enhanced image(s) can be saved in JPEG/Exif format only. 9. Click Exit. Important • If the enhanced image(s) is (are) not saved, the enhancement(s) will be deleted. Related Topic Special Image Filters Window 184
-
 1
1 -
2
-
3
-
4
-
5
-
6
-
7
-
8
-
9
-
10
-
11
-
12
-
13
-
14
-
15
-
16
-
17
-
18
-
19
-
20
-
21
-
22
-
23
-
24
-
25
-
26
-
27
-
28
-
29
-
30
-
31
-
32
-
33
-
34
-
35
-
36
-
37
-
38
-
39
-
40
-
41
-
42
-
43
-
44
-
45
-
46
-
47
-
48
-
49
-
50
-
51
-
52
-
53
-
54
-
55
-
56
-
57
-
58
-
59
-
60
-
61
-
62
-
63
-
64
-
65
-
66
-
67
-
68
-
69
-
70
-
71
-
72
-
73
-
74
-
75
-
76
-
77
-
78
-
79
-
80
-
81
-
82
-
83
-
84
-
85
-
86
-
87
-
88
-
89
-
90
-
91
-
92
-
93
-
94
-
95
-
96
-
97
-
98
-
99
-
100
-
101
-
102
-
103
-
104
-
105
-
106
-
107
-
108
-
109
-
110
-
111
-
112
-
113
-
114
-
115
-
116
-
117
-
118
-
119
-
120
-
121
-
122
-
123
-
124
-
125
-
126
-
127
-
128
-
129
-
130
-
131
-
132
-
133
-
134
-
135
-
136
-
137
-
138
-
139
-
140
-
141
-
142
-
143
-
144
-
145
-
146
-
147
-
148
-
149
-
150
-
151
-
152
-
153
-
154
-
155
-
156
-
157
-
158
-
159
-
160
-
161
-
162
-
163
-
164
-
165
-
166
-
167
-
168
-
169
-
170
-
171
-
172
-
173
-
174
-
175
-
176
-
177
-
178
-
 179
179 -
 180
180 -
 181
181 -
 182
182 -
 183
183 -
 184
184 -
 185
185 -
 186
186 -
 187
187 -
 188
188 -
 189
189 -
190
-
191
-
192
-
193
-
194
-
195
-
196
-
197
-
198
-
199
-
200
-
201
-
202
-
203
-
204
-
205
-
206
-
207
-
208
-
209
-
210
-
211
-
212
-
213
-
214
-
215
-
216
-
217
-
218
-
219
-
220
-
221
-
222
-
223
-
224
-
225
-
226
-
227
-
228
-
229
-
230
-
231
-
232
-
233
-
234
-
235
-
236
-
237
-
238
-
239
-
240
-
241
-
242
-
243
-
244
-
245
-
246
-
247
-
248
-
249
-
250
-
251
-
252
-
253
-
254
-
255
-
256
-
257
-
258
-
259
-
260
-
261
-
262
-
263
-
264
-
265
-
266
-
267
-
268
-
269
-
270
-
271
-
272
-
273
-
274
-
275
-
276
-
277
-
278
-
279
-
280
-
281
-
282
-
283
-
284
-
285
-
286
-
287
-
288
-
289
-
290
-
291
-
292
-
293
-
294
-
295
-
296
-
297
-
298
-
299
-
300
-
301
-
302
-
303
-
304
-
305
-
306
-
307
-
308
-
309
-
310
-
311
-
312
-
313
 |
 |
