Canon PIXMA MX922 Troubleshooting Guide - Page 146
Error Regarding the Power Cord Being Unplugged Is Displayed
 |
View all Canon PIXMA MX922 manuals
Add to My Manuals
Save this manual to your list of manuals |
Page 146 highlights
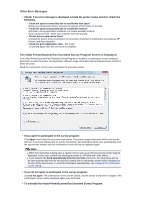
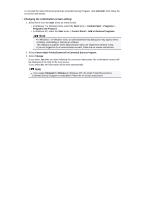
The power cord may have been unplugged last while the machine was still on. Press the OK button to dismiss the error. Note See Notice for Unplugging the Power Cord for unplugging the power cord. • The power cord has been unplugged and unsent/received docs in memory have been lost. A power failure has occurred or the power cord has been unplugged when the faxes are stored in the machine's memory. Important If a power failure occurs or you unplug the power cord, all faxes stored in the machine's memory are deleted. For details on how to unplug the power cord, see Notice for Unplugging the Power Cord. Press the OK button. After pressing the OK button, the list of the faxes deleted from the machine's memory (MEMORY CLEAR REPORT) will be printed. For details, refer to Summary of Reports and Lists. Error Regarding Automatic Duplex Printing Is Displayed • Check: See Cannot Print Properly with Automatic Duplex Printing and take the appropriate action. Error Regarding the Power Cord Being Unplugged Is Displayed The power cord may have been unplugged while the machine was still on. Check the error message that appears on the computer, then click OK. The machine starts printing. See Notice for Unplugging the Power Cord for unplugging the power cord. Important If you disconnect the power plug, all the faxes stored in the machine's memory are deleted. Writing Error/Output Error/Communication Error • Check 1: If all the lamps on the operation panel are off, make sure that the power plug is plugged in, then turn the machine on. While any lamp on the operation panel is flashing, the machine is initializing. Wait until the lamp on the operation panel stops flashing and remains lit. • Check 2: Make sure that the printer port is configured appropriately in the printer driver. * In the following instructions, "XXX" signifies your machine's name. 1. Log on as a user account with administrator privilege. 2. Select items from the Start menu as shown below. • In Windows 7, select Devices and Printers from the Start menu. • In Windows Vista, select the Start menu > Control Panel > Hardware and Sound > Printers. • In Windows XP, select the Start menu > Control Panel > Printers and Other Hardware > Printers and Faxes. 3. Open the properties of printer driver for the machine.
-
 1
1 -
2
-
3
-
4
-
5
-
6
-
7
-
8
-
9
-
10
-
11
-
12
-
13
-
14
-
15
-
16
-
17
-
18
-
19
-
20
-
21
-
22
-
23
-
24
-
25
-
26
-
27
-
28
-
29
-
30
-
31
-
32
-
33
-
34
-
35
-
36
-
37
-
38
-
39
-
40
-
41
-
42
-
43
-
44
-
45
-
46
-
47
-
48
-
49
-
50
-
51
-
52
-
53
-
54
-
55
-
56
-
57
-
58
-
59
-
60
-
61
-
62
-
63
-
64
-
65
-
66
-
67
-
68
-
69
-
70
-
71
-
72
-
73
-
74
-
75
-
76
-
77
-
78
-
79
-
80
-
81
-
82
-
83
-
84
-
85
-
86
-
87
-
88
-
89
-
90
-
91
-
92
-
93
-
94
-
95
-
96
-
97
-
98
-
99
-
100
-
101
-
102
-
103
-
104
-
105
-
106
-
107
-
108
-
109
-
110
-
111
-
112
-
113
-
114
-
115
-
116
-
117
-
118
-
119
-
120
-
121
-
122
-
123
-
124
-
125
-
126
-
127
-
128
-
129
-
130
-
131
-
132
-
133
-
134
-
135
-
136
-
137
-
138
-
139
-
140
-
 141
141 -
 142
142 -
 143
143 -
 144
144 -
 145
145 -
 146
146 -
 147
147 -
 148
148 -
 149
149 -
 150
150 -
 151
151 -
152
-
153
-
154
-
155
-
156
-
157
-
158
-
159
-
160
-
161
-
162
-
163
-
164
-
165
-
166
-
167
-
168
-
169
-
170
-
171
-
172
-
173
-
174
-
175
-
176
-
177
-
178
-
179
-
180
-
181
-
182
-
183
-
184
-
185
-
186
-
187
-
188
-
189
-
190
-
191
-
192
-
193
-
194
-
195
-
196
-
197
-
198
-
199
-
200
-
201
-
202
-
203
-
204
-
205
-
206
-
207
-
208
-
209
-
210
-
211
-
212
-
213
-
214
-
215
-
216
-
217
-
218
-
219
-
220
-
221
-
222
-
223
-
224
-
225
-
226
-
227
-
228
-
229
-
230
-
231
-
232
-
233
-
234
-
235
-
236
-
237
-
238
-
239
-
240
-
241
-
242
-
243
-
244
-
245
-
246
-
247
-
248
-
249
-
250
-
251
-
252
-
253
-
254
-
255
-
256
-
257
-
258
-
259
-
260
-
261
-
262
-
263
-
264
-
265
-
266
-
267
 |
 |
