Canon PIXMA MX922 Troubleshooting Guide - Page 147
Check 5: When the machine is connected to your computer with a USB cable, check - mac driver
 |
View all Canon PIXMA MX922 manuals
Add to My Manuals
Save this manual to your list of manuals |
Page 147 highlights
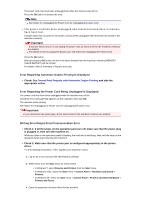
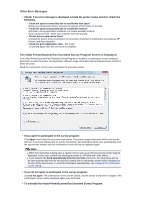
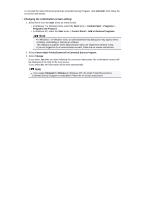
• In Windows 7, right-click the "Canon XXX Printer" icon (where "XXX" is your machine's name), then select Printer properties. • In Windows Vista or Windows XP, right-click the "Canon XXX Printer" icon (where "XXX" is your machine's name), then select Properties. 4. Click the Ports tab to confirm the port settings. Make sure that a port named "USBnnn" (where "n" is a number) with "Canon XXX Printer" appearing in the Printer column is selected for Print to the following port(s). Note When the machine is used over LAN, the port name of the machine is displayed as "CNBJNP_xxxxxxxxxx". "xxxxxxxxxx" is the character string generated from the MAC address or a character string specified by the user when setting up the machine. • If the setting is incorrect: Reinstall the MP Drivers. • Printing does not start even though the machine is connected to the computer using a USB cable and the port named "USBnnn" is selected: Click Start and select All programs, Canon Utilities, Canon My Printer, Canon My Printer, then select Diagnose and Repair Printer. Follow the on-screen instructions to set the correct printer port, then select your machine's name. If the problem is not resolved, reinstall the MP Drivers. • Printing does not start even though the port named "CNBJNP_xxxxxxxxxx" is selected when the machine is used over LAN: Launch IJ Network Tool, and select "CNBJNP_xxxxxxxxxx" as you confirmed in step 4, then associate the port with the printer using Associate Port in the Settings menu. If the problem is not resolved, reinstall the MP Drivers. • Check 3: Make sure that the machine is connected to your computer properly. When the machine is connected to your computer with a USB cable, make sure that the USB cable is securely plugged in to the machine and the computer, then check the followings: • If you are using a relay device such as a USB hub, disconnect it, connect the machine directly to the computer, and try printing again. If printing starts normally, there is a problem with the relay device. Consult the reseller of the relay device for details. • There could also be a problem with the USB cable. Replace the USB cable and try printing again. When you use the machine over LAN, make sure that the machine is connected to the network with a LAN cable or is set up correctly. • Check 4: Make sure that the MP Drivers are installed correctly. Uninstall the MP Drivers following the procedure described in Deleting the Unnecessary MP Drivers, insert the Setup CD-ROM into the computer's disc drive and install the MP Drivers again. • Check 5: When the machine is connected to your computer with a USB cable, check the status of the device on your computer. Follow the procedure below to check the status of the device. 1. Open the Device Manager on your computer as shown below. If the User Account Control screen is displayed, follow the on-screen instructions. • In Windows 7 or Windows Vista, click Control Panel, Hardware and Sound, then Device Manager. • In Windows XP, click Control Panel, Performance and Maintenance, System, then click Device Manager on the Hardware sheet. 2. Double-click Universal Serial Bus controllers then USB Printing Support. If the USB Printing Support Properties screen is not displayed, make sure that the machine is correctly connected to the computer. Check 3: Make sure that the machine is connected to your computer properly. 3. Click the General tab and make sure that there is no indication of a problem with the device. If a device error is displayed, refer to Windows help to resolve the error.
-
 1
1 -
2
-
3
-
4
-
5
-
6
-
7
-
8
-
9
-
10
-
11
-
12
-
13
-
14
-
15
-
16
-
17
-
18
-
19
-
20
-
21
-
22
-
23
-
24
-
25
-
26
-
27
-
28
-
29
-
30
-
31
-
32
-
33
-
34
-
35
-
36
-
37
-
38
-
39
-
40
-
41
-
42
-
43
-
44
-
45
-
46
-
47
-
48
-
49
-
50
-
51
-
52
-
53
-
54
-
55
-
56
-
57
-
58
-
59
-
60
-
61
-
62
-
63
-
64
-
65
-
66
-
67
-
68
-
69
-
70
-
71
-
72
-
73
-
74
-
75
-
76
-
77
-
78
-
79
-
80
-
81
-
82
-
83
-
84
-
85
-
86
-
87
-
88
-
89
-
90
-
91
-
92
-
93
-
94
-
95
-
96
-
97
-
98
-
99
-
100
-
101
-
102
-
103
-
104
-
105
-
106
-
107
-
108
-
109
-
110
-
111
-
112
-
113
-
114
-
115
-
116
-
117
-
118
-
119
-
120
-
121
-
122
-
123
-
124
-
125
-
126
-
127
-
128
-
129
-
130
-
131
-
132
-
133
-
134
-
135
-
136
-
137
-
138
-
139
-
140
-
141
-
 142
142 -
 143
143 -
 144
144 -
 145
145 -
 146
146 -
 147
147 -
 148
148 -
 149
149 -
 150
150 -
 151
151 -
 152
152 -
153
-
154
-
155
-
156
-
157
-
158
-
159
-
160
-
161
-
162
-
163
-
164
-
165
-
166
-
167
-
168
-
169
-
170
-
171
-
172
-
173
-
174
-
175
-
176
-
177
-
178
-
179
-
180
-
181
-
182
-
183
-
184
-
185
-
186
-
187
-
188
-
189
-
190
-
191
-
192
-
193
-
194
-
195
-
196
-
197
-
198
-
199
-
200
-
201
-
202
-
203
-
204
-
205
-
206
-
207
-
208
-
209
-
210
-
211
-
212
-
213
-
214
-
215
-
216
-
217
-
218
-
219
-
220
-
221
-
222
-
223
-
224
-
225
-
226
-
227
-
228
-
229
-
230
-
231
-
232
-
233
-
234
-
235
-
236
-
237
-
238
-
239
-
240
-
241
-
242
-
243
-
244
-
245
-
246
-
247
-
248
-
249
-
250
-
251
-
252
-
253
-
254
-
255
-
256
-
257
-
258
-
259
-
260
-
261
-
262
-
263
-
264
-
265
-
266
-
267
 |
 |
