Canon S830D S830D Quick Start Guide - Page 62
Troubleshooting
 |
View all Canon S830D manuals
Add to My Manuals
Save this manual to your list of manuals |
Page 62 highlights
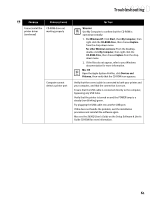
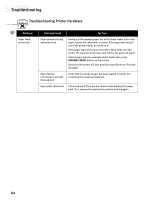
Troubleshooting Troubleshooting Printed Output Problem Possible Cause Try This Poor print quality Print head clogged Verify that your print head is working properly by printing a Nozzle Check Pattern. See "Printing a Nozzle Check Pattern" on page 43. Try cleaning the print head. See "Cleaning the Print Head" on page 45. If you do not see any improvements, try print head cleaning three times. If there is still no improvement, perform a deep print head cleaning using the Maintenance tab in your printer driver for Windows and the printer utility for Mac OS. Incorrect printer driver settings Altering driver settings may improve the appearance of your printed image. See "Setting Driver Options" on page 8 for instructions on selecting the optimum print mode for your print job. One or more ink tanks are installed in the wrong position or not seated properly Verify that the ink tanks are in the correct color slot. Check that they have been firmly seated. Press down on the ink tanks until they click into place. See "Replacing Ink Tanks" on page 41. Color settings need to be adjusted You can enhance the color on your printout. See "Adjusting Color Balance, Brightness and Saturation" on page 17. Low ink or ink tank may need to be replaced Verify that you have sufficient ink in the ink tanks. See "Monitoring Ink Levels" on page 39. If necessary, replace the ink tanks. See "Replacing Ink Tanks" on page 41. Print head needs to be Perform print head alignment. See "Aligning the Print Head" on aligned page 41. Print head seated incorrectly Reseat the print head. See the "Easy Setup Instructions" in the S830D User's Guide on the Setup Software & User's Guide CD-ROM. Print head may need to be replaced Perform multiple print head cleanings. See "Cleaning the Print Head" on page 45. If problem persist, contact the Canon Customer Care Center. Printout and screen image colors appear differently Incorrect printer driver settings Altering driver settings may improve the appearance of your printed image. See "Setting Driver Options" on page 8 for instructions on selecting the optimum print mode for your print job. One or more ink tanks are installed in the incorrect position or not seated properly Verify that the ink tanks are in the correct color slot. Check that they have been firmly seated. Press down on the ink tanks until they click into place. See "Replacing Ink Tanks" on page 41. Incorrect media type setting or weight Verify that your media is compatible and/or fit for your print job and that the media you are using is selected in the driver. See "Using Specialty Media" on page 3. 58
-
 1
1 -
2
-
3
-
4
-
5
-
6
-
7
-
8
-
9
-
10
-
11
-
12
-
13
-
14
-
15
-
16
-
17
-
18
-
19
-
20
-
21
-
22
-
23
-
24
-
25
-
26
-
27
-
28
-
29
-
30
-
31
-
32
-
33
-
34
-
35
-
36
-
37
-
38
-
39
-
40
-
41
-
42
-
43
-
44
-
45
-
46
-
47
-
48
-
49
-
50
-
51
-
52
-
53
-
54
-
55
-
56
-
 57
57 -
 58
58 -
 59
59 -
 60
60 -
 61
61 -
 62
62 -
 63
63 -
 64
64 -
 65
65 -
 66
66 -
 67
67 -
68
-
69
-
70
-
71
-
72
-
73
-
74
-
75
-
76
-
77
-
78
-
79
-
80
-
81
-
82
-
83
-
84
-
85
-
86
-
87
-
88
 |
 |
