Casio EX-Z850 Owners Manual - Page 60
Recording Precautions, In a REC mode, press [MENU]., to select the, to select, AF Assist Light
 |
UPC - 079767684556
View all Casio EX-Z850 manuals
Add to My Manuals
Save this manual to your list of manuals |
Page 60 highlights
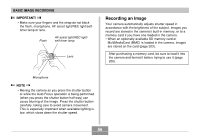
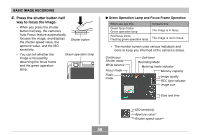
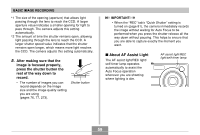
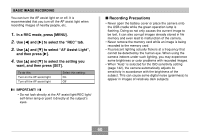
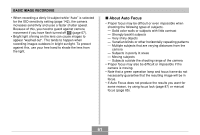
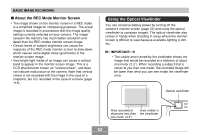
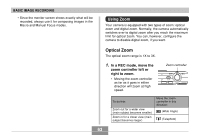
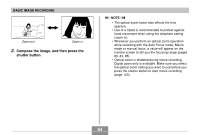
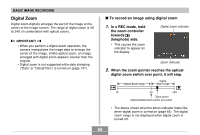
BASIC IMAGE RECORDING You can turn the AF assist light on or off. It is recommended that you turn off the AF assist light when recording images of nearby people, etc. 1. In a REC mode, press [MENU]. 2. Use [̇] and [̈] to select the "REC" tab. 3. Use [̆] and [̄] to select "AF Assist Light", and then press [̈]. 4. Use [̆] and [̄] to select the setting you want, and then press [SET]. To do this: Turn on the AF assist light Turn off the AF assist light Select this setting: On Off IMPORTANT! • Do not look directly at the AF assist light/REC light/ self-timer lamp or point it directly at the subject's eyes. I Recording Precautions • Never open the battery cover or place the camera onto the USB cradle while the green operation lamp is flashing. Doing so not only causes the current image to be lost, it can also corrupt images already stored in file memory and even lead to malfunction of the camera. • Never remove the memory card while an image is being recorded to the memory card. • Fluorescent lighting actually flickers at a frequency that cannot be detected by the human eye. When using the camera indoors under such lighting, you may experience some brightness or color problems with recorded images. • When "Auto" is selected for the ISO sensitivity setting (page 142), the camera automatically adjusts its sensitivity in accordance with the brightness of the subject. This can cause some digital noise (graininess) to appear in images of relatively dark subjects. 60
-
 1
1 -
2
-
3
-
4
-
5
-
6
-
7
-
8
-
9
-
10
-
11
-
12
-
13
-
14
-
15
-
16
-
17
-
18
-
19
-
20
-
21
-
22
-
23
-
24
-
25
-
26
-
27
-
28
-
29
-
30
-
31
-
32
-
33
-
34
-
35
-
36
-
37
-
38
-
39
-
40
-
41
-
42
-
43
-
44
-
45
-
46
-
47
-
48
-
49
-
50
-
51
-
52
-
53
-
54
-
 55
55 -
 56
56 -
 57
57 -
 58
58 -
 59
59 -
 60
60 -
 61
61 -
 62
62 -
 63
63 -
 64
64 -
 65
65 -
66
-
67
-
68
-
69
-
70
-
71
-
72
-
73
-
74
-
75
-
76
-
77
-
78
-
79
-
80
-
81
-
82
-
83
-
84
-
85
-
86
-
87
-
88
-
89
-
90
-
91
-
92
-
93
-
94
-
95
-
96
-
97
-
98
-
99
-
100
-
101
-
102
-
103
-
104
-
105
-
106
-
107
-
108
-
109
-
110
-
111
-
112
-
113
-
114
-
115
-
116
-
117
-
118
-
119
-
120
-
121
-
122
-
123
-
124
-
125
-
126
-
127
-
128
-
129
-
130
-
131
-
132
-
133
-
134
-
135
-
136
-
137
-
138
-
139
-
140
-
141
-
142
-
143
-
144
-
145
-
146
-
147
-
148
-
149
-
150
-
151
-
152
-
153
-
154
-
155
-
156
-
157
-
158
-
159
-
160
-
161
-
162
-
163
-
164
-
165
-
166
-
167
-
168
-
169
-
170
-
171
-
172
-
173
-
174
-
175
-
176
-
177
-
178
-
179
-
180
-
181
-
182
-
183
-
184
-
185
-
186
-
187
-
188
-
189
-
190
-
191
-
192
-
193
-
194
-
195
-
196
-
197
-
198
-
199
-
200
-
201
-
202
-
203
-
204
-
205
-
206
-
207
-
208
-
209
-
210
-
211
-
212
-
213
-
214
-
215
-
216
-
217
-
218
-
219
-
220
-
221
-
222
-
223
-
224
-
225
-
226
-
227
-
228
-
229
-
230
-
231
-
232
-
233
-
234
-
235
-
236
-
237
-
238
-
239
-
240
-
241
-
242
-
243
-
244
-
245
-
246
-
247
-
248
-
249
-
250
-
251
-
252
-
253
-
254
-
255
-
256
-
257
-
258
-
259
-
260
-
261
-
262
-
263
-
264
-
265
-
266
-
267
-
268
-
269
-
270
-
271
-
272
-
273
-
274
-
275
-
276
-
277
-
278
-
279
 |
 |