Cisco NME-16ES-1G User Guide - Page 109
Verifying Switchport Configuration - p ios upgrade
 |
UPC - 882658036101
View all Cisco NME-16ES-1G manuals
Add to My Manuals
Save this manual to your list of manuals |
Page 109 highlights
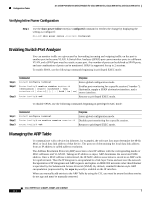
16- and 36-Port Ethernet Switch Module for Cisco 2600 Series, Cisco 3600 Series, and Cisco 3700 Series Configuration Tasks Step 3 Step 4 Step 5 Command Purpose Router(config)# switchport access vlan vlan-id Sets the native VLAN for untagged traffic. The value of vlan-id represents the ID of the VLAN that is sending and receiving untagged traffic on the port. Valid IDs are from 1 to 1001. Leading zeroes are not accepted. Router(config)# switchport voice vlan dot1p Configures the Cisco IP phone to send voice traffic with higher priority (CoS=5 on 802.1Q tag) on the access VLAN. Data traffic (from an attached PC) is sent untagged for lower priority (port default=0). Router# end Returns to the privileged EXEC mode. Verifying Switchport Configuration Step 1 Step 2 Use the show run interface command to verify the switch port configuration and the write memory command to save the current configuration in flash memory: Router# show run interface interface Router# write memory Configuring Ethernet Ports to Support Cisco IP Phones with Multiple Ports You might want to use multiple ports to connect the Cisco IP phones if any of the following conditions apply to your Cisco IP telephony network: • You are connecting Cisco IP phones that do not have a second Ethernet port for attaching a PC. • You want to create a physical separation between the voice and data networks. • You want to provide in-line power easily to the IP phones without having to upgrade the data infrastructure. • You want to limit the number of switches that need Uninterruptible Power Supply (UPS) power. IP Addressing The recommended configuration for using multiple cables to connect IP phones to the Cisco AVVID network is to use a separate IP subnet and separate VLANs for IP telephony. Managing the Ethernet Switch Network Module This section describes how to perform basic management tasks on the Ethernet switch network module with the Cisco IOS CLI. You might find this information useful when you configure the switch for the previous scenarios. The following topics are included: • Adding Trap Managers, page 110 • Configuring IP Information, page 110 Cisco IOS Release 12.2(2)XT, 12.2(8)T, and 12.2(15)ZJ 109
-
 1
1 -
2
-
3
-
4
-
5
-
6
-
7
-
8
-
9
-
10
-
11
-
12
-
13
-
14
-
15
-
16
-
17
-
18
-
19
-
20
-
21
-
22
-
23
-
24
-
25
-
26
-
27
-
28
-
29
-
30
-
31
-
32
-
33
-
34
-
35
-
36
-
37
-
38
-
39
-
40
-
41
-
42
-
43
-
44
-
45
-
46
-
47
-
48
-
49
-
50
-
51
-
52
-
53
-
54
-
55
-
56
-
57
-
58
-
59
-
60
-
61
-
62
-
63
-
64
-
65
-
66
-
67
-
68
-
69
-
70
-
71
-
72
-
73
-
74
-
75
-
76
-
77
-
78
-
79
-
80
-
81
-
82
-
83
-
84
-
85
-
86
-
87
-
88
-
89
-
90
-
91
-
92
-
93
-
94
-
95
-
96
-
97
-
98
-
99
-
100
-
101
-
102
-
103
-
 104
104 -
 105
105 -
 106
106 -
 107
107 -
 108
108 -
 109
109 -
 110
110 -
 111
111 -
 112
112 -
 113
113 -
 114
114 -
115
-
116
-
117
-
118
-
119
-
120
-
121
-
122
-
123
-
124
-
125
-
126
-
127
-
128
-
129
-
130
-
131
-
132
-
133
-
134
-
135
-
136
-
137
-
138
-
139
-
140
-
141
-
142
-
143
-
144
-
145
-
146
-
147
-
148
-
149
-
150
-
151
-
152
-
153
-
154
-
155
-
156
-
157
-
158
-
159
-
160
-
161
-
162
-
163
-
164
-
165
-
166
-
167
-
168
-
169
-
170
-
171
-
172
-
173
-
174
-
175
-
176
-
177
-
178
-
179
-
180
-
181
-
182
-
183
-
184
-
185
-
186
-
187
-
188
-
189
-
190
-
191
-
192
-
193
-
194
-
195
-
196
-
197
-
198
-
199
-
200
-
201
-
202
-
203
-
204
-
205
-
206
-
207
-
208
-
209
-
210
-
211
-
212
-
213
-
214
-
215
-
216
-
217
-
218
-
219
-
220
-
221
-
222
-
223
-
224
-
225
-
226
-
227
-
228
-
229
-
230
-
231
-
232
-
233
-
234
-
235
-
236
-
237
-
238
-
239
-
240
-
241
-
242
-
243
-
244
-
245
-
246
 |
 |
