Cisco NME-16ES-1G User Guide - Page 96
Configuring CoS Maps, Configuring the CoS-to-DSCP Map
 |
UPC - 882658036101
View all Cisco NME-16ES-1G manuals
Add to My Manuals
Save this manual to your list of manuals |
Page 96 highlights
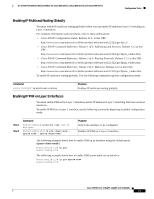
Configuration Tasks 16- and 36-Port Ethernet Switch Module for Cisco 2600 Series, Cisco 3600 Series, and Cisco 3700 Series Configuring CoS Maps This section describes how to configure the DSCP maps: • Configuring the CoS-to-DSCP Map, page 96 • Configuring the DSCP-to-CoS Map, page 96 All the maps are globally defined. Configuring the CoS-to-DSCP Map You use the CoS-to-DSCP map to map CoS values in incoming packets to a DSCP value that QoS uses internally to represent the priority of the traffic. Table 13 shows the default CoS-to-DSCP map. Table 13 Default CoS-to-DSCP Map CoS value 0 1 2 3 4 5 6 7 DSCP value 0 8 16 26 32 46 48 56 If these values are not appropriate for your network, you need to modify them. These CoS-to-DSCP mapping numbers follow the numbers used in deploying Cisco AVVID and may be different from the mapping numbers used by the Catalyst 2950, Catalyst 3550, and other switches. Beginning in privileged EXEC mode, follow these steps to modify the CoS-to-DSCP map: Step 1 Step 2 Command configure terminal mls qos map cos-dscp dscp1...dscp8 Step 3 Step 4 Step 5 end show mls qos maps cos-dscp copy running-config startup-config Purpose Enters global configuration mode. Modifies the CoS-to-DSCP map. For dscp1...dscp8, enter 8 DSCP values that correspond to CoS values 0 to 7. Separate each DSCP value with a space. The supported DSCP values are 0, 8, 10, 16, 18, 24, 26, 32, 34, 40, 46, 48, and 56. Returns to privileged EXEC mode. Verifies your entries. (Optional) Saves your entries in the configuration file. To return to the default map, use the no mls qos map cos-dscp global configuration command. Configuring the DSCP-to-CoS Map You use the DSCP-to-CoS map to map DSCP values in incoming packets to a CoS value, which is used to select one of the four egress queues. The Ethernet switch network modules support these DSCP values: 0, 8, 10, 16, 18, 24, 26, 32, 34, 40, 46, 48, and 56. Cisco IOS Release 12.2(2)XT, 12.2(8)T, and 12.2(15)ZJ 96
-
 1
1 -
2
-
3
-
4
-
5
-
6
-
7
-
8
-
9
-
10
-
11
-
12
-
13
-
14
-
15
-
16
-
17
-
18
-
19
-
20
-
21
-
22
-
23
-
24
-
25
-
26
-
27
-
28
-
29
-
30
-
31
-
32
-
33
-
34
-
35
-
36
-
37
-
38
-
39
-
40
-
41
-
42
-
43
-
44
-
45
-
46
-
47
-
48
-
49
-
50
-
51
-
52
-
53
-
54
-
55
-
56
-
57
-
58
-
59
-
60
-
61
-
62
-
63
-
64
-
65
-
66
-
67
-
68
-
69
-
70
-
71
-
72
-
73
-
74
-
75
-
76
-
77
-
78
-
79
-
80
-
81
-
82
-
83
-
84
-
85
-
86
-
87
-
88
-
89
-
90
-
 91
91 -
 92
92 -
 93
93 -
 94
94 -
 95
95 -
 96
96 -
 97
97 -
 98
98 -
 99
99 -
 100
100 -
 101
101 -
102
-
103
-
104
-
105
-
106
-
107
-
108
-
109
-
110
-
111
-
112
-
113
-
114
-
115
-
116
-
117
-
118
-
119
-
120
-
121
-
122
-
123
-
124
-
125
-
126
-
127
-
128
-
129
-
130
-
131
-
132
-
133
-
134
-
135
-
136
-
137
-
138
-
139
-
140
-
141
-
142
-
143
-
144
-
145
-
146
-
147
-
148
-
149
-
150
-
151
-
152
-
153
-
154
-
155
-
156
-
157
-
158
-
159
-
160
-
161
-
162
-
163
-
164
-
165
-
166
-
167
-
168
-
169
-
170
-
171
-
172
-
173
-
174
-
175
-
176
-
177
-
178
-
179
-
180
-
181
-
182
-
183
-
184
-
185
-
186
-
187
-
188
-
189
-
190
-
191
-
192
-
193
-
194
-
195
-
196
-
197
-
198
-
199
-
200
-
201
-
202
-
203
-
204
-
205
-
206
-
207
-
208
-
209
-
210
-
211
-
212
-
213
-
214
-
215
-
216
-
217
-
218
-
219
-
220
-
221
-
222
-
223
-
224
-
225
-
226
-
227
-
228
-
229
-
230
-
231
-
232
-
233
-
234
-
235
-
236
-
237
-
238
-
239
-
240
-
241
-
242
-
243
-
244
-
245
-
246
 |
 |
