Compaq 270680-003 Compaq Reference Guide Deskpro 4000 and Deskpro 6000 Series - Page 228
Preparing the Computer for Installation, Installation Procedures
 |
View all Compaq 270680-003 manuals
Add to My Manuals
Save this manual to your list of manuals |
Page 228 highlights
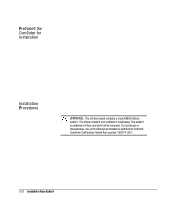
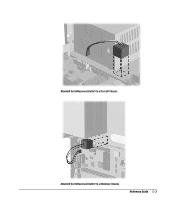
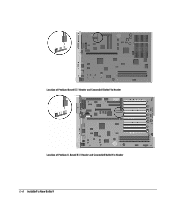
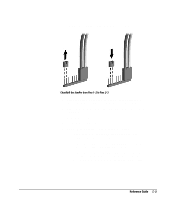
Preparing the Computer for Installation Installation Procedures To prepare the computer, complete the following steps: 1. If you have locked the Smart Cover Lock, use Computer Setup to unlock the lock. For more information about Computer Setup, refer to Chapter 8, "Using Compaq Utilities." 2. If the computer is on, turn it off. 3. Unplug the computer. 4. Remove the computer cover or side panel. For more information about removing the computer cover, side panel, and expansion board cage, refer to Chapter 6, "Upgrading the Desktop Computer," or Chapter 7, "Upgrading the Minitower Computer." 5. Remove the expansion board cage. 6. Refer to the following section for specific battery installation steps. The battery that came with this computer is non-removable and is permanently installed on the system board. A second battery is installed when the first becomes inoperative. ! WARNING: The system board contains a clock/CMOS lithium battery. The lithium battery may explode if mistreated. The battery is soldered in place and may not be removed. Do not abuse or disassemble. Use only replacement batteries supplied by Compaq Computer Corporation (spare part number 160274-001). To install the replacement battery, complete the following steps: 1. Remove and discard the protective covering from the adhesive backing on the hook-and-loop connector on the back of the battery. 2. Attach the battery to the computer chassis as shown in the following illustrations: G-2 Installing a New Battery
-
 1
1 -
2
-
3
-
4
-
5
-
6
-
7
-
8
-
9
-
10
-
11
-
12
-
13
-
14
-
15
-
16
-
17
-
18
-
19
-
20
-
21
-
22
-
23
-
24
-
25
-
26
-
27
-
28
-
29
-
30
-
31
-
32
-
33
-
34
-
35
-
36
-
37
-
38
-
39
-
40
-
41
-
42
-
43
-
44
-
45
-
46
-
47
-
48
-
49
-
50
-
51
-
52
-
53
-
54
-
55
-
56
-
57
-
58
-
59
-
60
-
61
-
62
-
63
-
64
-
65
-
66
-
67
-
68
-
69
-
70
-
71
-
72
-
73
-
74
-
75
-
76
-
77
-
78
-
79
-
80
-
81
-
82
-
83
-
84
-
85
-
86
-
87
-
88
-
89
-
90
-
91
-
92
-
93
-
94
-
95
-
96
-
97
-
98
-
99
-
100
-
101
-
102
-
103
-
104
-
105
-
106
-
107
-
108
-
109
-
110
-
111
-
112
-
113
-
114
-
115
-
116
-
117
-
118
-
119
-
120
-
121
-
122
-
123
-
124
-
125
-
126
-
127
-
128
-
129
-
130
-
131
-
132
-
133
-
134
-
135
-
136
-
137
-
138
-
139
-
140
-
141
-
142
-
143
-
144
-
145
-
146
-
147
-
148
-
149
-
150
-
151
-
152
-
153
-
154
-
155
-
156
-
157
-
158
-
159
-
160
-
161
-
162
-
163
-
164
-
165
-
166
-
167
-
168
-
169
-
170
-
171
-
172
-
173
-
174
-
175
-
176
-
177
-
178
-
179
-
180
-
181
-
182
-
183
-
184
-
185
-
186
-
187
-
188
-
189
-
190
-
191
-
192
-
193
-
194
-
195
-
196
-
197
-
198
-
199
-
200
-
201
-
202
-
203
-
204
-
205
-
206
-
207
-
208
-
209
-
210
-
211
-
212
-
213
-
214
-
215
-
216
-
217
-
218
-
219
-
220
-
221
-
222
-
 223
223 -
 224
224 -
 225
225 -
 226
226 -
 227
227 -
 228
228 -
 229
229 -
 230
230 -
 231
231 -
 232
232 -
 233
233 -
234
 |
 |
