Compaq 270680-003 Compaq Reference Guide Deskpro 4000 and Deskpro 6000 Series - Page 231
If the computer has a Compaq hard drive, you have, Computer Setup to relock the lock.
 |
View all Compaq 270680-003 manuals
Add to My Manuals
Save this manual to your list of manuals |
Page 231 highlights
4. Change the jumper at E50 from pins 1-2 to pins 2-3. Changing the Jumper from Pins 1-2 to Pins 2-3 5. Place the pale blue sticker included with the battery kit above the power connector on the back of the computer 6. Replace the expansion board cage and computer cover or side panel. 7. Plug in the computer. 8. Turn on the computer. 9. Run Computer Setup to reconfigure the system t If you normally lock the Smart Cover Lock, use Computer Setup to relock the lock. t If the computer has a Compaq hard drive, you have now successfully completed the installation. t If the computer has a third-party hard drive, you must reconfigure the hard drive using the parameters you recorded before you began the installation procedure. Reference Guide G-5
-
 1
1 -
2
-
3
-
4
-
5
-
6
-
7
-
8
-
9
-
10
-
11
-
12
-
13
-
14
-
15
-
16
-
17
-
18
-
19
-
20
-
21
-
22
-
23
-
24
-
25
-
26
-
27
-
28
-
29
-
30
-
31
-
32
-
33
-
34
-
35
-
36
-
37
-
38
-
39
-
40
-
41
-
42
-
43
-
44
-
45
-
46
-
47
-
48
-
49
-
50
-
51
-
52
-
53
-
54
-
55
-
56
-
57
-
58
-
59
-
60
-
61
-
62
-
63
-
64
-
65
-
66
-
67
-
68
-
69
-
70
-
71
-
72
-
73
-
74
-
75
-
76
-
77
-
78
-
79
-
80
-
81
-
82
-
83
-
84
-
85
-
86
-
87
-
88
-
89
-
90
-
91
-
92
-
93
-
94
-
95
-
96
-
97
-
98
-
99
-
100
-
101
-
102
-
103
-
104
-
105
-
106
-
107
-
108
-
109
-
110
-
111
-
112
-
113
-
114
-
115
-
116
-
117
-
118
-
119
-
120
-
121
-
122
-
123
-
124
-
125
-
126
-
127
-
128
-
129
-
130
-
131
-
132
-
133
-
134
-
135
-
136
-
137
-
138
-
139
-
140
-
141
-
142
-
143
-
144
-
145
-
146
-
147
-
148
-
149
-
150
-
151
-
152
-
153
-
154
-
155
-
156
-
157
-
158
-
159
-
160
-
161
-
162
-
163
-
164
-
165
-
166
-
167
-
168
-
169
-
170
-
171
-
172
-
173
-
174
-
175
-
176
-
177
-
178
-
179
-
180
-
181
-
182
-
183
-
184
-
185
-
186
-
187
-
188
-
189
-
190
-
191
-
192
-
193
-
194
-
195
-
196
-
197
-
198
-
199
-
200
-
201
-
202
-
203
-
204
-
205
-
206
-
207
-
208
-
209
-
210
-
211
-
212
-
213
-
214
-
215
-
216
-
217
-
218
-
219
-
220
-
221
-
222
-
223
-
224
-
225
-
 226
226 -
 227
227 -
 228
228 -
 229
229 -
 230
230 -
 231
231 -
 232
232 -
 233
233 -
 234
234
 |
 |

Reference Guide
G-5
4.
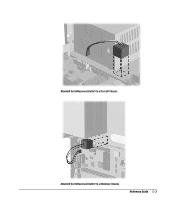
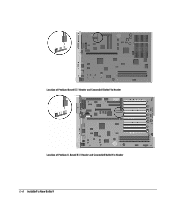
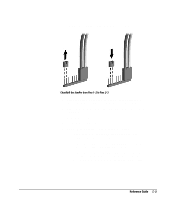
Change the jumper at E50 from pins 1-2 to pins 2-3.
Changing the Jumper from Pins 1-2 to Pins 2-3
5. Place the pale blue sticker included with the battery kit
above the power connector on the back of the computer
6. Replace the expansion board cage and computer cover or
side panel.
7. Plug in the computer.
8. Turn on the computer.
9. Run Computer Setup to reconfigure the system
If you normally lock the Smart Cover Lock, use
Computer Setup to relock the lock.
If the computer has a Compaq hard drive, you have
now successfully completed the installation.
If the computer has a third-party hard drive, you must
reconfigure the hard drive using the parameters you
recorded before you began the installation procedure.