Compaq 270680-003 Compaq Reference Guide Deskpro 4000 and Deskpro 6000 Series - Page 64
Upgrading Graphics Capabilities, Using Compaq Utilities.
 |
View all Compaq 270680-003 manuals
Add to My Manuals
Save this manual to your list of manuals |
Page 64 highlights
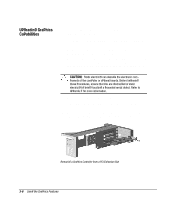
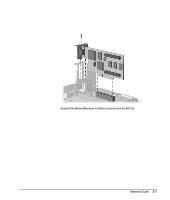
Upgrading Graphics Capabilities To install an upgrade module onto the graphics controller, complete the following steps: 1. If you have locked the Smart Cover Lock, use Computer Setup to unlock the lock. For more information about Computer Setup, refer to Chapter 8, "Using Compaq Utilities." 2. Turn off the computer, disconnect the power cord from the electrical outlet, and remove the cover or side panel. If upgrading a minitower computer, turn the computer on its side. CAUTION: Static electricity can damage the electronic com - ponents of the computer or optional boards. Before beginning these procedures, ensure that you are discharged of static electricity by briefly touching a grounded metal object. Refer to Appendix F for more information. 3. Remove the expansion board cage. If you are upgrading the Matrox Millennium-II graphics controller, skip to step 5. 4. Remove the screw at the side of the expansion slot and remove the graphics controller board. Go to step 6. Removing a Graphics Controller from a PCI Expansion Slot 3-6 Using the Graphics Features
-
 1
1 -
2
-
3
-
4
-
5
-
6
-
7
-
8
-
9
-
10
-
11
-
12
-
13
-
14
-
15
-
16
-
17
-
18
-
19
-
20
-
21
-
22
-
23
-
24
-
25
-
26
-
27
-
28
-
29
-
30
-
31
-
32
-
33
-
34
-
35
-
36
-
37
-
38
-
39
-
40
-
41
-
42
-
43
-
44
-
45
-
46
-
47
-
48
-
49
-
50
-
51
-
52
-
53
-
54
-
55
-
56
-
57
-
58
-
 59
59 -
 60
60 -
 61
61 -
 62
62 -
 63
63 -
 64
64 -
 65
65 -
 66
66 -
 67
67 -
 68
68 -
 69
69 -
70
-
71
-
72
-
73
-
74
-
75
-
76
-
77
-
78
-
79
-
80
-
81
-
82
-
83
-
84
-
85
-
86
-
87
-
88
-
89
-
90
-
91
-
92
-
93
-
94
-
95
-
96
-
97
-
98
-
99
-
100
-
101
-
102
-
103
-
104
-
105
-
106
-
107
-
108
-
109
-
110
-
111
-
112
-
113
-
114
-
115
-
116
-
117
-
118
-
119
-
120
-
121
-
122
-
123
-
124
-
125
-
126
-
127
-
128
-
129
-
130
-
131
-
132
-
133
-
134
-
135
-
136
-
137
-
138
-
139
-
140
-
141
-
142
-
143
-
144
-
145
-
146
-
147
-
148
-
149
-
150
-
151
-
152
-
153
-
154
-
155
-
156
-
157
-
158
-
159
-
160
-
161
-
162
-
163
-
164
-
165
-
166
-
167
-
168
-
169
-
170
-
171
-
172
-
173
-
174
-
175
-
176
-
177
-
178
-
179
-
180
-
181
-
182
-
183
-
184
-
185
-
186
-
187
-
188
-
189
-
190
-
191
-
192
-
193
-
194
-
195
-
196
-
197
-
198
-
199
-
200
-
201
-
202
-
203
-
204
-
205
-
206
-
207
-
208
-
209
-
210
-
211
-
212
-
213
-
214
-
215
-
216
-
217
-
218
-
219
-
220
-
221
-
222
-
223
-
224
-
225
-
226
-
227
-
228
-
229
-
230
-
231
-
232
-
233
-
234
 |
 |
