Compaq nx9010 Maintenance and Service Guide - Page 97
Troubleshooting the Problem, Observe Symptoms., Separate Problems., Consider Causes. - during install power off
 |
View all Compaq nx9010 manuals
Add to My Manuals
Save this manual to your list of manuals |
Page 97 highlights
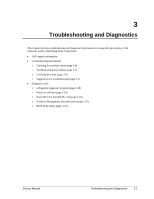
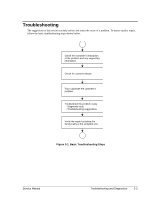
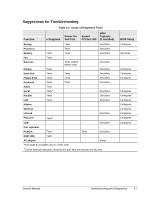
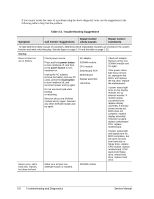
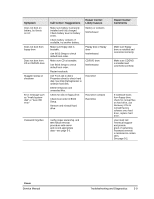
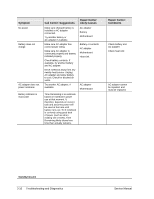
Troubleshooting the Problem Record pertinent information about the notebook: • Model and serial number • Operating system and version • Software version (stored in hidden fileC:\version.inf) • BIOS version • Accessories and peripherals used Analyze the problem: • Observe Symptoms. Using the customer's information, try to duplicate the problem. Determine how the problem differs from proper behavior. Also, note the functions that do work properly. • Separate Problems. If there are multiple symptoms, separate them into distinct problems. • Consider Causes. Keep in mind possible causes for each problem. Use the diagnostic tools and troubleshooting suggestions to help find possible causes. The e-Diagtools diagnostic program tests most of the notebook components using automatic and interactive tests, and is your primary troubleshooting tool. Other tools include the power-on self-test, WMI/Toptools (if installed), the BIOS Setup utility, and the Sycard PCCtest. Table 3-2 on page 3-7 shows how you can use these tools to isolate the cause of the notebook's problem. The troubleshooting suggestions on page 3-8 include general suggestions for repairing notebooks that show specific failure symptoms. Swapping modules that might be defective with others known to be good is generally an ideal way to find the module responsible for the problem. A failure symptom is rarely caused by more than one module, so you will not usually need to replace more than one to correct a particular failure. After you replace a module, the notebook will normally be in a confused state and lock up when you apply power. If this happens, press the reset button: this turns the notebook off, so that you can restart it in a known state. Service Manual Troubleshooting and Diagnostics 3-5
-
 1
1 -
2
-
3
-
4
-
5
-
6
-
7
-
8
-
9
-
10
-
11
-
12
-
13
-
14
-
15
-
16
-
17
-
18
-
19
-
20
-
21
-
22
-
23
-
24
-
25
-
26
-
27
-
28
-
29
-
30
-
31
-
32
-
33
-
34
-
35
-
36
-
37
-
38
-
39
-
40
-
41
-
42
-
43
-
44
-
45
-
46
-
47
-
48
-
49
-
50
-
51
-
52
-
53
-
54
-
55
-
56
-
57
-
58
-
59
-
60
-
61
-
62
-
63
-
64
-
65
-
66
-
67
-
68
-
69
-
70
-
71
-
72
-
73
-
74
-
75
-
76
-
77
-
78
-
79
-
80
-
81
-
82
-
83
-
84
-
85
-
86
-
87
-
88
-
89
-
90
-
91
-
 92
92 -
 93
93 -
 94
94 -
 95
95 -
 96
96 -
 97
97 -
 98
98 -
 99
99 -
 100
100 -
 101
101 -
 102
102 -
103
-
104
-
105
-
106
-
107
-
108
-
109
-
110
-
111
-
112
-
113
-
114
-
115
-
116
-
117
-
118
-
119
-
120
-
121
-
122
-
123
-
124
-
125
-
126
-
127
-
128
-
129
-
130
-
131
-
132
-
133
-
134
-
135
-
136
-
137
-
138
-
139
-
140
-
141
-
142
-
143
-
144
-
145
-
146
-
147
-
148
-
149
-
150
-
151
-
152
-
153
-
154
 |
 |