Dell B2375dfw Dell Mono MFP User's Guide - Page 206
Scan to WSD, Installing a WSD Printer Driver, Scanning using the WSD feature, Devices and Printers
 |
View all Dell B2375dfw manuals
Add to My Manuals
Save this manual to your list of manuals |
Page 206 highlights
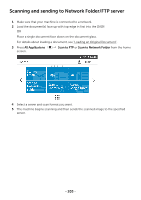
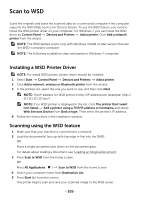
Scan to WSD Scans the originals and saves the scanned data on a connected computer if the computer supports the WSD (Web Service for Device) feature. To use the WSD feature, you need to install the WSD printer driver on your computer. For Windows 7, you can install the WSD driver by Control Panel Devices and Printers Add a printer. Click Add a network printer from the wizard. NOTE: The WSD feature works only with Windows Vista® or later version that are the WSD-compliant computer. NOTE: The following installation steps are based on Windows 7 computer. Installing a WSD Printer Driver NOTE: For install WSD printer, printer driver should be installed. 1 Select Start Control Panel Devices and Printers Add a printer. 2 Click Add a network, wireless or Bluetooth printer from the wizard. 3 In the printers list, select the one you want to use, and then click Next. NOTE: The IP address for WSD printer is http://IP address/ws/ (example: http:// 111.111.111.111/ws/). NOTE: If no WSD printer is displayed in the list, click The printer that I want isn't listed Add a printer using a TCP/IP address or hostname and select Web Services Device from Device type. Then enter the printer's IP address. 4 Follow the instructions in the installation window. Scanning using the WSD feature 1 Make sure that your machine is connected to a network. 2 Load the document(s) face up with top edge in first into the DADF. OR Place a single document face down on the document glass. For details about loading a document, see "Loading an Original Document". 3 Press Scan to WSD from the home screen. OR Press All Appli(c atons ) Scan to WSD from the home screen. 4 Select your computer name from Destination List. 5 Press Start ( ) from the screen. The printer begins scan and save your scanned image to the WSD server. - 205
-
 1
1 -
2
-
3
-
4
-
5
-
6
-
7
-
8
-
9
-
10
-
11
-
12
-
13
-
14
-
15
-
16
-
17
-
18
-
19
-
20
-
21
-
22
-
23
-
24
-
25
-
26
-
27
-
28
-
29
-
30
-
31
-
32
-
33
-
34
-
35
-
36
-
37
-
38
-
39
-
40
-
41
-
42
-
43
-
44
-
45
-
46
-
47
-
48
-
49
-
50
-
51
-
52
-
53
-
54
-
55
-
56
-
57
-
58
-
59
-
60
-
61
-
62
-
63
-
64
-
65
-
66
-
67
-
68
-
69
-
70
-
71
-
72
-
73
-
74
-
75
-
76
-
77
-
78
-
79
-
80
-
81
-
82
-
83
-
84
-
85
-
86
-
87
-
88
-
89
-
90
-
91
-
92
-
93
-
94
-
95
-
96
-
97
-
98
-
99
-
100
-
101
-
102
-
103
-
104
-
105
-
106
-
107
-
108
-
109
-
110
-
111
-
112
-
113
-
114
-
115
-
116
-
117
-
118
-
119
-
120
-
121
-
122
-
123
-
124
-
125
-
126
-
127
-
128
-
129
-
130
-
131
-
132
-
133
-
134
-
135
-
136
-
137
-
138
-
139
-
140
-
141
-
142
-
143
-
144
-
145
-
146
-
147
-
148
-
149
-
150
-
151
-
152
-
153
-
154
-
155
-
156
-
157
-
158
-
159
-
160
-
161
-
162
-
163
-
164
-
165
-
166
-
167
-
168
-
169
-
170
-
171
-
172
-
173
-
174
-
175
-
176
-
177
-
178
-
179
-
180
-
181
-
182
-
183
-
184
-
185
-
186
-
187
-
188
-
189
-
190
-
191
-
192
-
193
-
194
-
195
-
196
-
197
-
198
-
199
-
200
-
 201
201 -
 202
202 -
 203
203 -
 204
204 -
 205
205 -
 206
206 -
 207
207 -
 208
208 -
 209
209 -
 210
210 -
 211
211 -
212
-
213
-
214
-
215
-
216
-
217
-
218
-
219
-
220
-
221
-
222
-
223
-
224
-
225
-
226
-
227
-
228
-
229
-
230
-
231
-
232
-
233
-
234
-
235
-
236
-
237
-
238
-
239
-
240
-
241
-
242
-
243
-
244
-
245
-
246
-
247
-
248
-
249
-
250
-
251
-
252
-
253
-
254
-
255
-
256
-
257
-
258
-
259
-
260
-
261
-
262
-
263
-
264
-
265
-
266
-
267
-
268
-
269
-
270
-
271
-
272
-
273
-
274
-
275
-
276
-
277
-
278
-
279
-
280
-
281
-
282
-
283
-
284
-
285
-
286
-
287
-
288
-
289
-
290
-
291
-
292
-
293
-
294
-
295
-
296
-
297
-
298
-
299
-
300
-
301
-
302
-
303
-
304
-
305
-
306
-
307
-
308
-
309
-
310
-
311
-
312
-
313
-
314
-
315
-
316
-
317
-
318
-
319
-
320
-
321
-
322
-
323
-
324
-
325
-
326
-
327
-
328
-
329
-
330
-
331
-
332
-
333
-
334
-
335
-
336
-
337
-
338
-
339
-
340
-
341
-
342
-
343
-
344
-
345
-
346
-
347
-
348
-
349
-
350
-
351
-
352
-
353
-
354
-
355
-
356
-
357
-
358
-
359
 |
 |