Dell B2375dfw Dell Mono MFP User's Guide - Page 263
Using the Secure Receiving Mode (Administrator only), Memory Full, My Settings, Machine Setup
 |
View all Dell B2375dfw manuals
Add to My Manuals
Save this manual to your list of manuals |
Page 263 highlights
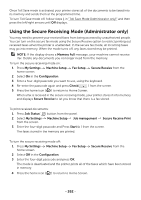
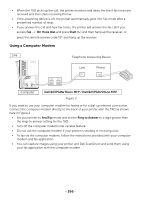
Once Toll Save mode is activated, your printer stores all of the documents to be faxed into its memory and sends them at the programmed time. To turn Toll Save mode off, follow steps 1 in "Toll Save Mode (Administrator only)" and then press the left/right arrows until Off displays. Using the Secure Receiving Mode (Administrator only) You may need to prevent your received faxes from being accessed by unauthorized people. You can turn on the secure fax mode using the Secure Receive option to restrict printing out received faxes when the printer is unattended. In the secure fax mode, all incoming faxes may go into memory. When the mode turns off, any faxes stored may be printed. NOTE: If the display shows a Memory Full message, your machine cannot receive fax. Delete any documents you no longer need from the memory. To turn the secure receiving mode on: 1 Press My Settings Machine Setup Fax Setup Secure Receive from the home screen. 2 Select On in the Configuration. 3 Enter a four-digit passcode you want to use, using the keyboard. 4 Re-enter the passcode again and press Check( ) from the screen. 5 Press the home icon ( ) to return to Home Screen. When a fax is received in the secure receiving mode, your printer stores it into memory and displays Secure Receive to let you know that there is a fax stored. To print received documents: 1 Press Job Status( ) button from the panel. 2 Select My Settings Machine Setup Job management Secure Receive Print from the screen. 3 Enter the four-digit passcode and Press Start ( ) from the screen. The faxes stored in the memory are printed. To turn the secure receiving mode off: 1 Press My Settings Machine Setup Fax Setup home screen. 2 Select Off in the Configuration. 3 Enter the four-digit passcode and press OK. Secure Receive from the The mode is deactivated and the printer prints all of the faxes which have been stored in memory. 4 Press the home icon ( ) to return to Home Screen. - 262
-
 1
1 -
2
-
3
-
4
-
5
-
6
-
7
-
8
-
9
-
10
-
11
-
12
-
13
-
14
-
15
-
16
-
17
-
18
-
19
-
20
-
21
-
22
-
23
-
24
-
25
-
26
-
27
-
28
-
29
-
30
-
31
-
32
-
33
-
34
-
35
-
36
-
37
-
38
-
39
-
40
-
41
-
42
-
43
-
44
-
45
-
46
-
47
-
48
-
49
-
50
-
51
-
52
-
53
-
54
-
55
-
56
-
57
-
58
-
59
-
60
-
61
-
62
-
63
-
64
-
65
-
66
-
67
-
68
-
69
-
70
-
71
-
72
-
73
-
74
-
75
-
76
-
77
-
78
-
79
-
80
-
81
-
82
-
83
-
84
-
85
-
86
-
87
-
88
-
89
-
90
-
91
-
92
-
93
-
94
-
95
-
96
-
97
-
98
-
99
-
100
-
101
-
102
-
103
-
104
-
105
-
106
-
107
-
108
-
109
-
110
-
111
-
112
-
113
-
114
-
115
-
116
-
117
-
118
-
119
-
120
-
121
-
122
-
123
-
124
-
125
-
126
-
127
-
128
-
129
-
130
-
131
-
132
-
133
-
134
-
135
-
136
-
137
-
138
-
139
-
140
-
141
-
142
-
143
-
144
-
145
-
146
-
147
-
148
-
149
-
150
-
151
-
152
-
153
-
154
-
155
-
156
-
157
-
158
-
159
-
160
-
161
-
162
-
163
-
164
-
165
-
166
-
167
-
168
-
169
-
170
-
171
-
172
-
173
-
174
-
175
-
176
-
177
-
178
-
179
-
180
-
181
-
182
-
183
-
184
-
185
-
186
-
187
-
188
-
189
-
190
-
191
-
192
-
193
-
194
-
195
-
196
-
197
-
198
-
199
-
200
-
201
-
202
-
203
-
204
-
205
-
206
-
207
-
208
-
209
-
210
-
211
-
212
-
213
-
214
-
215
-
216
-
217
-
218
-
219
-
220
-
221
-
222
-
223
-
224
-
225
-
226
-
227
-
228
-
229
-
230
-
231
-
232
-
233
-
234
-
235
-
236
-
237
-
238
-
239
-
240
-
241
-
242
-
243
-
244
-
245
-
246
-
247
-
248
-
249
-
250
-
251
-
252
-
253
-
254
-
255
-
256
-
257
-
 258
258 -
 259
259 -
 260
260 -
 261
261 -
 262
262 -
 263
263 -
 264
264 -
 265
265 -
 266
266 -
 267
267 -
 268
268 -
269
-
270
-
271
-
272
-
273
-
274
-
275
-
276
-
277
-
278
-
279
-
280
-
281
-
282
-
283
-
284
-
285
-
286
-
287
-
288
-
289
-
290
-
291
-
292
-
293
-
294
-
295
-
296
-
297
-
298
-
299
-
300
-
301
-
302
-
303
-
304
-
305
-
306
-
307
-
308
-
309
-
310
-
311
-
312
-
313
-
314
-
315
-
316
-
317
-
318
-
319
-
320
-
321
-
322
-
323
-
324
-
325
-
326
-
327
-
328
-
329
-
330
-
331
-
332
-
333
-
334
-
335
-
336
-
337
-
338
-
339
-
340
-
341
-
342
-
343
-
344
-
345
-
346
-
347
-
348
-
349
-
350
-
351
-
352
-
353
-
354
-
355
-
356
-
357
-
358
-
359
 |
 |